As of LabMaestro version 1.11.0, you can now export project requirements as MATLAB or Python code. This is useful if you are using LabMaestro to set up your hardware and running your experiment using MATLAB or Python. By using this new feature, you can add the device configuration code to the beginning of your experiment code to ensure that your devices are always set up as necessary for your experiment whenever you start a session.
Step 1 - Define Project Requirements for your Device
First, to access this feature, select one of your VPixx devices in the Project panel, under Environment. If you are working remotely, you can add a device or use the LabMaestro Simulator.
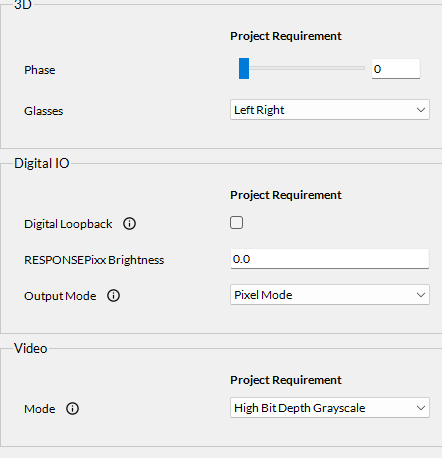
Once your device has been added, you can define your parameters as needed for your project. In the example below, we are using a DATAPixx3, which is using Pixel Mode as an output mode and High Bit Depth Grayscale as a video mode.
Step 2 - Export Project Requirements to a Code Block
Once your project requirements have been defined, you can press the newly added “Export to Code” button, below “Device Settings.”

Upon clicking it, a contextual window will open asking if you wish to export your requirements to Python (Default) or MATLAB Code. If you choose Python code, you must specify the name of the Python library (_libdpx by default). Whichever you choose, the following window will then be shown:
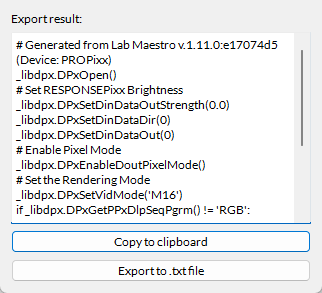
You can then choose to either export this code block to a .txt file to save it for future reference or copy it to your clipboard, allowing you to paste it directly into your experiment code.
As an example, here is the Python code to export the Project Requirements defined in this example:
# Generated from Lab Maestro v.1.11.0:e17074d5 (Device: DATAPixx3)
_libdpx.DPxOpen()
# Set RESPONSEPixx Brightness
_libdpx.DPxSetDinDataOutStrength(0.0)
_libdpx.DPxSetDinDataDir(0)
_libdpx.DPxSetDinDataOut(0)
# Enable Pixel Mode
_libdpx.DPxEnableDoutPixelMode()
# Set the Rendering Mode
_libdpx.DPxSetVidMode('M16')
if _libdpx.DPxGetPPxDlpSeqPgrm() != 'RGB':
	_libdpx.DPxSetPPxDlpSeqPgrm('RGB')
_libdpx.DPxDisableVidVesaBlueline()
# Set the phase of the VESA 3D waveform (0-255)
_libdpx.DPxSetVidVesaPhase(0)
_libdpx.DPxUpdateRegCache()
_libdpx.DPxClose()
For Python, you will need to add the import line yourself. By default, it should be
from pypixxlib import _libdpx