Timeline Flow and Rendering Flow
This small tutorial aims to provide more details on how visual stimuli are rendered during LabMaestro experiments and how it differs from other experiment-building software. This information is critical to know to optimize your usage of LabMaestro.
The Rendering Queue
When creating an epoch in LabMaestro, an epoch’s elements are ordered from top to bottom. However, all elements are rendered simultaneously, until a “wait” type command is found (mostly Wait and WaitForInputs, though StopRecording may also temporarily block some frames to read and save data). Elements are added to a “rendering queue” and will be shown on screen on the next frame refresh. Elements stay in the rendering queue until one of three events occurs:
-
A region element is hidden using the “Hide Region” command.
-
An epoch with the “Clear on Exit” property set as “True” ends.
-
The timeline ends
Events While Waiting
One key difference between LabMaestro and other experiment-building tools is that it renders all visual stimuli on every frame, regardless of whether they changed or not. For example, if you use LabMaestro to display a circular region and wait 10 seconds before adding a pattern, the circle is rendered on every frame spent waiting.
To users familiar with other rendering software, this is the same as executing a “flip” command on every frame. Unless this is done, these software do not redraw visual stimuli until the next “flip”.
This flexibility in LabMaestro’s design allows dynamic changes to stimulus properties to be easily rendered without further adjustments from the user.
Visual Stimuli Rendering – Demonstration
To better understand visual rendering, we can review a Visual Rendering demo. You can download the demo here:Rendering_Demo.lm.
This simple demonstration has only one timeline with one epoch executed only once (the exit condition is set to true). The epoch contains four elements:
-
An oval region, with default values for properties.
-
A radial pattern nested in the region, with speed set to 0 degrees/second. Its orientation property is defined as time*10.
-
A text component gives information on the total rotation and wait time since experiment onset. The text expression is defined as “Wait time: {floor(time)} seconds. Rotation: {round(time*10)} degrees.”
-
A wait blocking command that is set to last for 30 seconds. Once this time ends, the experiment window closes.
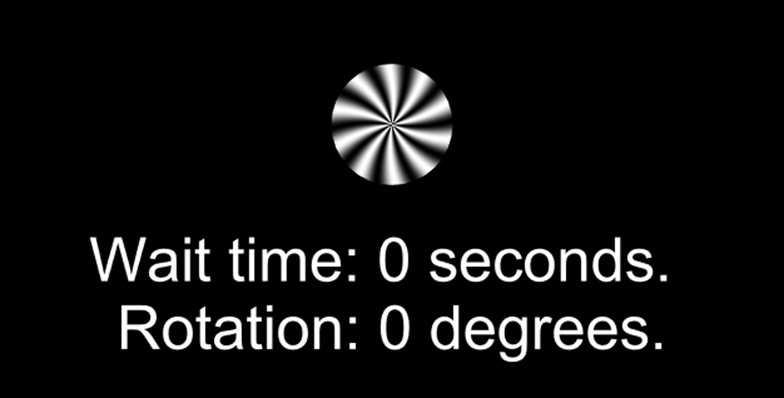
Running the demonstration will show that, even though the timeline waits for 30 seconds after visual elements are initially rendered, all elements are updated: the pattern keeps rotating, and the text values are updated correctly. The expressions for the Radial pattern orientation and the Text element are reevaluated on every frame, which allows the visual stimuli to be rendered dynamically.
For those familiar with other experiment-building software, this is not what would happen if you used a similar command (e.g., WaitSecs(30)); it is more akin to nesting your visual stimulus rendering inside of a “while” loop timed to last for 30 seconds.