This demo is the Python equivalent to our MATLAB demo Drawing dots at 1440 Hz. We use PsychoPy and the libdpx wrapper tools to display twelve white dots around the center of the screen, cycling at a rate of 1440 Hz. The demo ends after 5 seconds.
To achieve this display rate, the PROPixx uses a “sequencer” to break up a single 1920 x 1080, 120 Hz RGB video signal into 12 frames displayed in sequence.
First, the 1920 x 1080 image is divided into four 960 x 540 images, or “quadrants.”. Next, each 8-bit RGB colour channel is converted to grayscale and displayed sequentially. The order of appearance is given in the illustration below:
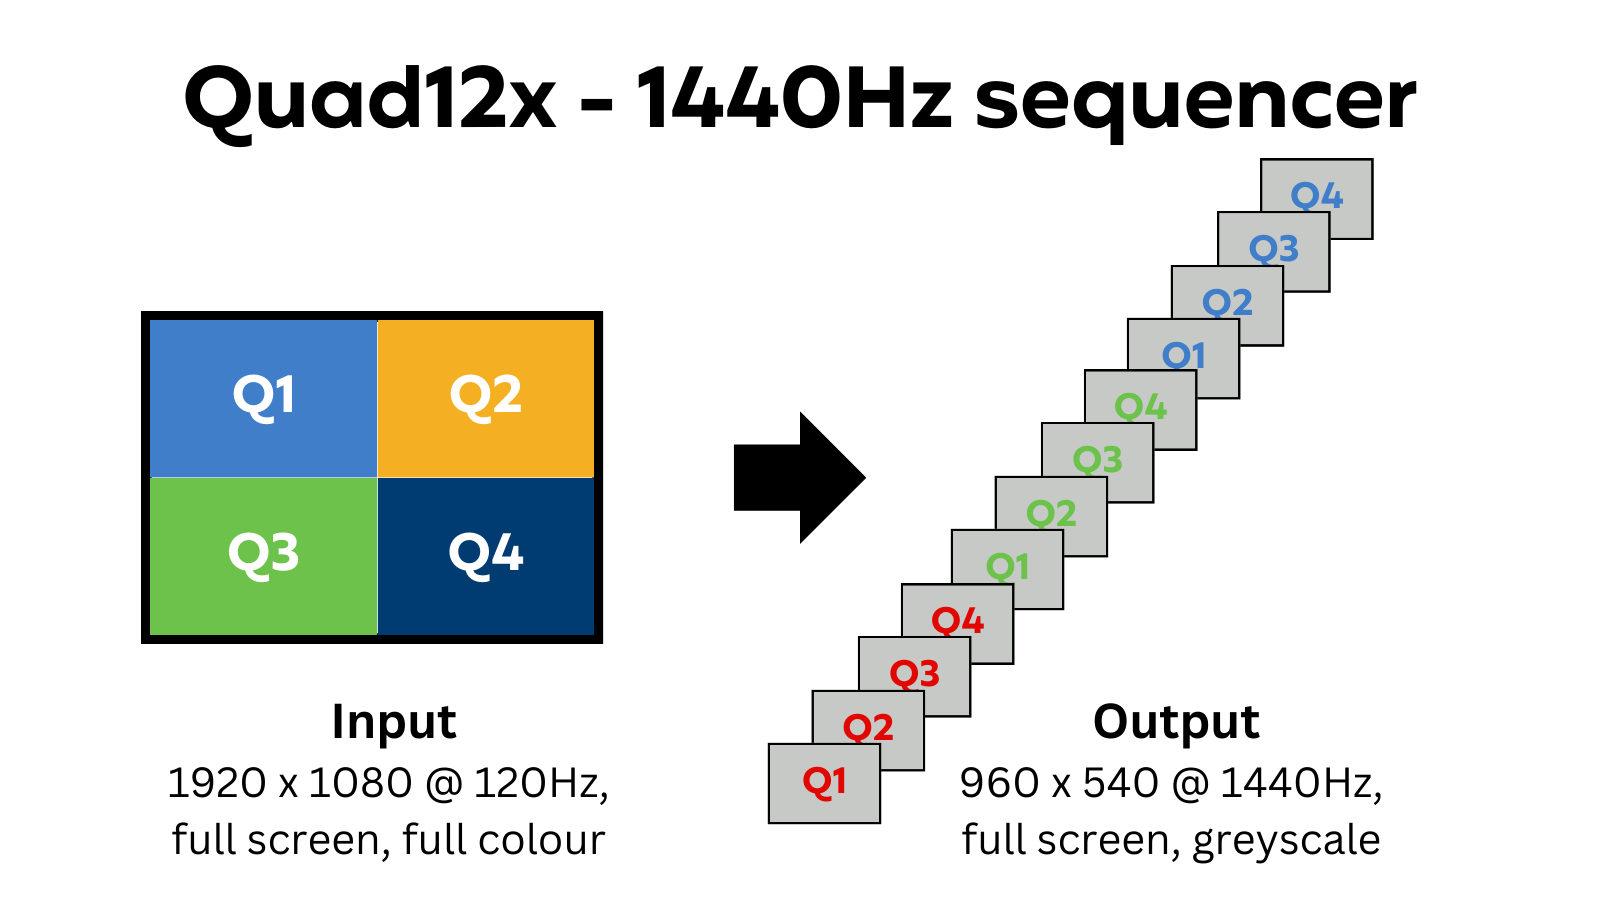
To create our stimuli, we determine target locations as if they were full resolution, full screen. The helper script reformatForQUAD12x reassigns and rescales the target positon to the correct quadrant. Depending on the frame, we draw our targets as either full red, full green or full blue.
A screen running in 120 Hz mode will display the twelve dots on the same frame, in the correct quadrant and with the proper colour profile. Here is a demonstration, albeit slowed down:
A screen running in 120 Hz mode will display the twelve dots on the same frame, in the correct quadrant and with the correct colour profile. Here is a demonstration, albeit slowed down.

The PROPixx in 1440 Hz mode will display the four quadrants in sequence, starting with red and repeating for green and blue. The image will be on full screen and grayscale. Note: This animation is slowed down for demonstration purposes. At true 1440 Hz, the dots appear simultaneously in a ring.
"""
This demonstration invokes the PROPixx QUAD12x sequencer to present a series of dots
at 1440 Hz. The dot positions are initially constructed based on a full-sized image.
They are drawn in order from 1-12; the colour of the dot is chosen based on their position in the order,
and a helper function scales the dots and adds an offset for the appropriate quadrant. The final
image is of a ring of white dots positioned around the center of the display. They are in fact illuminating
sequentially but to the eye they appear static.

History
Feb 10 2025 - LEF & JT - Written & tested
"""

from psychopy import visual  # Import visual module from PsychoPy for stimulus presentation
from psychopy.hardware import keyboard  # Import keyboard module for user input handling
from pypixxlib import _libdpx as dp  # Import DPX library for PROPixx hardware communication
import numpy as np  # Import NumPy for numerical operations


### HELPER FUNCTIONS
def reformatForQUAD12x(shapeStim, win, quadrant):
    """
    Rescales the shapeStim stimulus to 960 x 540 and applies a position offset
    based on the quadrant argument.

    Parameters:
    shapeStim (PsychoPy visual stimulus): The stimulus to be resized and repositioned
    win (PsychoPy Window): The PsychoPy window where the stimulus is displayed
    quadrant (int): Quadrant number (1-4) determining position offset

    Returns:
    shapeStim (PsychoPy visual stimulus): Updated stimulus with new size and position
    """

    # Ensure the window is 1920 x 1080, required for proper sequencing
    if not(win.size[0] == 1920) or not(win.size[1] == 1080):
        print('Warning! Window is not 1920 x 1080, window size must be 1920 x 1080 for sequencer to work correctly.')
        return

    # Rescale stimulus size by half to match resolution reduction
    for i in range(0, len(shapeStim.size)):
        shapeStim.size[i] = shapeStim.size[i] / 2

    # Define position offsets for each quadrant
    x = win.size[0] / 4  # Quarter of screen width
    y = win.size[1] / 4  # Quarter of screen height
    offsets = np.tile(([-x, y], [x, y], [-x, -y], [x, -y]), (3, 1))  # Offsets for 4 quadrants

    # Apply position offsets
    newPos = [0, 0]
    newPos[0] = shapeStim.pos[0] + offsets[quadrant][0]
    newPos[1] = shapeStim.pos[1] + offsets[quadrant][1]
    shapeStim.pos = newPos

    return shapeStim

### EXPERIMENT START
# Start PROPixx connection and enable sequencer
dp.DPxOpen()
isReady = dp.DPxIsReady()
if isReady:
    dp.DPxSetPPxDlpSeqPgrm('GREY Quad 1440Hz')  # Set sequencing mode
    dp.DPxWriteRegCache()
else:
    print('Warning! DPx call failed, check connection to hardware')

## Create a 1920 x 1080 PsychoPy window
win = visual.Window(
        screen=0,  # Change to 1 for second monitor display
        monitor=None,
        size=[1920, 1080],
        fullscr=True,  # Fullscreen mode
        pos=[0, 0],
        color=[-1, -1, -1],  # Black background
        units="pix"   # Pixel-based coordinate system
)

# Define stimulus parameters
dotRadius = 30  # Radius of stimulus dot
targetRadius = 200  # Distance of stimuli from center
targetIntensity = 1 # Max intensity
center = (0, 0)  # Center of display
locations = np.empty(shape=(12, 2))  # Array to store stimulus positions

# Define 12 evenly spaced positions around a circle
position = np.linspace(-180, 150, 12)  # Generate angles for circular placement
for k in range(0, 12):
    angle = position[k]
    locations[k, 0] = center[0] + targetRadius * np.cos(-angle * np.pi / 180)  # X-coordinate
    locations[k, 1] = center[1] + targetRadius * np.sin(-angle * np.pi / 180)  # Y-coordinate


### PRESENTATION LOOP
# Initialize time step counter
t = 0

while t < (120*5):  # Run for 5s
    for i in range(0, 12):

        # Assign color based on stimulus index
        if i < 4:
            colourChannel = [targetIntensity, -1, -1]  # Red
        elif i > 7:
            colourChannel = [-1, -1, targetIntensity]  # Blue
        else:
            colourChannel = [-1, targetIntensity, -1]  # Green

        # Create circular stimulus
        stimulus = visual.Circle(win=win,
                                 pos = locations[i],
                                 size=[dotRadius, dotRadius],
                                 fillColor=colourChannel)

        # Reformat stimulus position based on quadrant
        stimulus = reformatForQUAD12x(stimulus, win, i)
        stimulus.draw()  # Draw stimulus to window

        # Flip window after all 12 quadrants are drawn
        if i == 11:
            win.flip()

        t += 1  # Increment frame counter

# Close the PsychoPy window
win.close()

# Restore default PROPixx sequencing mode (Commented out for now)
dp.DPxSetPPxDlpSeqPgrm('RGB 120Hz')
dp.DPxWriteRegCache()
dp.DPxClose()