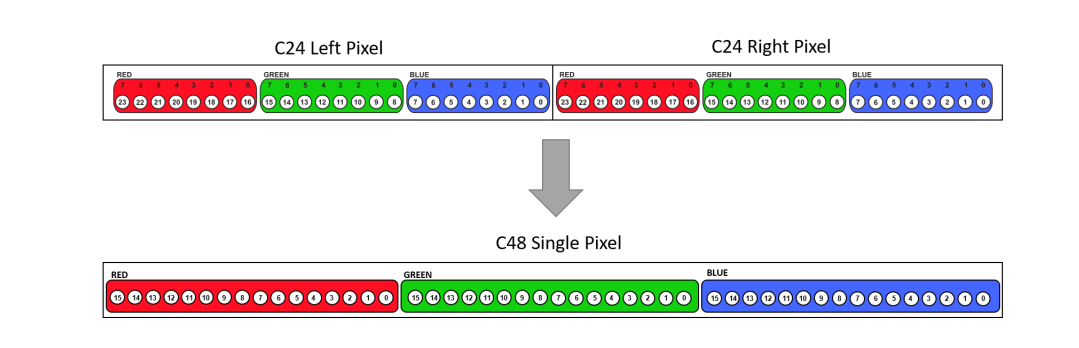
In C24, which is our standard operating mode, the red, green and blue components of a pixel are assigned 8 bits each. This means that each colour has 28 or 256 levels of intensity (0-255). Most commercial displays are 8 bits per colour (bpc).
In C48, data from horizontally adjacent pixels are combined so that each colour channel receives 16 bits instead. The leftmost pixel of the pair contributes the 8 most significant bits, and the rightmost pixel contributes the 8 least significant bits.
Bit assignment in C24 (standard mode) and C48 (combined horizontal pixels)
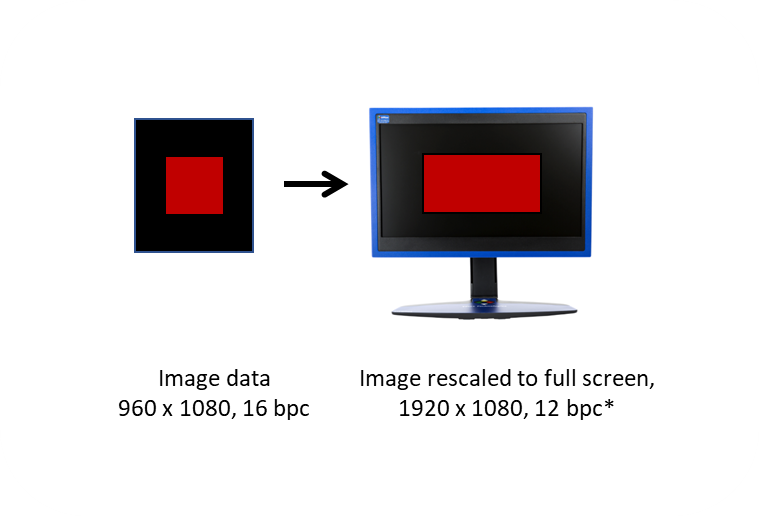
At 16 bpc, your red, green and blue colour channels now have 216 or 65,536 levels of intensity (0-65535). However, as a consequence of this pixel combination your image’s horizontal resolution is halved. So if your 8 bpc stimuli were drawn in full HD (1920 x 1080 pixels), your 16 bpc image will be reduced to 960 x 1080 pixels.
Our hardware will present this 16 bpc image data full screen, full resolution on the display. The image data is scaled to double-width to get the final display output.
This means that if you do nothing to adjust your stimuli in C48, they will appear horizontally stretched on your display.
Half-resolution image data is shown full screen on a VIEWPixx display
If you are working in MATLAB or Octave, there are several PsychImaging functions to simplify working in C48 mode. These functions allow you to draw your images directly in 16 bpc, so you don’t need to worry about combining 8 bpc pixels yourself. The backend graphics management will then handle formatting the image data for our hardware. These PsychImaging functions also offer some different options for rescaling your stimuli automatically so they don’t appear stretched. For more on scaling options, see our C48 examples below.
If you are working in Python, we have a module called “shaders.py” which contains a number of functions for implementing high bit depth mode shaders. These functions will allow you to draw your images directly in 16 bpc, so you don’t need to worry about combining 8 bpc pixels yourself. Image rescaling is also handled automatically by these shaders, so you can draw your stimuli in Python/PsychoPy without needing to account for the scaling of the image width.
The major advantage of C48 is having access to the full spectrum of colours on each video frame. This is a great mode for rich multicoloured images, complex gradients or colour wheels, and colour- or luminance-based visual search tasks where a fine degree of control is needed.
Examples
Drawing a simple luminance patch in C48
Note this example requires the use of Psychtoolbox for MATLAB. In this example, we enable drawing in 16 bpc and C48 mode. Our stimulus is a luminance patch with a randomly selected 16 bpc gray level on a black background. We would like our output to be square, so we manually scaled our patch width to half the height. This ensures the stimulus will be stretched to the desired dimensions on our display.
MATLAB Example
MATLAB
%Establish the correct colour and video settings
AssertOpenGL;
PsychImaging('PrepareConfiguration');

%Draw stimuli in 16 bits per colour
PsychImaging('AddTask', 'General', 'FloatingPoint32Bit');

%Enable C48 and set the framebuffer to half the display resolution (no automatic scaling)
PsychImaging('AddTask', 'General', 'EnableDataPixxC48Output', 0);

%If using the PROPixx - uncomment the following to change the sequencer for linearized output (trades off luminance). Make sure to reset to 0 at the end of your script.
%Datapixx('SetPropixxDlpSequenceProgram', 6);
%Datapixx('RegWr');

%Open a full-screen window with a black background
screenNumber = max(Screen('Screens'));
[win, rect] = PsychImaging('OpenWindow', screenNumber, [0,0,0]);

%Set up some position parameters
center = [rect(3)/2, rect(4)/2];
patchHeight = 200;
patchWidth = patchHeight/2; %rescale to half-width, so our final stretched image appears square
patchRect = [center(1) - patchWidth/2,  center(2) - patchHeight/2, ...
            center(1) + patchWidth/2,  center(2) + patchHeight/2];

%Let's pick a random gray level between 0-65535, which is our maximum value at 16 bpc. This must be expressed as a value from 0-1.
maxIntensity = (2^16)-1;
colourValue = randi(maxIntensity)/maxIntensity;

%Draw our patch and flip
Screen('FillRect', win, colourValue, patchRect);
Screen('Flip', win);

WaitSecs(4);

%Close window
Screen('Closeall');
Python Example
Python
#import necessary libraries and modules
from psychopy import core, visual
from psychopy.hardware import keyboard
from pypixxlib import _libdpx as dp
from pypixxlib import shaders
import random

from pypixxlib.propixx import PROPixx
from pypixxlib.viewpixx import VIEWPixx

#In order to set up the shader for C48 mode you will need to specify which VPixx device/display you are using:
myDevice = PROPixx() #comment out if you are using a VIEWPixx
#myDevice = VIEWPixx() #uncomment if you are using a PROPixx

kb = keyboard.Keyboard()

#initialization steps
dp.DPxOpen()
dp.DPxSetVidMode('C48') #set your device/display in C48 video mode
dp.DPxSetPPxDlpSeqPgrm('RGBHBD') #set RGB high bit depth sequencer mode; do this when displaying on PROPixx to maintain linearity, gamma = 1. Otherwise, comment this line out
dp.DPxWriteRegCache()

#choose a random 16-bit intensity value
random_integer = random.randint(0, 65535)
random_intensity = random_integer/65535

#open your PsychoPy window; note that we specify the colorspace to be 'rgb1' so that RGB values range from 0 to 1. We also explicity set the frame buffer bit depth to 16, by setting depthBits = 16. These steps are necessary for specifying 16-bit values
win = visual.Window(
        screen = 1,
        monitor =None,
        fullscr=True,
        color='black',
        units = "pix",
        useFBO = True,
        colorSpace='rgb1',
        depthBits=16
        )

#setup the shader for C48 mode
shaders.setUpShaderAndWindow(myDevice, win)

#define the properties of the stimulus patch
square = visual.Rect(
    win=win,
    size=200,
    pos=[0, 0],
    colorSpace='rgb1',
    fillColor = random_intensity
)

#keep flipping the stimulus until the user presses 'escape'
while True:
    square.draw()
    win.flip()

    # Check for escape key press; exit program if 'escape' is pressed
    keys = kb.getKeys()
    if 'escape' in keys:
        break

#close the PsychoPy window and set the video mode back to the default C24 mode
dp.DPxSetVidMode('C24')
dp.DPxWriteRegCache()
win.close()
core.quit()
Drawing a gradient of dots in C48 mode, using automatic scaling
In this example, we use the Screen(‘DrawDots’) command to draw a gradient of dots in a ring around the center of the display. Like the previous example, we will draw our stimuli directly in 16 bpc.
DrawDots does not allow you to manually scale dots to half-width. Instead, we will use one of the automatic scaling modes available with PsychImaging(‘AddTask’, ‘General’, ‘EnableDataPixxC48Output’, modes). This will ensure our dots appear as circles on the display, rather than stretched ovals.
As of April 2022, there are three scaling modes to choose from:
Mode
Description
0
Image framebuffer is set to half the display resolution. This preserves 100% of whatever you draw, but if you do not manually scale your stimuli (as in example 1) they will appear stretched on the final full resolution display.
1
Image framebuffer is set to full display resolution. When the half-resolution image data is generated to send to the display, odd pixels in the framebuffer are ignored. Stimuli appear with the correct dimensions on the final full-resolution display.
2
Image framebuffer is set to full display resolution. When the half-resolution image data is generated to send to the display, the 16 bpc values of adjacent pixels are averaged to a single value. Stimuli appear with the correct dimensions on the final full-resolution display.
Which of these modes you use depends on your stimuli and what you are trying to achieve. Here we will use mode 2, as the pixel averaging creates some nice antialiasing around the edges of our dots and makes them look smoother.
MATLAB Example
MATLAB
%Establish the correct colour video settings
AssertOpenGL;

Screen('Preference', 'SkipSyncTests', 1);
PsychImaging('PrepareConfiguration');
PsychImaging('AddTask', 'General', 'FloatingPoint32Bit');

%Our stimuli are circular and hard to scale manually, so we will use mode 2, which averages adjacent pixels to scale the image for us. You can also use mode 1, but mode 2 gives some nice antialiasing around the edges of circular stimuli.
PsychImaging('AddTask', 'General', 'EnableDataPixxC48Output', 2);

%If using the PROPixx - uncomment the following to change the sequencer
%for linearized output (trades off luminance). Make sure to reset to 0 at
%the end of your script.
%Datapixx('SetPropixxDlpSequenceProgram', 6);
%Datapixx('RegWr');

%Open a full-screen window with a black background
screenNumber = max(Screen('Screens'));
[win, rect] = PsychImaging('OpenWindow', screenNumber, [0,0,0]);

%Set up some parameters
bitDepth = 16;
maxIntensity = 2^bitDepth;
numDots = 400;
radius = 400; %pixels
radiusCenter = [rect(3)/2, rect(4)/2];
dotSize = 10;
theta = (pi*2)/numDots;

%Initialize dot parameters
positions = nan(2,numDots);
colours = nan(3,numDots);

%A simple loop to assign dot positions and create an evenly-spaced red gradient
for k=1:numDots
    positions(1, k) = radius * cos(theta*k);
    positions(2, k) = radius * sin(theta*k);
    colours(:, k) = [((maxIntensity/numDots)*k)/maxIntensity,0,0];
end

%Draw all of our dots and flip
Screen('DrawDots', win, positions, dotSize, colours, radiusCenter, 1);
Screen('Flip', win);

WaitSecs(4);

%Close window
Screen('Closeall');
Python Example
Note that there is no DrawDots in Python/PsychoPy. Instead, we simply generate the dots in a loop and append them to an ElementArrayStim so they can be drawn with a single command.
Python
#import necessary libraries and modules
from psychopy import core, visual
from psychopy.hardware import keyboard
from pypixxlib import _libdpx as dp
from pypixxlib import shaders
import numpy as np

from pypixxlib.propixx import PROPixx
from pypixxlib.viewpixx import VIEWPixx

#In order to set up the shader for C48 mode you will need to specify which VPixx device/display you are using:
myDevice = PROPixx() #comment out if you are using a VIEWPixx
#myDevice = VIEWPixx() #uncomment if you are using a PROPixx

kb = keyboard.Keyboard()

#initialization steps
dp.DPxOpen()
dp.DPxSetVidMode('C48')
dp.DPxSetPPxDlpSeqPgrm('RGBHBD') #set RGB high bit depth sequencer mode; do this when displaying on PROPixx to maintain linearity, gamma = 1. Otherwise, comment this line out
dp.DPxWriteRegCache()

#Set up some parameters
maxIntensity = 65535
numDots = 400
radius = 400
radiusCenter = [0,0]
dotSize = 10
pi = 3.14159265
theta = (pi*2)/numDots

positions = np.zeros((numDots,2))
colors = np.zeros((numDots,3))

#a simple loop to assign dot positions and create an evenly-spaced red gradient
for k in range(numDots) :
    positions[k,0] = radius * np.cos(theta*k)
    positions[k,1] = radius * np.sin(theta*k)
    colors[k,:] =  [((maxIntensity/numDots)*k)/maxIntensity,0,0]

#open your PsychoPy window; note that we specify the colorspace to be 'rgb1' so that RGB values range from 0 to 1. We also explicity set the frame buffer bit depth to 16, by setting depthBits = 16. These steps are necessary for specifying 16-bit values
win = visual.Window(
        screen = 1,
        monitor =None,
        fullscr=True,
        color='black',
        units = "pix",
        useFBO = True,
        colorSpace='rgb1',
        depthBits=16
        )

#setup the shader for C48 mode
shaders.setUpShaderAndWindow(myDevice, win)

#define the properties of the dot stimuli
dots = visual.ElementArrayStim(
    win = win,
    units = "pix",
    elementMask = "circle",
    nElements = numDots,
    xys = positions,
    sizes = dotSize,
    elementTex=None,
    colorSpace='rgb1',
    colors = colors,
)

#keep flipping the stimulus until the user presses 'escape'
while True:
    dots.draw()
    win.flip()

    # Check for escape key press
    keys = kb.getKeys()
    if 'escape' in keys:
        break

#close the PsychoPy window and set the video mode back to the default C24 mode
dp.DPxSetVidMode('C24')
dp.DPxWriteRegCache()
win.close()
core.quit()
Not sure if you are actually in C48 mode? Psychtoolbox prints detailed information to the command line whenever a new window is opened; under “PTB – Info” you should see C48 and your scaling mode identified. You can also check in PyPixx under “Video Mode Configuration” (while the window is open), or by disabling any scaling and confirming your stimuli are horizontally stretched.
These methods will confirm what video mode the hardware is in. Only an external measurement tool like a colorimeter or spectrophotometer can externally verify your display colour/luminance output.
Blending, interpolating and antialiasing can cause strange results when using CLUTs. It is best to avoid these in our high bit depth modes like M16. See What is Pixel Identity Passthrough?for more details.