L48 very simply allows the user to define a 256 x 3, 16 bpc CLUT for the display and assign it to our hardware. Subsequently, individual objects are assigned a red colour value that is an index to a row in the CLUT containing a 16 bpc RGB triplet.
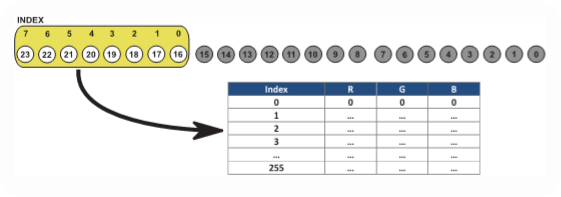
The CLUT may be updated dynamically between frames, allowing access to the full 16-bit colour gamut across an experiment; however, a single video frame may contain a maximum of 256 unique colours.
Examples
Presenting side-by-side swatches
Note this example requires the use of Psychtoolbox for MATLAB. In this example, we present two side-by-side swatches of different hues, a common stimulus set in perceptual discrimination tasks. We must first set the video mode using Psychtoolbox’s PsychImaging commands.
%Establish the correct colour and video settings
AssertOpenGL;
PsychImaging('PrepareConfiguration');
PsychImaging('AddTask', 'General', 'EnableDataPixxL48Output');
Next, we open an onscreen window and adjust a few settings
%Open a full-screen window with a black background
screenNumber = max(Screen('Screens'));
[win, winRect] = PsychImaging('OpenWindow', screenNumber, [0,0,0]);

%If using the PROPixx - uncomment the following to change the sequencer
%for linearized output (trades off luminance). Make sure to reset to 0 at
%the end of your script.
%Datapixx('SetPropixxDlpSequenceProgram', 6);
%Datapixx('RegWr');
Now we are ready to generate some 16-bit colour values and populate our CLUT. Here we create two patches of similar hue for presentation and add them to a table loaded onto VPixx hardware. Since we are writing directly to our hardware, we need to send a register write (RegWr) to push our Datapixx commands to the device.
On Windows, due to PTB’s scaling methods, row 1 of the CLUT is ignored. Row 2 is indexed as 1, Row 3 as 2, etc. The MATLAB example below demonstrates this.
%generate some colours
patch1 = [0, 0, 0]; %Our desired background colour
patch2 = [0, 52428/65535, 10000/65535];
patch3 = [0, 52628/65535, 10000/65535];

%Generate our colour look-up table (CLUT) for our main display.
%CLUT values are 0-1; the output is 16 bit (0-65535).

%!! ON WINDOWS!!
% PTB scales colour by 255/256, therefore CLUT row indexing by PTB starts at the second row.
% See example below.

%!! ON OS-X !!
%CLUT assignment seems to have issues with mapping onto CLUTs. Consider making multiple (~5) rows
%The same colour and calling the middle row to ensure a buffer. myTable=repmat([0,0,0], [256,1]);

myTable(1,:) = patch1; %CLUT row 0 in Windows. This will overwrite the window background colour on the next flip, when the CLUT takes over! So make sure it is set to your desired background colour.
myTable(2,:) = patch2; %CLUT row 1 in Windows
myTable(3,:) = patch3; %CLUT row 2 in Windows

Datapixx('SetVideoClut', myTable);
Datapixx('RegWr');
Now we can draw our patches and flip them to the display:
%Draw our patches side by side, using the index to the CLUT as the colour argument, flip
Screen('FillRect', win, 1, [winRect(3)/2, winRect(4)/2-50, winRect(3)/2+100, winRect(4)/2+50]);
Screen('FillRect', win, 2, [winRect(3)/2-100, winRect(4)/2-50, winRect(3)/2, winRect(4)/2+50]);
Screen('Flip', win);
Python/PsychoPy
For an equivalent demo in Python, see the following block of code:
#import the necessary libraries and modules
from psychopy import core, visual
from psychopy.hardware import keyboard
from pypixxlib import _libdpx as dp
import numpy as np


kb = keyboard.Keyboard()

#initialization steps
dp.DPxOpen()

#generate some colours
patch1 = [0, 0, 0]; #Our desired background colour
patch2 = [0, 52428, 10000];
patch3 = [0, 52628, 10000];

#load the CLUT on the device
myTable = np.zeros((3, 256),dtype=np.uint16)
myTable[:,0] = patch1
myTable[:,1] = patch2
myTable[:,2] = patch3
dp.DPxSetVidClut(myTable)
dp.DPxWriteRegCache()

#Enable the L48 video mode
dp.DPxSetVidMode('L48')
dp.DPxSetPPxDlpSeqPgrm('RGBHBD') #set RGB high bit depth sequencer mode; do this when displaying on PROPixx to maintain linearity, gamma = 1. Otherwise, comment this line out
dp.DPxWriteRegCache()

#Open the PsychoPy window
win = visual.Window(
        screen = 1,
        monitor =None,
        fullscr=True,
        color='black',
        units = "pix",
        colorSpace='rgb255',
        depthBits=16
        )

#Define the properties of the first patch, set color value to index the row #1 of CLUT

square1 = visual.Rect(
    win=win,
    size=200,
    pos=[-100, 0],
    colorSpace='rgb255',
    fillColor = [1,0,0]
)

#Define the properties of the second patch, set color value to index the row #2 of CLUT

square2 = visual.Rect(
    win=win,
    size=200,
    pos=[100, 0],
    colorSpace='rgb255',
    fillColor = [2,0,0]
)

# keep drawing and flipping the patches to the screen until the user presses 'escape'
while True:
    square1.draw()
    square2.draw()
    win.flip()

    # Check for escape key press; exit program if 'escape' is pressed
    keys = kb.getKeys()
    if 'escape' in keys:

        break


#re-initialize the default video mode, C24, and close the window.
dp.DPxSetVidMode('C24')
dp.DPxWriteRegCache()
win.close()
core.quit()
Blending, interpolating and antialiasing can cause strange results when using CLUTs. It is best to avoid these in our high bit depth modes like M16. See What is Pixel Identity Passthrough? for more details.