This template project presents various practical uses for an epoch’s EntryCondition and ExitCondition properties.
Download the template project here: EnterConditionExitCondition_V1.lm, and click "Launch Experiment" to see the demonstration. Read the instructions attentively to proceed.
Warning: In LabMaestro Public Beta 1 through LabMaestro 1.7, when first opening a *.lm file, the preview may not be immediately refreshed. This may occur when property fields contain Expressions, or references to custom variables defined within the property panel of Timelines. To refresh the preview, without executing the entire experiment, click on Play Timeline. Note that variables defined by Methods may have a preview option available from their own method tab.
The demonstration is an example of Flow Control Within Timelines, implemented over multiple Epochs. It is divided into three parts:
-
Part 1: Demonstrates how to use an EnterCondition to dynamically ignore or evaluate an epoch during an experiment.
-
Part 2: Demonstrates how to use an ExitCondition, timeline CustomVariables, a SetVariable command and WaitForInput to replicate the behaviour of a repeating (for) loop.
-
Part 3: Demonstrates how to use and ExitCondition, a ListenforInput commands, SetVariables, and the Time variable to replicate the behaviour of a while loop, implementing a timeout condition.
We suggest using Timelines and Flow Control Within Timelinesto establish the basic structure of a trial, while Methodsare recommended for manipulating experimental variables at a higher level. It may be possible to encode an entire experiment within a single timeline using various Components, but doing so may lead to unpredictable consequences.
Part 1 : EnterCondition Flow Control
The EnterCondition control is demonstrated in the first three epochs of the timeline. The content of Epoch1 will be executed first, and the onscreen text will instruct you to press either the A keyboard key to display the red circle from Epoch2, or the 1 keyboard key to display the green polygon from Epoch3.
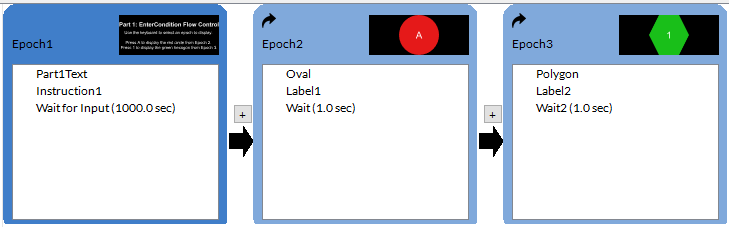
The command restricts valid keypresses to only these two keys. Immediately after a valid selection is made, the key pressed is stored into the variable as LastEvent.Key.Value.
Select an Epoch in the Project Panel, or directly from the Timeline Editor, to display its current EnterCondition in the Properties panel:
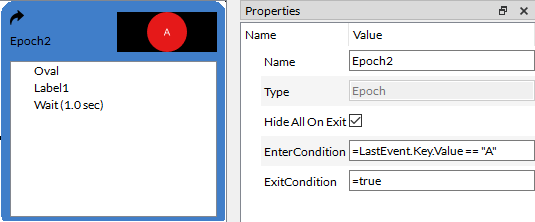
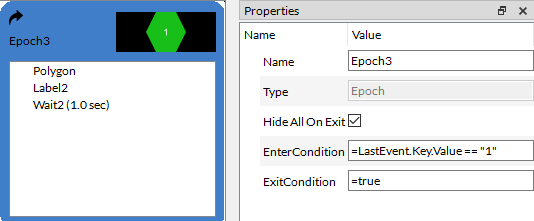
Notice that the expression uses the == (equal) logical operator () to compare the value stored in LastEvent.Key.Value with either the string value “A” or “1”
Part 2 : ExitCondition Flow Control – Repeating (For) Loop
In LabMaestro Public Beta 1.6.1, to replicate the traditional behaviour of a https://en.wikipedia.org/wiki/For_loop#:~:text=In%20computer%20science%20a%20for,)%20printf(%22*%22)%3B, we first need to create a custom variable whose value can be increased every time we repeat the content of the epoch.
-
From the Project Panel, click on the EnterExitConditions Timeline to display its properties.
-
All timelines have the ability to define new custom variables, which will only be used within the local scope of their own timelines. Click on […] to open the CustomVariables dialog box.
-
Two custom variables, counter and maxCounter were created using the + icon, and defined as integers. Every time the timeline is executed through the ‘PlayTimeline’ or the ‘Launch Experiment’ buttons, their values are respectively reset to1 and 3 upon entering the timeline.

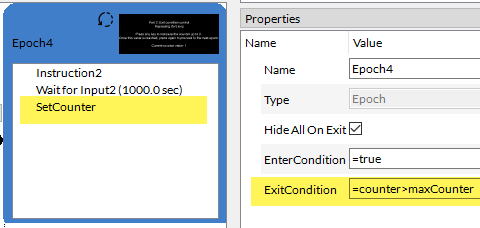
Click on Epoch4 to display the ExitCondition: The expression uses a relational operator to indicate that the content of the epoch will continue to be displayed until the value stored in counter is strictly greater than maxCounter.
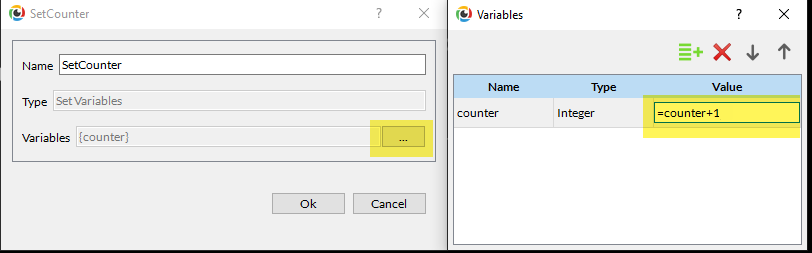
To increase the counter value iteratively, a command, renamed SetCounter, was inserted after a blocking command.
Double-clicking on SetCounter will open the SetVariables panel. Variables that are updated within this commands are listed in the Variables field. Click on […] to display the expression used to update the counter. This expression increases the counter value by one, everytime SetCounter is executed.
Part 3 : ExitCondition Flow Control – Timeout/State Control (While) Loop
The ExitCondition can be used to replicate the flow control provided by a traditional programminghttps://en.wikipedia.org/wiki/While_loop. In LabMaestro Public Beta 1.6.1, this is achieved by continuously executing the content of the epoch while ExitCondition is false, until the ExitCondition evaluates to true.
If the ExitCondition of Epochs always evaluates to false during runtime, it causes an infinite loop. Similar to a traditional programming language, the experiment will not proceed further (you can refer to EnterCondition and ExitCondition for more details). However, if you hold down the Esc key, it will break out of the infinite loop and exit the previewed timeline or launched experiment. This will bring control back to the LabMaestro editor.
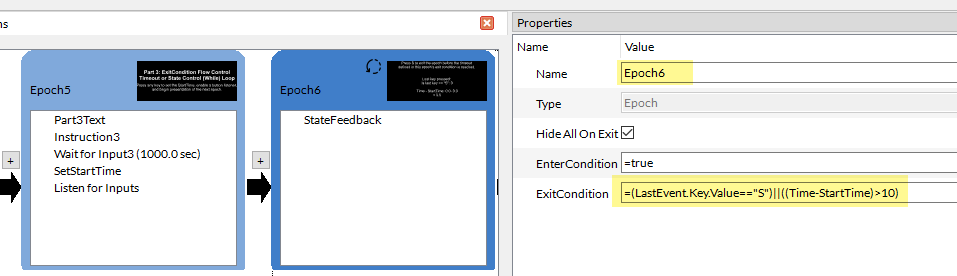
In this example, the content of Epoch6 is repeated until the "S" key is pressed or the epoch has been presented for 10 seconds, whichever occurs first. Certain setup needs to be implemented before entering Epoch6, for this control flow to work properly.
First, a floating point variable called StartTime was created as a CustomVariable in the EnterExitCondition timeline The variable was initialized at =0.0. Please see Part 2 for instructions on accessing and modifying CustomVariables).
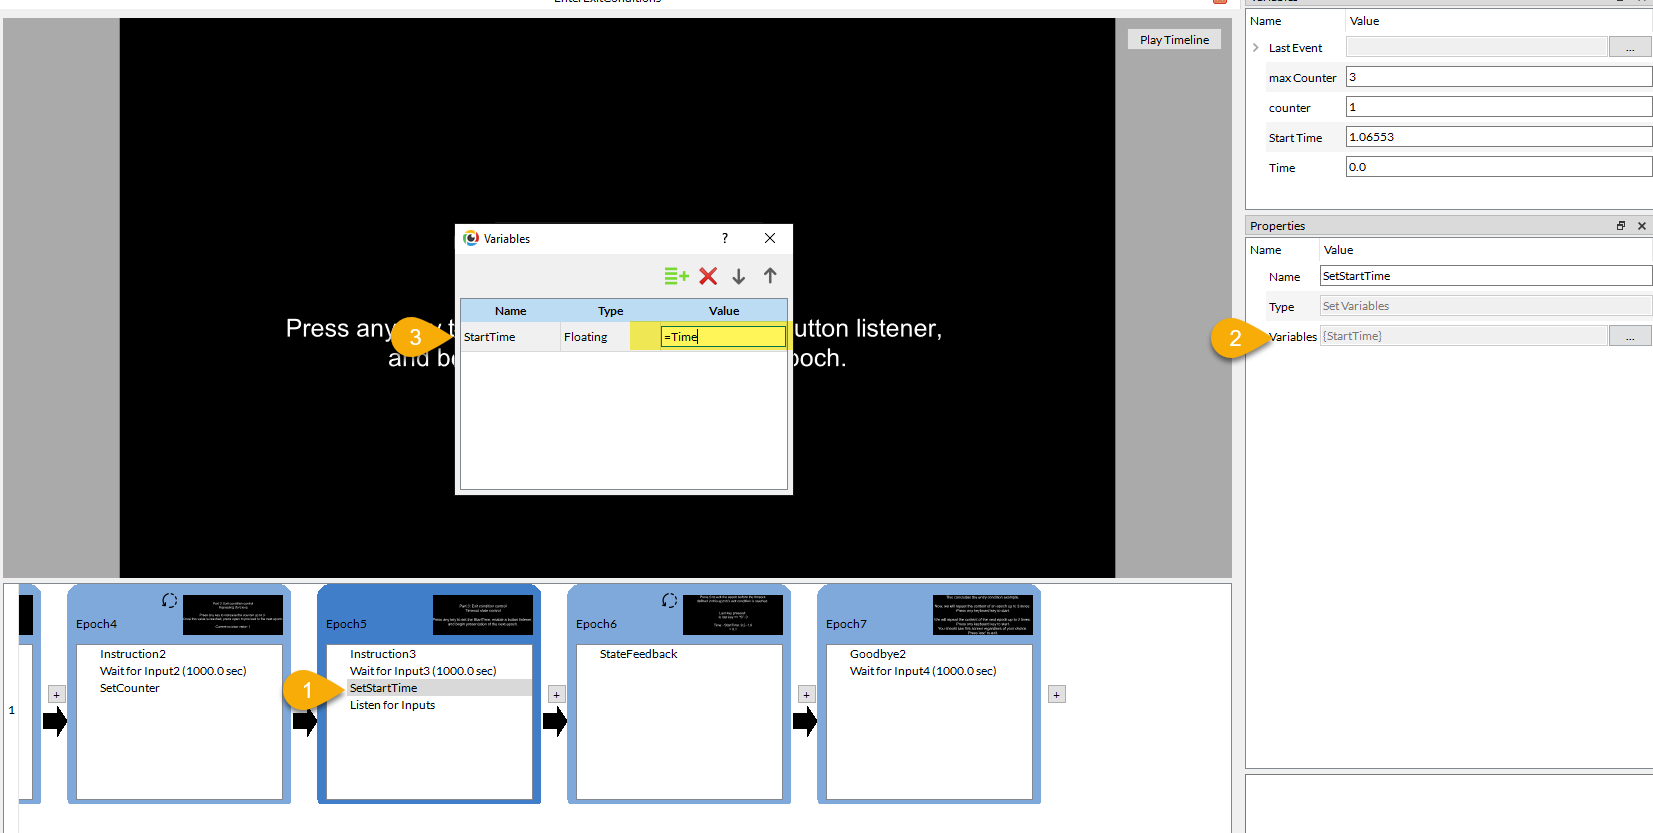
In Epoch5, a command, renamed SetStartTime, is used to update the StartTime value to the current software time:
-
Click on SetStartTime to open the Properties Panel.
-
Click on […] to display the expressions used to update the StartTime value.
-
The expression in the Value column refers to the software variable Time, expressed in seconds. This variable is provided directly by LabMaestro, and is always accessible in expressions.
The updated StartTime now enables the calculation of the time that has elapsed since entering Epoch6.
A command is then used to initiate a non-blocking button listener, which is defined to react to any keyboard key pressed. As in Part 1, the last key pressed is stored in LastEvent.Key.Value.
The timeline then proceeds to Epoch6, which will continue to be displayed until either the “S” key has been pressed, or the elapsed time exceeds 10 seconds, as expressed in its ExitCondition.