This guide provides a few simple steps to diagnose and correct display issues on the PROPixx Projector.
We suggest reading the first section on General Layout and Wiring. After that, if you have a clear idea of what is happening, you can skip to the section on Specific PROPixx Issues to see if any of the described problems match your current situation, and follow the specific recommended solutions in the table. If you aren’t sure where to start, read through our list of Basic Diagnostics for ideas on troubleshooting tests.
Still stuck? At the bottom of this guide are instructions for how to get in touch with VPixx Technical Support for more assistance.
General Layout and Wiring
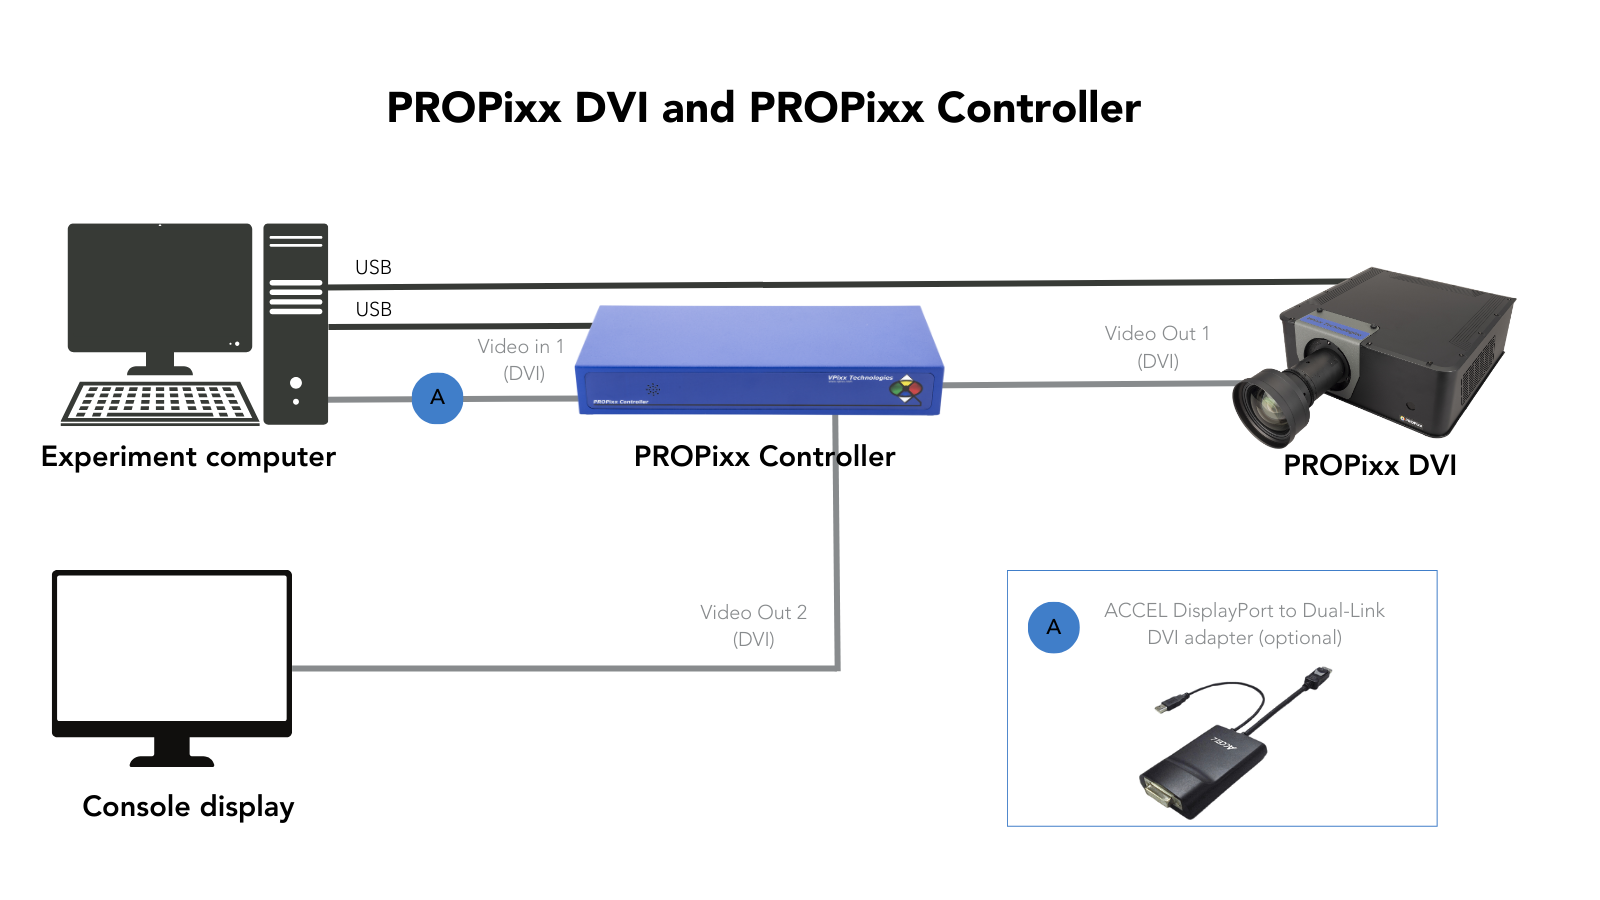
There are three basic projection layouts for the PROPixx, based on the generation and age of the unit. Identify which schematic best represents your specific installation from the options below.
In addition, you may have the following video-related accessories
From VPixx:
-
A fibre optic bridge between the control unit (DATAPixx3 or PROPixx Controller) and the PROPixx. This is typically used for MRI where the PROPixx is inside the scanning room inside a SHIELDPixx enclosure, or when the video cable is very long (> 30 meters). The sender resides in the control room and converts the video and USB signals to the PROPixx into fibre optic. The receiver is near the PROPixx and converts the fibre optic signal back into electrical.
-
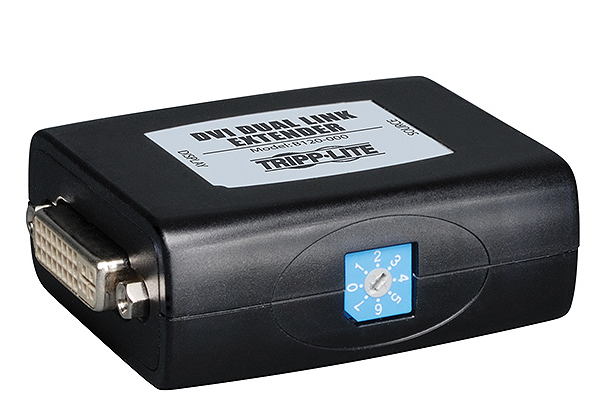
A signal booster between the control unit (DATAPixx3 or PROPixx Controller) and the PROPixx. This is used for dual-link DVI video cables between 10 - 30 m and is placed at the end of the long video cable (e.g., closer to the PROPixx). Shorter cables do not require a signal booster; longer cables must use a fibre optic bridge. The booster we provide is from TrippLite and looks like this:

Dual-Link DVI booster -
Fibre optic DisplayPort cabling between the control unit (DATAPixx3 or PROPixx Controller), if your DisplayPort cable exceeds 10 m.
You may also have:
-
Additional video adapters between your PC and the control unit (DATAPixx3 or PROPixx Controller)
-
A KVM switch that toggles between multiple inputs to the projection system
Basic Diagnostics 1: Try our test patterns
Your VPixx devices have several test patterns pre-loaded onto the hardware. These are meant for demonstration purposes and do not require a video signal from the PC to operate.
As a first step in troubleshooting, try the following test patterns to verify there are no issues with the display. To run a test pattern, open the vputil command line software included in your VPixx Software Tools and enter the following commands:
|
Test pattern |
Description |
|---|---|
|
tp 12 |
White screen, loaded directly on the PROPixx. If this fails the issue is almost certainly hardware-related. Skip to Contact VPixx Technical Support. |
|
tp 27 |
Spinning wheels. Only available on the PROPixx Controller. If this test pattern fails, the issue is specifically the video connection between the controller and the PROPixx. Skip to Basic Diagnostics 5: Swap Cables. |
|
tp 0 |
Turns off test patterns. Use to return to a normal display. |
If vputil does not detect your hardware, ensure you have a working USB connection to control unit (PROPixx Controller or DATAPixx3) and a working USB connection to the PROPixx. See above diagrams for reference. Try a different USB port on your PC if needed.
If you have a fibre optic bridge and you cannot detect the PROPixx, the fibre optic USB connection has an issue. If both sender and receiver have power (see Basic Diagnostics 2), and the PROPixx is not showing video, skip to Contact VPixx Technical Support.
Basic Diagnostics 2: Ensure all components have power and are turned on
The PROPixx, control unit (DATAPixx3 or PROPixx Controller) must be powered on to receive and present video. Some accessories also require power to operate.
-
The PROPixx has a rocker switch with an LED that will illuminate when it is powered on. It also has a silver push button to “wake” the projector and show an image. When the display is awake, the blue status LED will illuminate and you will hear the fans spin up. If the status LED starts to flash red, this indicates a thermal shutdown. Scroll down to the Specific PROPixx Issues → thermal shutdown below.
-
The PROPixx Controller has a rocker switch to toggle on the power. When it is on, the LED on the switch will illuminate and you should hear the fans spin up. Depending on the generation of the device, the rocker switch will be either on the front or the back of the unit.
-
The DATAPixx3 has a power button on the front of the box. This will illuminate in green when the unit is powered on.
-
If you are using them:
-
The DisplayPort to Dual-Link DVI adapter receives power either by USB or a power cable connected to the DATAPixx3. Make sure this is plugged in.
-
The signal booster has a blue LED on the side indicating it has power.
-
The fibre optic bridge has unique power sources for the sender and the receiver.
-
The sender power LED should be green (ThinkLogical brand) or blue (Gefen brand)
-
The receiver power LED should be green (ThinkLogical brand) or blue (Gefen brand)
-
-
Basic Diagnostics 3: Replicate the problem without third-party video adapters or KVMs
If the test pattern(s) do not show any issues, but the video from the PC is still not working, try eliminating all third-party components from the video pipeline.
All three versions of the PROPixx are designed to use either DisplayPort or direct Dual-Link DVI from your PC, with or without the specific DisplayPort to Dual-Link DVI adapter provided by VPixx (see schematics above for reference). Converting your PC video signal from something other than DisplayPort (e.g., HDMI) or using third-party video adapters or KVMs can sometimes cause issues with the video. As a first step, try to drive the system directly via Dual-Link DVI or DisplayPort. You may need to swap in a different PC for this test.
If the adapters or KVM prove to be the issue, you will need to find a different solution for video conversion. For official recommendations on adapters and KVMs we have tested, see this part of our FAQ.
Basic Diagnostics 4: Verify your display settings
The PROPixx supports several different video settings:
-
1920 x 1080 (16:9) @ 60 Hz*
-
1920 x 1080 (16:9) @ 120 Hz
-
1920 x 1080 (16:9) @ 144 Hz
-
1280 x 1024 (5:4) @ 60 Hz*
-
1280 x 1024 (5:4) @ 120 Hz
-
1280 x 1024 (5:4) @ 180 Hz
-
1280 x 720 (16:9) @ 60 Hz*
-
1280 x 720 (16:9) @ 120 Hz*
-
1280 x 720 (16:9) @ 180 Hz*
-
1280 x 720 (16:9) @ 240 Hz
-
1024 x 768 (4:3) @ 240 Hz
-
960 x 540 @ 480 Hz
*Not available with PROPixx DVI and DATAPixx3 configuration specifically
Ensure your PC display settings reflect one of these supported video settings. You can verify the output in our vputil command line utility. Simply select the device using one of the following commands:
|
Device |
Command |
|---|---|
|
PROPixx (any) |
devsel ppx |
|
DATAPixx3 |
devsel dp3 |
|
PROPixx Controller |
devsel ppc |
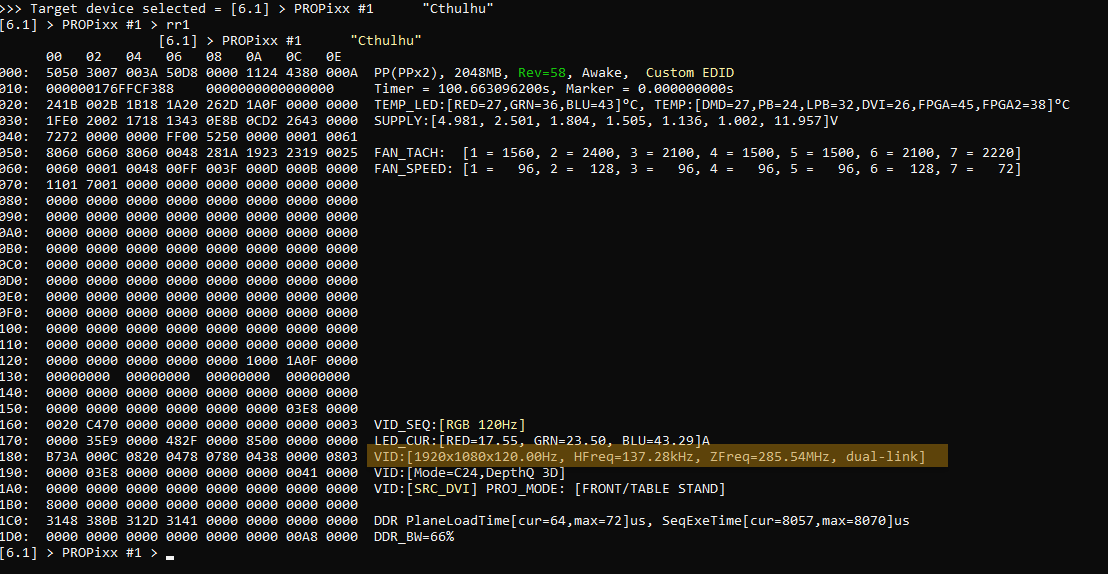
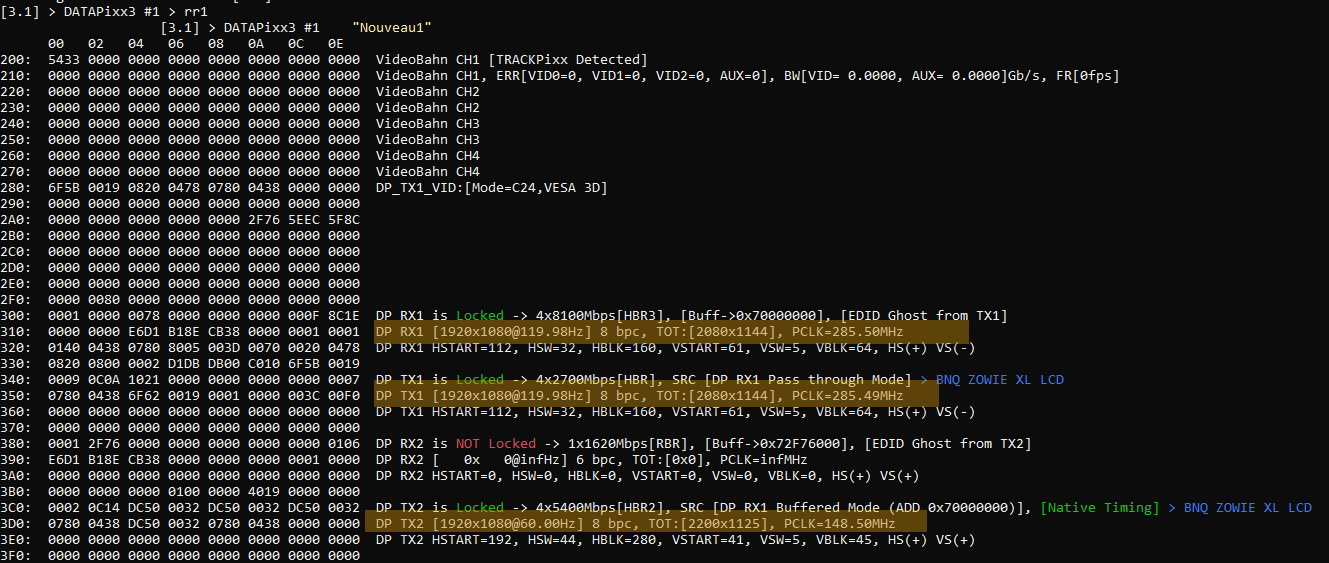
Then type rr1 and hit enter. This will return a great deal of data from the hardware, including the current video settings. You will need to repeat this process for both your control unit and your PROPixx. Expand the relevant sections below to see how you can confirm the video signal settings for each device.
If you see a message indicating ‘single link’ anywhere, this is a sign that you have a bad video adapter or your DVI cable is not a dual link. If removing the adapter does not solve the issue, try a different DVI cable, ideally one supplied by VPixx.
If you are using a signal booster, you may need to adjust the blue dial on the side to stabilize the display. A weak signal is usually the source of flickering video. There is no one recommended dial setting that suits all installations; you will need to make adjustments to see what works in your setup. We recommend using dynamic video (e.g., a Youtube video or movie) when adjusting booster settings.
Basic Diagnostics 5: Swap cables
If the control unit is receiving the correct video, but the projector is not receiving video, there may be an issue with the cable from video out 1. Try swapping the following cables entirely (ie, at both ends):
-
Video out 1 (controller → projector) and video out 2 (controller → console display)
-
If using a fibre optic bridge, swap USB and video fibre cables
If swapping the cables solves the issue, then the original cable is faulty and must be replaced. Contact our team with your product serial number to see if it is still under warranty.
Specific PROPixx issues
Below is a table of specific PROPixx display issues and our recommendations. Browse the issue descriptions to see if something matches your current problem.
|
Issue |
Cause |
Solutions |
|---|---|---|
|
On power up and wake, PROPixx shows a colourful plaid image and then goes dark after several seconds |
No video to the projector |
|
|
On power up and wake, PROPixx does not show anything |
Likely an issue with the PROPixx |
|
|
On power up and wake, PROPixx shows a colourful plaid image and then RGBW bars |
Projector is receiving single-link video or incompatible video mode |
|
|
On power up and wake, PROPixx shows a white grid on a black background (PROPixx DVI + DATAPixx3 only) |
DATAPixx3 is not receiving video |
|
|
PROPixx image flickers or is unstable |
Video signal too weak |
|
|
PROPixx powers on properly but the video goes black after a certain amount of time |
Thermal shutdown |
|
|
PROPixx works fine, but console display is not showing video |
Console monitor is not compatible with VPixx controller |
|
|
PROPixx is too bright |
Typically occurs with small images and/or short projection distances |
|
|
PROPixx is too dark |
Image size is too large or lens is obstructed |
|
|
PROPixx is out of focus |
Out of focus |
|
|
PROPixx image is too high/too low or not centered on screen |
Image off-center |
|
Contact VPixx Technical Support
Our support team is here to help. If you have gone through our recommended diagnostics and are still having issues, please send us an email. Be sure to include the following information:
-
The serial number on the back of the PROPixx
-
What firmware revision you are using (you can see this information listed under your device in vputil)
-
Screenshots of the register reads (rr1 results) obtained in Basic Diagnostics 4
-
What operating system and graphics card you are using
-
A photo or video of the issue, if possible
-
A description of the issue and any diagnostics you have already tried
-
Minimal code that reproduces the error (if applicable)
-
Photos of the LEDs on the fibre optic sender and receiver (if using)
The more information you can give us, the faster we can help you get back to doing science. Send us a message at support@vpixx.com.


