The PROPixx projector is designed to suit a range of image sizes and projection distances. In general, the smaller the projected image, the brighter it is. Some PROPixx users, particularly in MRI settings, may find the default brightness settings to be too high. This short VOCAL demonstrates how to reduce the brightness settings on the projector.
Mechanical vs. software-based brightness adjustment
There are two general approaches to adjusting the projector brightness.
First, you can adjust the brightness via a mechanical iris, which is mounted on the lens. Adjusting the slider on the iris changes the iris aperture; the smaller the aperture, the dimmer the display.

The advantages of using a mechanical iris are:
-
Ability to adjust and fine-tune brightness output to desired levels
-
Maintains factory-calibrated D65 white point at all intensity levels
-
Compatible with all specialty video modes and sequencers
The major disadvantage is that the mechanical iris must be purchased separately and installed on your PROPixx. It is not included by default in your order. Contact our sales team if you want to purchase an iris for your projector; please make sure to include the projector's serial number (located on the back of the unit) in your message so that we can identify the correct lens mount for your system.
The second method of reducing PROPixx brightness is to use our software tools to adjust the LED intensities on the projector directly. We offer intensity levels of 100%, 50%, 25%, 12.5% and 6.25%. All intensity levels have been factory-calibrated to maintain a D65 white point. The advantages of software-based brightness adjustment are:
-
Easy to implement
-
No additional purchase required
-
Toggle between multiple discrete levels
-
Brightness settings can be saved as a default power-on setting (only available in LabMaestro)
-
Custom brightness settings (non-calibrated) can be developed and saved on our hardware
The disadvantage to this method is that it is not compatible with all PROPixx high-bit depth video modes and high-speed sequencers. See below for a summary of which modes and sequencers are supported:
|
Video Mode |
Description |
Screen resolution |
Bit Depth (bits per colour)* |
Compatible with digitally-reduced brightness? |
|---|---|---|---|---|
|
C24 |
Standard video mode |
Several |
8 |
Yes |
|
High bit depth colours via custom CLUT |
1920 x 1080 @120 Hz |
16 |
Yes |
|
|
High bit depth grayscale with optional colour overlay |
1920 x 1080 @ 120 Hz |
16 |
Yes |
|
|
High bit depth colour |
960 x 1080 @ 120 Hz |
16 |
Yes |
|
|
RB24 |
High bit depth red/blue stereo |
1920 x 1080 @ 120 Hz |
12 |
Yes |
|
Viewing tool for RB3D sequencer (adds CLUT on green channel) |
1920 x 1080 @ 240 Hz |
8 on main display 16 on console CLUT* |
No** |
|
Sequencer |
Description |
Screen resolution |
Bit Depth* |
Compatible with digitally-reduced brightness? |
|
RGB |
Standard mode |
Several |
8 |
Yes |
|
Greyscale 3D |
1920 x 1080 @240 Hz (120 Hz/eye) |
8 (greyscale)
|
No** |
|
|
High refresh rate colour |
960 x 540 @ 480 Hz |
8 |
Yes |
|
|
Ultra high refresh rate grayscale |
960 x 540 @ 1440 Hz |
8 (greyscale) |
No** |
|
|
High refresh rate grayscale |
1920 x 1080 @ 720 Hz |
8 (greyscale) |
No** |
*Bit depth is based on bits available in software. In practice, the maximum bit depth a display can present depends on its hardware limitations. The maximum bit depth the PROPixx can physically display is 12 bpc. Most console monitors can only present 8 bpc. If a display receives a higher bit depth signal than it can show, the least significant bits (i.e., the smallest increments) are ignored.
**To use these modes at a reduced intensity, use a mechanical iris or calibrate the PROPixx LEDs directly in grayscale mode. See the final section below for details on the latter method.
How to adjust brightness on the PROPixx via software
There are several software tools for adjusting the brightness level on the PROPixx. The PROPixx must be connected to your experiment PC via USB and powered on for these methods to work.
Using our MATLAB API
In MATLAB, the PROPixx intensity levels can be adjusted using these commands:
%Connect to hardware
Datapixx(‘Open’);

%Set the intensity. The intensities and their corresponding brightness levels are:
   % 0: 100.00%
   % 1:  50.00
   % 2:  25.00
   % 3:  12.50
   % 4:   6.25
   % 5: Custom #1
   % 6: Custom #2
Datapixx('SetPropixxLedIntensity', intensity);

%Pass command to hardware
Datapixx(‘RegWr’);
The brightness setting will persist until another setting is applied, or the PROPixx is switched off. On a restart, the PROPixx will return to intensity 0 (100%).
Using our Python API
In our Python API, the PROPixx intensity levels can be adjusted using these commands:
from pypixxlib.propixx import PROPixx

#Initialize PROPixx
ppx = PROPixx()

#Set the intensity. Options are:
# "100%"
# "50%"
# "25%"
# "12.5%"
# "6.25%"
# "Custom1"
# "Custom2"
ppx.setLedIntensity("25%")

#Pass command to hardware
ppx.writeRegisterCache()
The brightness setting will persist until another setting is applied, or the PROPixx is switched off. On a restart, the PROPixx will return to 100% intensity.
Using the LabMaestro Software
LabMaestro is currently only available for Windows.
Step 1: Open the LabMaestro software tool
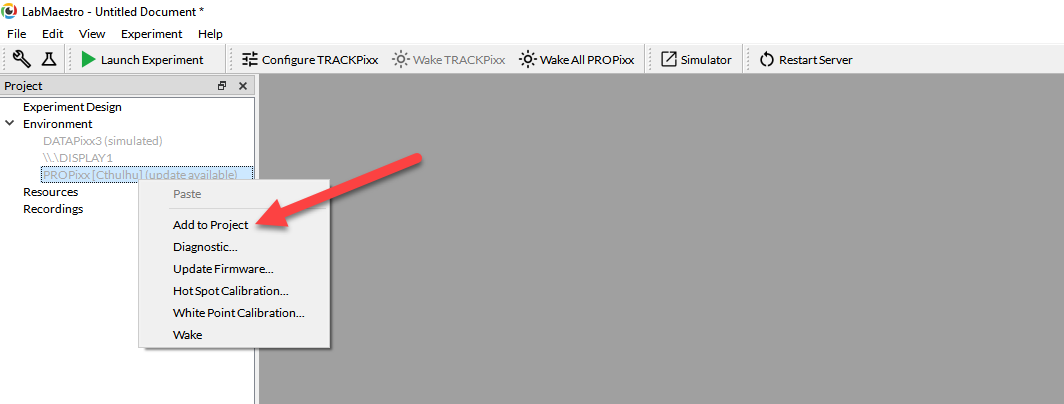
Step 2: Locate the PROPixx in the Project > Environment menu. Right-click on the PROPixx + select “Add to project.” This will open a settings page in the main window.

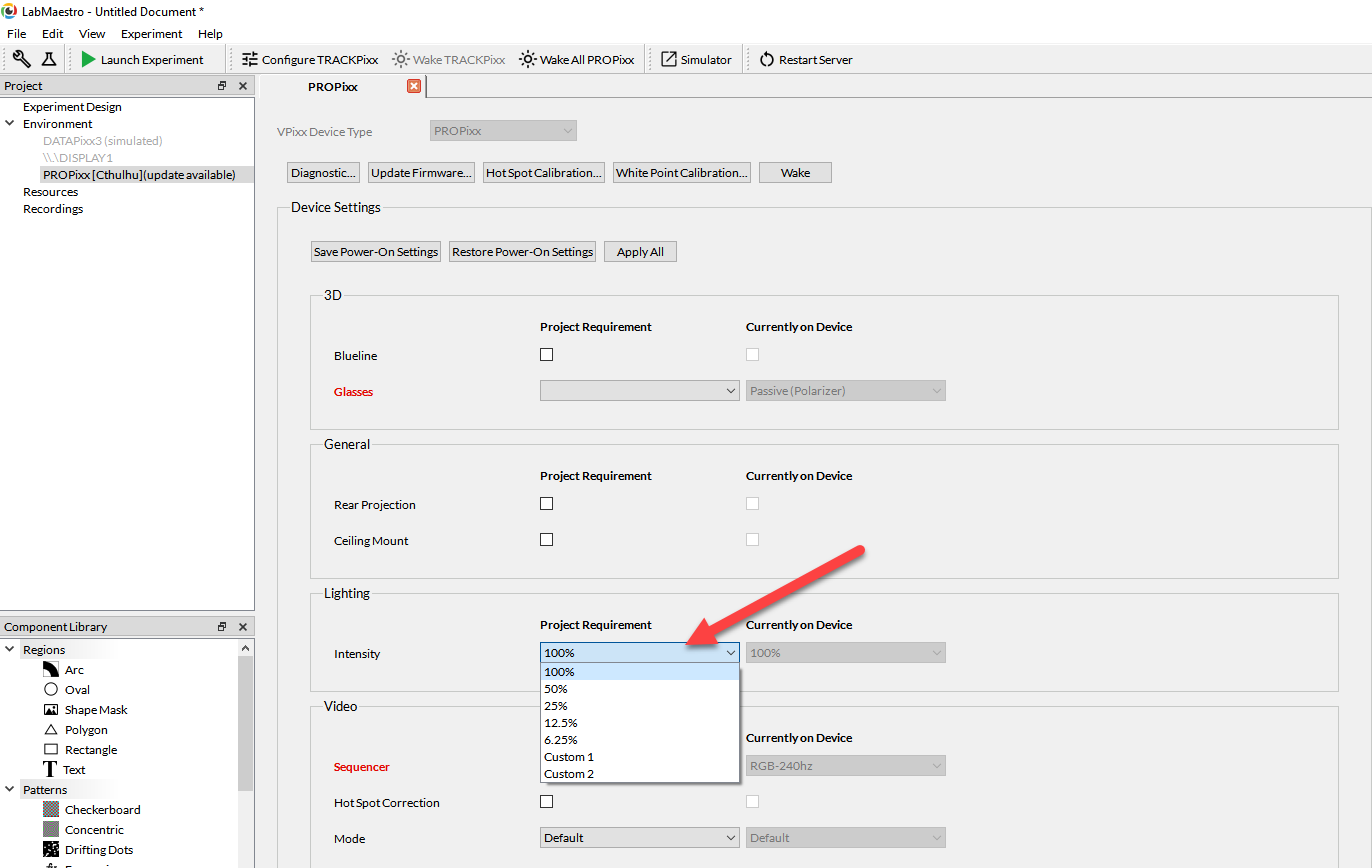
Step 3: In the “Lighting” section of the settings, select the desired intensity from the dropdown menu and select “Apply All”

The brightness setting will persist until another setting is applied, or the PROPixx is switched off. On a restart, the PROPixx will return to 100% intensity, and you will need to re-apply the project settings.
Step 4 (Optional): To save the reduced intensity setting as the default on power-up, press the “Save Power-On Settings.” This will cause the intensity setting to persist even after a projector restart. Saving a default power-on configuration is only an option in LabMaestro.
Using the vputil command line utility
Step 1: Open the vputil command line utility
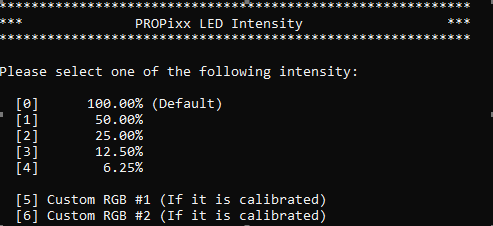
Step 2: Enter the command ppi:

Step 3: Type the number associated with your desired intensity, and hit enter.
The brightness setting will persist until another setting is applied, or the PROPixx is switched off. On a restart, the PROPixx will return to intensity 0 (100%).
Custom brightness settings
Users may wish to develop custom brightness settings, which can be saved and invoked using the Custom Intensity slots shown above. Note that these custom settings are not D65 white-point calibrated. Care should be taken when creating custom intensity levels, and a light meter (colorimeter or spectrophotometer) is strongly recommended. For assistance, please contact us at support@vpixx.com.
Calibrating for greyscale modes and sequencers
Some of our specialty video modes and sequencers (QUAD12x, GREY720, RB3D) are greyscale. The behaviour of the LED chipsets in the PROPixx changes in these modes, and thus any custom intensity calibration performed must also be done in greyscale. For assistance, please contact us at support@vpixx.com.