Invoking pypixxlib in the PsychoPy Builder or a Python IDE
Our tools are not natively supported in PsychoPy’s Builder interface. This means when you need to interact with our hardware you will have to use custom code blocks strategically placed within the experiment flow. These blocks can use either OOP or procedural style code.
While custom code might sound daunting to new experiment designers, remember that these code blocks don’t need to be overly complicated. We offer many examples below you that you can copy or tweak as needed. These code blocks can be reused across multiple experiments accessing the same equipment.
Create custom code blocks in PsychoPy Builder from the Components > Custom > Code Icon

PsychoPy Code Icon
Custom code blocks can be inserted as elements into specific routines in your Experiment Flow. Code blocks also have an additional feature allowing you to specify where in the experiment you would like them to occur.
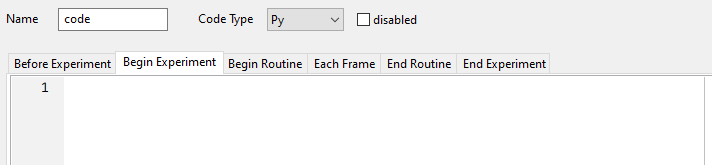
A blank code block editor
Below are some common examples of code which might appear in each one of these positions:
Before Experiment: Connect to VPixx hardware, apply settings changes
Begin Experiment: Apply settings changes, upload waveforms into the VPixx device RAM for playback during experiment (e.g., audio files, digital TTL waveforms, custom analog waveforms), turn on any recording schedules that will be on for the entire experiment (e.g., eye tracking).
Begin Routine: Set up and turn on input recording (e.g., listening for button activity), set up output for immediate playback, or playback with a video-based event (e.g., play audio at the same time as a visual stimulus, send a custom TTL waveform on stimulus onset)
Each Frame: Routinely check hardware for important status changes (like a button press being recorded, or the participant fixating a target). Note: frame intervals are typically <17 ms, so you only have a brief window of time to execute this code; try to keep your code to a bare minimum here.
End Routine: Import recorded data and evaluate it, save any important timestamps, disable recording or playback if needed
End Experiment: Shut down any ongoing recordings, restore hardware defaults, close connection to VPixx hardware
Some examples are given below.
Please note, most of our examples use libdpx procedural commands. These commands can be applied to most of our devices without any need to modify the code. If you prefer to use the object-oriented approach, you can look through our documentation to see what the corresponding commands are.
As a first step before using these examples, please make sure your pypixxlib is up to date. The most recent version of our software tools can be found here: Software Download.
Whenever you insert a code block, remember to ensure the Code Type option selected is “Py” or Python.
Calling pypixxlib commands in a Python IDE
Pypixxlib functions like other site packages in a Python environment. Once you have downloaded our software tools and installed pypixxlib, you will be able to import pypixxlib at the top of your script just like you would other packages (numpy, psychopy, matplotlib, etc).
There are examples of how to import our object-oriented tools or libdpx in the code snippets in the previous section of this guide. You can also find several IDE-based demos in the demo section of our pypixxlib documentation.