Setup
-
To setup a TRACKPixx3 within LabMaestro, confirm that the DATAPixx3 and TRACKPixx3 are detected and added to the project. Refer to Adding VPixx Hardware to a project for more information.
-
This page assumes that the TRACKPixx3 installation has been completed and that users are familiar with its operation principles. Relevant documentation can be found here Principles of TRACKPixx3 operation.
If you use multiple displays in your LabMaestro TRACKPixx3 experiment, please set your displays to ‘extended’ rather than ‘mirrored’ mode. Mirrored displays can cause resolution issues in the current calibration settings.
Navigating to the Configure TRACKPixx Properties
-
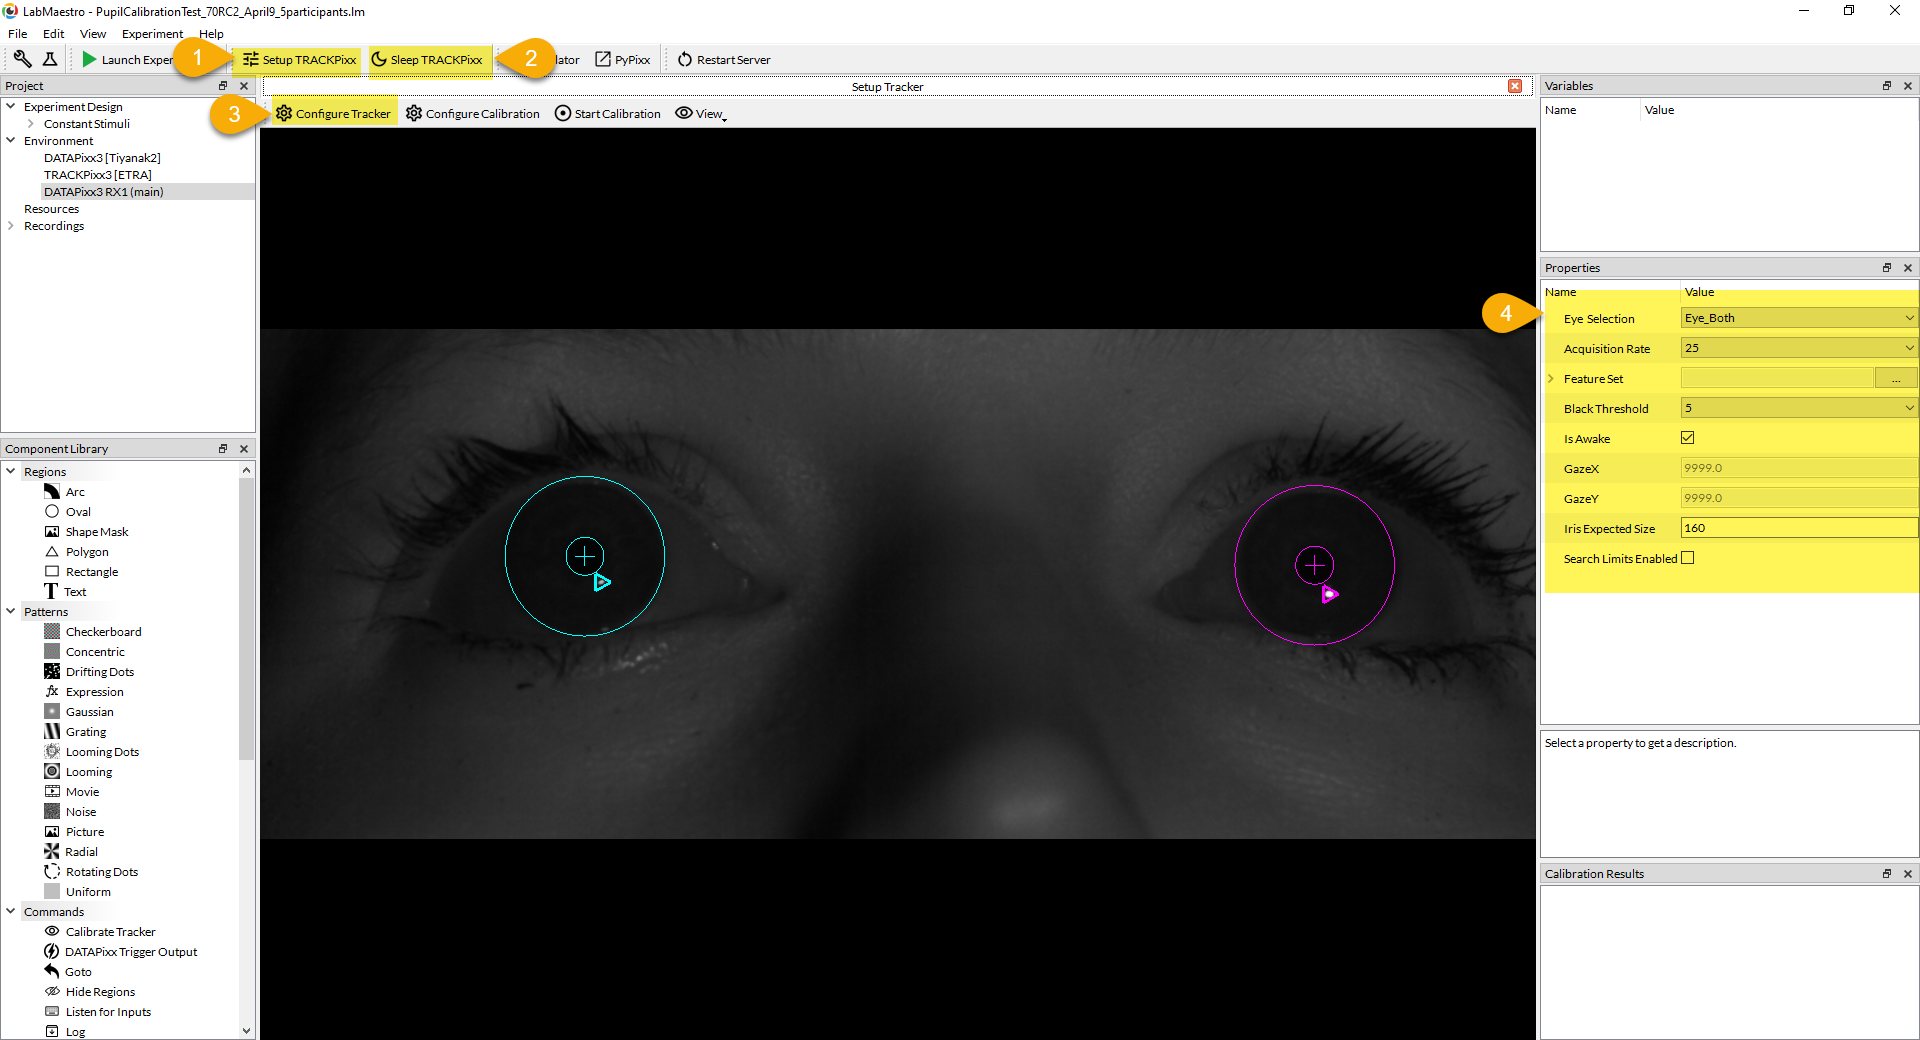
Once the desired DATAPixx3 and TRACKPixx3 required project settings Commands | Calibrate Tracker have been set and applied to the device, click on:
-
Setup TRACKPixx
-
Wake TRACKPixx
-
Configure Tracker
-
Configure Tracker Properties

Configure TRACKPixx Properties
The configure tracker properties are expected to be reviewed and modified on a subject-to-subject basis before launching an experiment, and are neither persistent across LabMaestro sessions, nor saved in LabMaestro Projects Files (*.lm) .

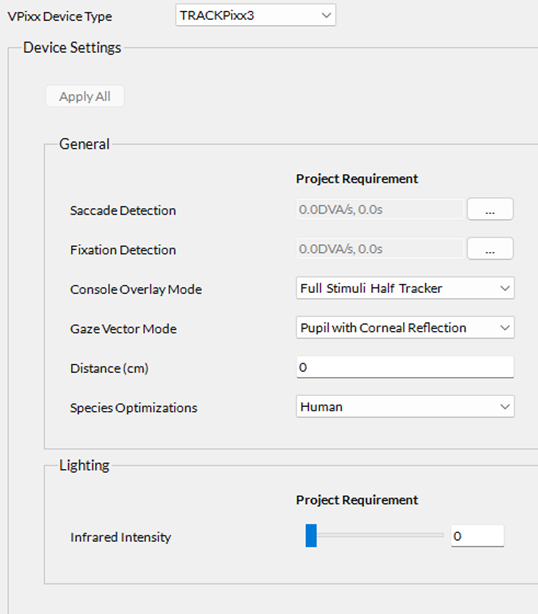
ConsoleOverlay: When a 27" monitor is connected to the "DisplayPort Out 2" port on the DATAPixx3, ConsoleOverlay determines the format of both the stimulus display and TRACKPixx3 camera passthrough view. There are four different views available:
-
FullStimuliNoTracker: Default view.
-
FullStimuliHalfTracker: Recommended view with a TRACKPixx3.
-
HalfStimuliFullTracker: Provides a larger TRACKPixx3 camera view than the FullStimuliHalfTracker.
-
FullStimuliHalftTracker: Both stimuli and TRACKPixx3 camera views are maximized on the console display.
Distance: The distance, in cm, between the TRACKPixx3 camera and the eyes of the participant. In tabletop TRACKPixx3 setups, this distance is often 60 cm.
FixationDetection: Sets the arguments required to generate online fixation flags. Two arguments need to be set:
-
Max Speed: This is the threshold required for fixation detection, in degrees of visual angle (dva/s). A 30 dva/s threshold is recommended for initial setup.
-
Duration: This determines how long the fixation speed must remain below the MaxSpeed threshold before generating the fixation flag, in seconds. This value must be a multiple of 1/2000. A 0.005 s value is recommended for initial setup.
SaccadeDetection: Sets the arguments required to generate online saccade flags. Two arguments need to be set:
-
MinSpeed: This is the threshold required for saccade detection, in degrees of visual angle (dva/s). A 30 dva/s threshold is recommended for initial setup.
-
Duration: This determines how long the fixation speed must remain above the MinSpeed threshold before generating the fixation flag, in seconds. This value must be a multiple of 1/2000. A 0.005 s value is recommended for initial setup.
Infrared Intensity: Set an infrared illuminator intensity. Lowering the IR intensity (or reducing the TRACKPixx3 aperture) might improve eye-tracking quality when spurious corneal reflections are generated on the cornea.
Species optimizations:
-
Human. Standard settings and algorithms for human participants. The infrared intensity selection range is constrained between 0-8 .
-
Non-human primates. Compared to the standard human mode, increases the range of allowable infrared intensity from the illuminator and relaxes a constraint on detected pupil size relative to iris width. This mode may improve tracking with non-human primates and should not be used with human participants.
Gaze vector mode:
-
Pupil with corneal reflection. Standard gaze algorithm which computes a vector between the center of the pupil and the corneal reflection detected on the eye image, below the pupil. This mode requires that participants use head-restriction hardware such as a chinrest.
-
Corneal reflection only. The gaze algorithm computes a vector between the camera image origin and the corneal reflection. The pupil is completely ignored in the gaze-tracking algorithm. Recommend systematic use of search limits. This mode is very sensitive to small head movements and should only be used with head-restriction hardware which provides exceptional head stability.
Configure the TRACKPixx3
NEW! TRACKPixx3 Settings Tuner
In version 1.10 of LabMaestro, we have added a new way to set up your TRACKPixx for new subject.

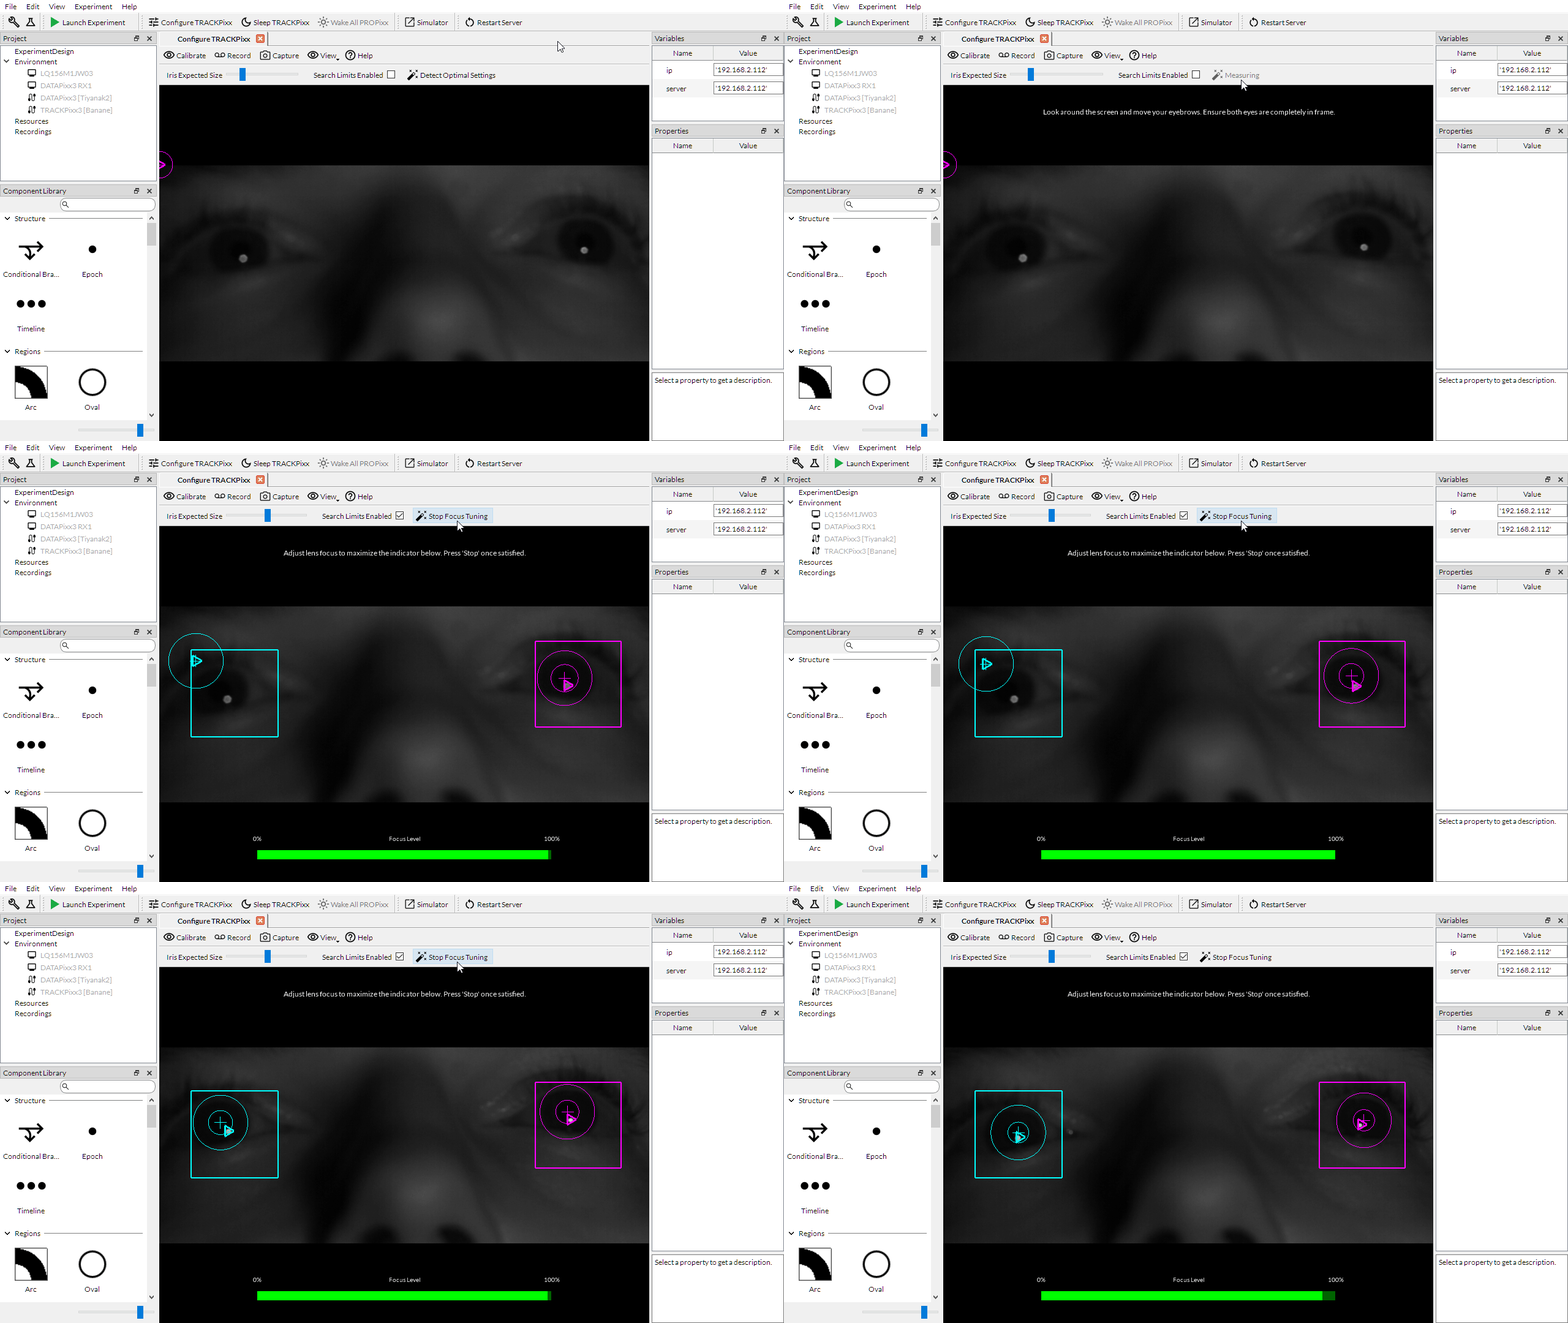
When clicking this option, your participant will be asked to look straight ahead. A detection algorithm will automatically be run on the TRACKPixx visual recording to locate the eyes and define optimal search limits, as well as the expected size of the iris. After this, a bar at the bottom will help you hone the focus of the TRACKPixx perfectly. Once you are done, you can click the Stop Focus Tuning button to stop the focus bar from appearing.
This process will only take a moment and help you start gathering eye-tracking data. If needed, you can then manually adjust some of these parameters to your liking.
Note that this option does not perform a calibration of the device. You will need to start a calibration routine following this. We recommend using Detect Optimal Settings before starting the calibration to ensure that the calibration is done on the same settings as the experiment.

TRACKPixx3 Manual Settings
Once your device settings are set, you can further configure settings to optimize data collection on a participant-by-participant basis. To access these settings:
-
On the toolbar in the top of the LabMaestro window, press Configure TRACKPixx.
-
Press Wake TRACKPixx
You should now see a contextual window open in the center of the LabMaestro interface. From here, you can adjust the following settings:

TRACKPixx3 Device Settings

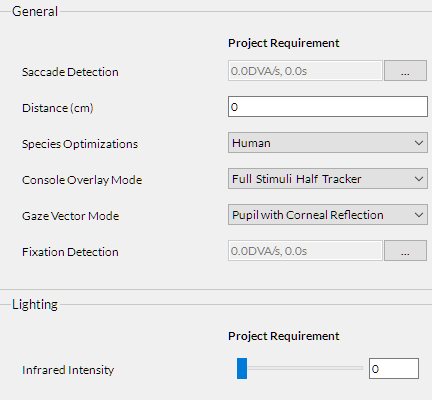
ConsoleOverlay: When a 27" monitor is connected to the "DisplayPort Out 2" port on the DATAPixx3, ConsoleOverlay determines the format of both the stimulus display and TRACKPixx3 camera passthrough view. There are four different views available:
-
FullStimuliNoTracker: Default view.
-
FullStimuliHalfTracker: Recommended view with a TRACKPixx3.
-
HalfStimuliFullTracker: Provides a larger TRACKPixx3 camera view than the FullStimuliHalfTracker.
-
FullStimuliHalftTracker: Both stimuli and TRACKPixx3 camera views are maximized on the console display.
The FixationDetection function sets the arguments required to generate online fixation flags. Two arguments need to be set: • MinSpeed: This is the threshold required for fixation detection in degrees of visual angle (dva/s). A 30 dva/s threshold is recommended for initial use. • Duration: This argument determines how long the fixation speed must remain below the MinSpeed threshold before generating the fixation flag, in seconds. The value must be a multiple of 1/2000. A 0.005 s value is recommended for initial use.
Distance: The distance, in cm, between the TRACKPixx3 camera and the eyes of the participant. In tabletop TRACKPixx3 setups, this distance is often 60 cm.
FixationDetection: Sets the arguments required to generate online fixation flags. Two arguments need to be set:
-
Max Speed: This is the threshold required for fixation detection, in degrees of visual angle (dva/s). A 30 dva/s threshold is recommended for initial setup.
-
Duration: This determines how long the fixation speed must remain below the MaxSpeed threshold before generating the fixation flag, in seconds. This value must be a multiple of 1/2000. A 0.005 s value is recommended for initial setup.
SaccadeDetection: Sets the arguments required to generate online saccade flags. Two arguments need to be set:
-
MinSpeed: This is the threshold required for saccade detection, in degrees of visual angle (dva/s). A 30 dva/s threshold is recommended for initial setup.
-
Duration: This determines how long the fixation speed must remain above the MinSpeed threshold before generating the fixation flag, in seconds. This value must be a multiple of 1/2000. A 0.005 s value is recommended for initial setup.
Infrared Intensity: Set an infrared illuminator intensity. Lowering the IR intensity (or reducing the TRACKPixx3 aperture) might improve eye-tracking quality when spurious corneal reflections are generated on the cornea.
Species optimizations:
-
Human. Standard settings and algorithms for human participants. The infrared intensity selection range is constrained between 0-8 .
-
Non-human primates. Compared to the standard human mode, increases the range of allowable infrared intensity from the illuminator and relaxes a constraint on detected pupil size relative to iris width. This mode may improve tracking with non-human primates and should not be used with human participants.
Gaze vector mode:
-
Pupil with corneal reflection. Standard gaze algorithm which computes a vector between the center of the pupil and the corneal reflection detected on the eye image, below the pupil. This mode requires that participants use head-restriction hardware such as a chinrest.
-
Corneal reflection only. The gaze algorithm computes a vector between the camera image origin and the corneal reflection. The pupil is completely ignored in the gaze-tracking algorithm. Recommend systematic use of search limits. This mode is very sensitive to small head movements and should only be used with head-restriction hardware which provides exceptional head stability.
LabMaestro Components for the TRACKPixx3
Here are the currently available components that specifically use the TRACKPixx:
Calibrate Tracker
Calibration routine for eye tracker. Specify the number of target dots and other details of the calibration procedure. The Calibrate Tracker command displays visual targets at pre-determined screen coordinates, and sample eye tracker data accordingly. Eye-tracking calibration is necessary to collect and report data in a calibrated screen pixel space. All parameters defined in the Calibrate the TRACKPixx3 section above are customizable. For more information, see .
Validate Tracker
Validation routine for VPixx eye trackers. Used after . This should be used after a set number of trials during extended testing sessions to ensure your calibration does not drift from the participant moving or adjusting position. If your validation is of poor quality, it is often a good idea to recalibrate the tracker.
Known Issue
The feedback screen of the Validate Tracker component does not properly show when called from a LabMaestro Epoch. This will be fixed in an upcoming release.
Start Recording Tracker
Initiates a TRACKPixx recording schedule. With a TRACKPixx3, this initiates a 2Khz binocular TRACKPixx3 recording schedule with the DATAPixx3’s microsecond precision clock and integrated video I/O subsystem. With a TRACKPixx/mini, this initiates a 120 Hz binocular recording.
Stop Recording Tracker
Stops recording of your eye tracking data. This exports your data to a filename you can specify. The default is “TrackerData”.
The TRACKPixx3 Object
When a TRACKPixx is included in a LabMaestro project, you can refer to specific parameters of the tracker object through the Tracker global variable. The name of this object is always Tracker and cannot be changed. Though not visible in the LabMaestro interface, it can be called in expressions. Here are the following properties you can refer to through the Tracker object. More will be added in the future.
-
isAwake (Boolean): Returns true if Tracker is awake, false otherwise.
-
gazeX (Float): Current average X position of the left and right eyes. Uses the VPixx coordinate system (Cartesian and in pixels, where 0,0 is the center of the screen). If a single eye is tracked, gazeX reports the x position for that eye.
-
gazeY (Float): Current average Y position of the left and right eyes. Uses the VPixx coordinate system (Cartesian and in pixels, where 0,0 is the center of the screen). If a single eye is tracked, gazeY reports the y position for that eye.
Note that gazeX and gazeY value updates at an approximate rate of 15 - 20 Hz and should only be used for online experiment management, not for offline data analysis.
TRACKPixx3 Special Expressions
The following TRACKPixx3-specific expressions are supported in LabMaestro:
You must be recording TRACKPixx3 data for these commands to work.
|
Operation |
Syntax |
Example |
|---|---|---|
|
Fixation |
fixation(ScreenX, ScreenY, Threshold) |
=fixation(10, 50, 100) will return True if the GazeX (same value as returned by tracker.GazeX) is within 10 +/- 100, and GazeY is also within 50 +/- 100, and the subject is currently fixating. Otherwise returns false. Note: As of 1.9, all values are in pixels. This function is based on the current gaze location. It does not matter if the gaze is fixed or moving. Consider checking that the fixation flag is also high whenever a true fixation inside the region of interest is required. |
|
Gaze Position |
gazeAt(ScreenX, ScreenY, Threshold) |
=fixation(10, 50, 100) will return True if the GazeX (same value as returned by tracker.GazeX) is within 10 +/- 100, and GazeY is also within 50 +/- 100. Otherwise returns false. Note: Only available as of 1.10 |
|
Fixation without Location |
isFixating() |
=isFixating() will return True if the subject is currently fixating. |
For more comprehensive examples of tasks using the TRACKPixx in LabMaestro, please refer to the following demos: