This guide will cover how to use the VIEWPixx3 /OLED monitor and 3DPixx active shutter glasses as a stereoscopic display. Some code examples are provided at the end. Note that this resource applies specifically to using the XPANDvision model of 3DPixx active shutter glasses, directly with the VIEWPixx3 /OLED; only this particular model of the 3DPixx glasses will work with the VIEWPixx3 /OLED. Additional modes may soon be available when the DATAPixx3 is added. Contact scientist@vpixx.com for information.
The VIEWPixx3 /OLED display is optimized for displaying stereoscopic 3D or dichoptic stimuli via frame-sequential presentation of left- and right-eye images, while synchronously driving a pair of active LCD shutter glasses to isolate each eye’s image to the intended eye.
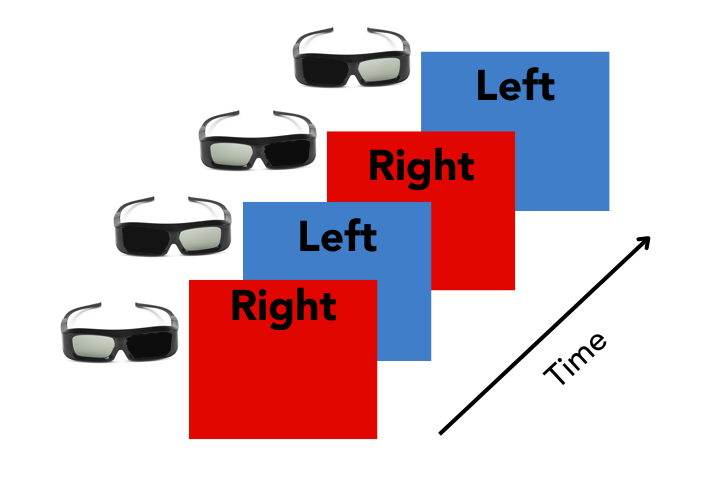
The 3DPixx active shutter glasses are synchronized to a Radio Frequency (RF) signal transmitted by an RF emitter, which interfaces with the VIEWPixx3 /OLED monitor via a VESA 3D port on the bottom of the display; the transmitted RF signal, is in turn synchronized to the display’s frame-alternation.

Since the VIEWPixx3’s OLED panel has intrinsically rapid pixel response times, with rise and fall times on the order of tens of microseconds, there is a high degree of interframe independence, which translates to extremely low levels of cross-talk (~0.23%). Cross-talk is the imperfect separation of the two eyes' images during dichoptic presentation.
The frame-alternation occurs at the display's refresh rate, 120Hz; therefore, each eye’s image can be updated at a rate of 60Hz. To achieve this, the display must receive both the left- and right-eye images at a rate of 60Hz (every ~16.67ms). On the VIEWPixx3 /OLED this is accomplished using Top-Bottom mode.
Top-Bottom Mode
In Top-Bottom mode, left- and right-eye images are stacked on top of one another in a single double-height video frame (2560 x 2880). This composite frame is passed to the display at 60 Hz. The display hardware deconstructs and presents the left- and right-eye images sequentially (2560 x 1440 @ 120 Hz).
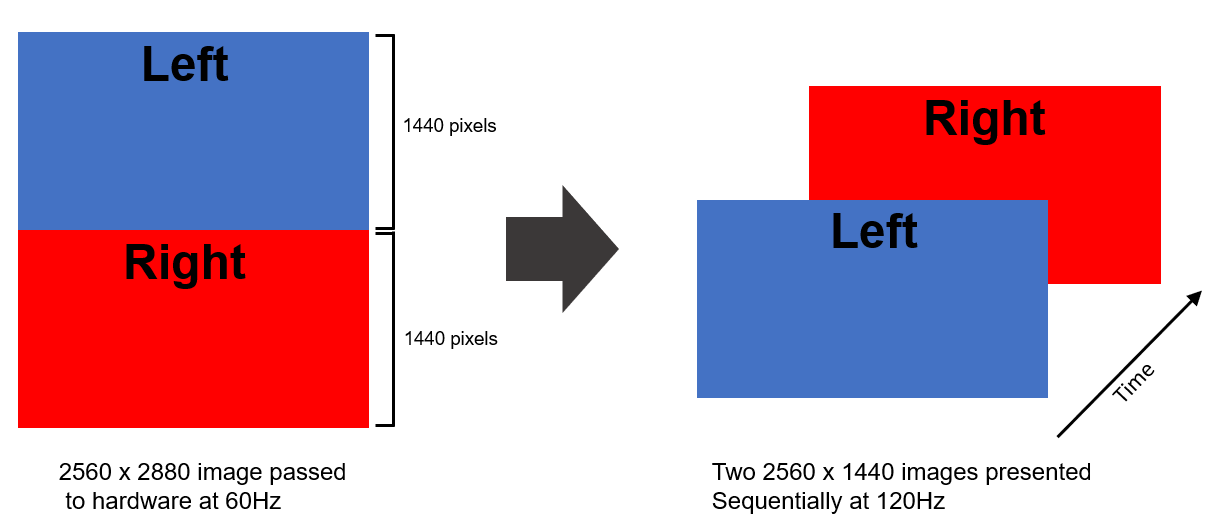
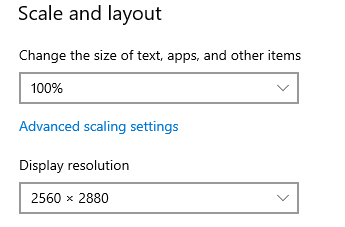
Top-bottom mode can be enabled on the VIEWPixx3 /OLED by simply setting the monitor’s resolution at 2560 x 2880, in your operating system’s display settings menu; once this is done, the monitor will immediately start displaying the top and bottom halves of the 2560 x 2880 @ 60Hz frames sequentially at 120Hz. Ensure the screen scaling is set to 100% in your operating system, as incorrect scaling may cause display issues.
Below, we provide examples of how to generate simple stimuli for dichoptic presentation on the VIEWPixx3 /OLED in Top-bottom 3D mode.
Unity Example
-
In the Scene view, create an empty GameObject named Anchor. Attach two child cameras, LeftEyeCamera and RightEyeCamera.

-
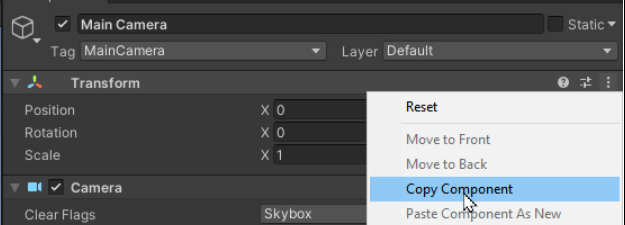
Adjust Anchor’s transform components to match that of the scene’s Main Camera. You can do this by selecting the three dots icon in the corner of the Transform component of the Main Camera, and selecting ‘Copy Component.' Select Anchor, click on the three dots in the Tranform Component, and select ‘Paste Component.’
-
Delete the Main Camera.
-
Offset the x position of both the LeftEyeCamera and RightEyeCamera by the 1/2 interpupillary distance each. You may want to write a script to adjust this dynamically for each participant.

-
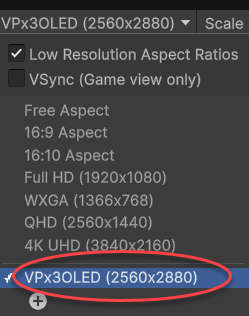
In the Game view, add a new resolution for the VIEWPixx3 OLED that is 2560 x 2880 pixels.
-
Modify LeftEyeCamera so that it renders only in the top half of the display. To do this, set the LeftEyeCamera Viewport Rect Y value to 0.5.
-
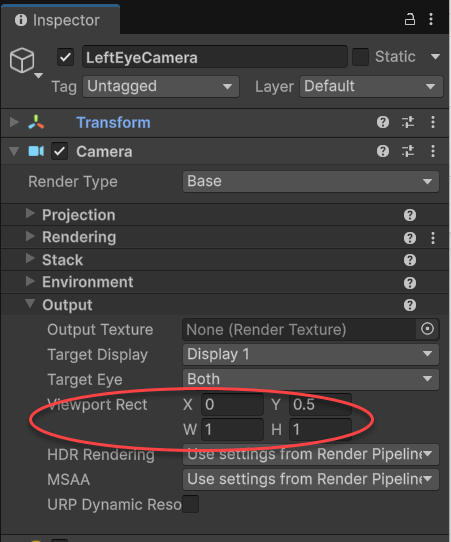
Repeat this process for RightEyeCamera and the lower half of the display. Set RightEyeCamera Viewport Rect H to 0.5.

-
You should now have a Game view with the left and right eye perspectives stacked vertically. This video will be passed to the VIEWPixx3/OLED and converted into an alternating-frame stereo presentation. The black band will not appear in the final stimulus.

Setting up the console monitor for Top-Bottom Mode
The VIEWPixx3 /OLED includes a DisplayPort output which mirrors the main video input, allowing you to connect an optional console display for experimenter viewing. There is no additional load on the GPU associated with this console display: duplication happens inside the VIEWPixx3 /OLED, after the video leaves the graphics card. We recommend using a console display to monitor participant behaviour and experiment progress without altering visual stimulus timing. The minimal requirement for the console monitor is that it must support 2560 × 1440 @ 60+Hz video.
When using the VIEWPixx3 /OLED in top-bottom 3D mode, the console monitor can be configured to display only one eye’s image (either left or right), or to alternate between the left and right eye images at a rate of 60Hz (30Hz per eye), acceptable for most third-party LCD monitors. Since the alternation happens at 30Hz per eye, the alternation between images is much more noticeable as a “flicker”; for this reason, the default for the console monitor in top-bottom mode is to show only one eye’s image (the left eye only), rather than alternating.
The following are examples of how to set the top-bottom mode of the console monitor in Matlab and Python.
Summary
In this VOCAL we described how stereoscopic 3D, or dichoptic, stimuli are presented on the VIEWPixx3 /OLED, in combination with the 3DPixx active shutter glasses. We covered the top-bottom mode setting which enables left- and right-eye images to be simultaneously sent on video frames, to be displayed sequentially by the VIEWPixx3 /OLED. Finally, we provided simple examples on how to generate dichoptic stimuli for top-bottom mode on the VIEWPixx3 /OLED, for Matlab/PsychToolBox, Python/PsychoPy and Unity. Now you should be able to generate and display your own stereoscopic 3D, or dichoptic, stimuli with the minimal cross-talk and striking display quality provided by the VIEWPixx3 /OLED monitor.