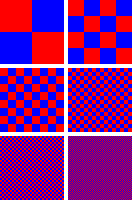
This guide contains images that may affect photosensitive viewers. They are hidden within expanding sections by default, and warnings are given. If you experience nausea or headache when viewing these examples, please close the section and rest your eyes.
Dithering occurs when a graphics card alters the colour value of a pixel on the display by +/- 1 step. Dithering exists to improve image quality for commercial displays, but can be a nuisance for vision research. It can also disrupt the one-to-one mapping between pixel value assignment and display output required for some of VPixx’s synchronization tools to work properly. Unfortunately, dithering is not always easy to detect or disable.
In this guide, we will cover the basics of what dithering is and why it exists. We will provide several methods for detecting dithering using our own tools and those available through MATLAB/Psychtoolbox. Lastly, we will cover how to disable dithering on your experiment computer.
This guide is not exhaustive. It is intended to provide a starting point for researchers wishing to troubleshoot problems in their graphics pipeline and the synchronization errors that can arise as a result. We encourage researchers to try the steps below to help identify and correct problems in their own systems. If dithering problems persist, we strongly recommend browsing the Psychtoolbox forums for additional insights into graphics pipeline related issues.
If you are planning to upgrade your current graphics card and are looking for recommendations, please see our dedicated page on graphics cards.
What is dithering?
For the purposes of video, dithering is an intentional oscillation of a pixel’s RGB values across multiple video frames (temporal dithering) and locations on the screen (spatial dithering). This is a process that is applied by your graphics card after the pixel’s value has been set by your experiment software.
Usually, dithering alters the RGB values of a pixel by +/- 1 bit. So, on a given sequence of frames, a gray pixel with the colour value [126, 126, 126] may be temporally dithered to [127, 127, 127] for a frame before reverting back to [126, 126, 126].
Flickering of pixel values above the flicker fusion frequency is undetectable to the human eye, and viewers will integrate luminance and colour properties across rapid sequences of video frames into a single, stable percept. By oscillating between two bitwise steps in the display’s colour output, a screen can thus generate a perceived colour value that is intermediate between the two displayed levels. This is an effective way to simulate a higher bit depth than the screen is physically capable of, and reduce perceptual artefacts like Mach banding.
In addition to temporal dithering, spatial dithering scatters jittered pixel values across the display. Spatially dispersed dithering also takes advantage of the summation properties of human perception to simulate additional colour or grayscale depth in an image.
Consequences for VPixx synchronization tools
Several of VPixx’s synchronization tools rely on pixel identity passthrough, i.e., a one-to-one pixel value assignment and screen output mapping.

Dithering can disrupt this mapping and cause these tools to stop working properly. Three major tools affected by dithering are Pixel Sync, Pixel Mode and hardware colour lookup tables (CLUTs).
Many other graphics manipulations can affect pixel identity passthrough, with a similar impact on VPixx tools. For a guide to other types of disruptions to pixel identity passthrough, see this guide: What is Pixel Identity Passthrough?
Dithering and Pixel Sync: -1010 and timeout errors
VPixx’s register-based synchronization system allows users to change multiple device settings in a single write command to VPixx hardware. All setting changes are enabled simultaneously, allowing users to send triggers, begin audio playback, commence data acquisition and more, all at the same time.
Register writes and updates can optionally be locked to the onset of specific events in the video signal. The ‘RegisterWritePixelSync’ (write command) and ‘RegisterWriteReadPixelSync’ (update command) indicate that the next settings change should occur when a custom sequence of pixels, or sync trigger, is detected by the acquisition system.
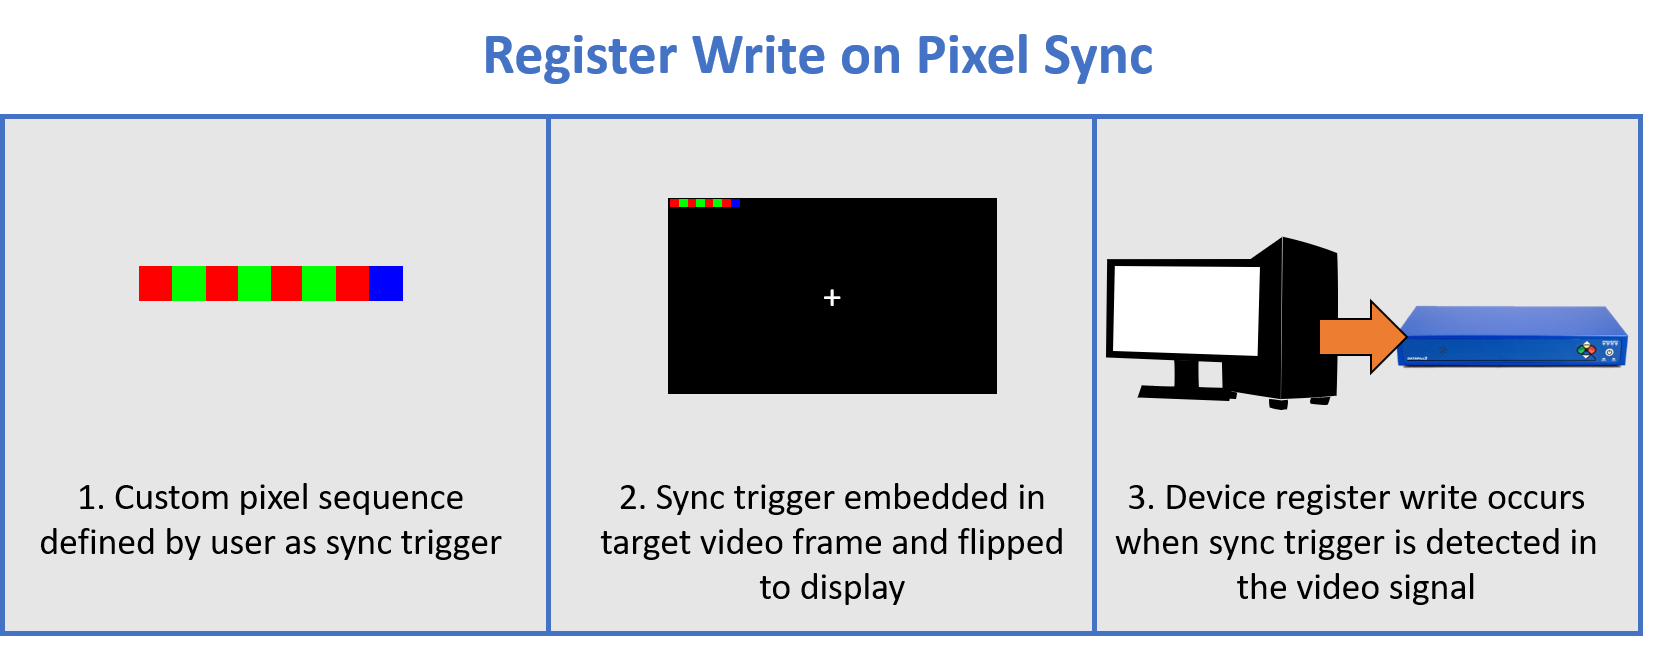
When the experiment software invokes a Pixel Sync command, the VPixx device immediately enters a busy state and waits until it detects the sync trigger in the video signal.
If the command is an update, it will block all subsequent lines of your code until either the sync trigger is detected or the system times out. Then, the device will return its status and the code can continue.
However, if the command is write-only, your software is able to continue executing subsequent lines in your script while the VPixx device is busy waiting for the sync trigger or timeout.
While the device is busy, any further attempts to communicate with it (e.g., by additional register writes) will be queued until the device becomes available. Repeated communication attempts can throw a -1010 error in MATLAB, and can even cause your experiment software and VPixx device server to crash.
If your graphics card is dithering output, the sync trigger may be compromised. In this case Pixel Sync will not find its target sync trigger and will proceed to timeout. Not only does this break synchronization, it can also throw errors and crash your software if you repeatedly query the device while it is still busy waiting for timeout.
Psychtoolbox commands that have the format PsychDataPixx(‘ ‘) may invoke Pixel Sync as part of their behaviour. If you are receiving timeout or timing errors in the absence of an explicit Pixel Sync in your experiment code, check to see whether one of these commands might be calling it in their definition.
Dithering and Pixel Mode: Unexpected Trigger Values
Pixel Mode is a method of automatically generating digital TTL triggers. There is an in-depth VOCAL guide to Pixel Mode and how it works here.
In brief, Pixel Mode works by reinterpreting the RGB value of the top left pixel on the display as a 24-bit TTL state. This state is applied to the device’s digital output port, and it remains until the pixel value changes.
Pixel Mode reads the video signal directly. It does not matter what program is used to draw the Pixel Mode pixel, as long as it appears in the right place on the screen. Pixel Mode is a great way to automate frame-accurate TTL triggers with any experiment software and no programming required. You can even use it with PowerPoint!
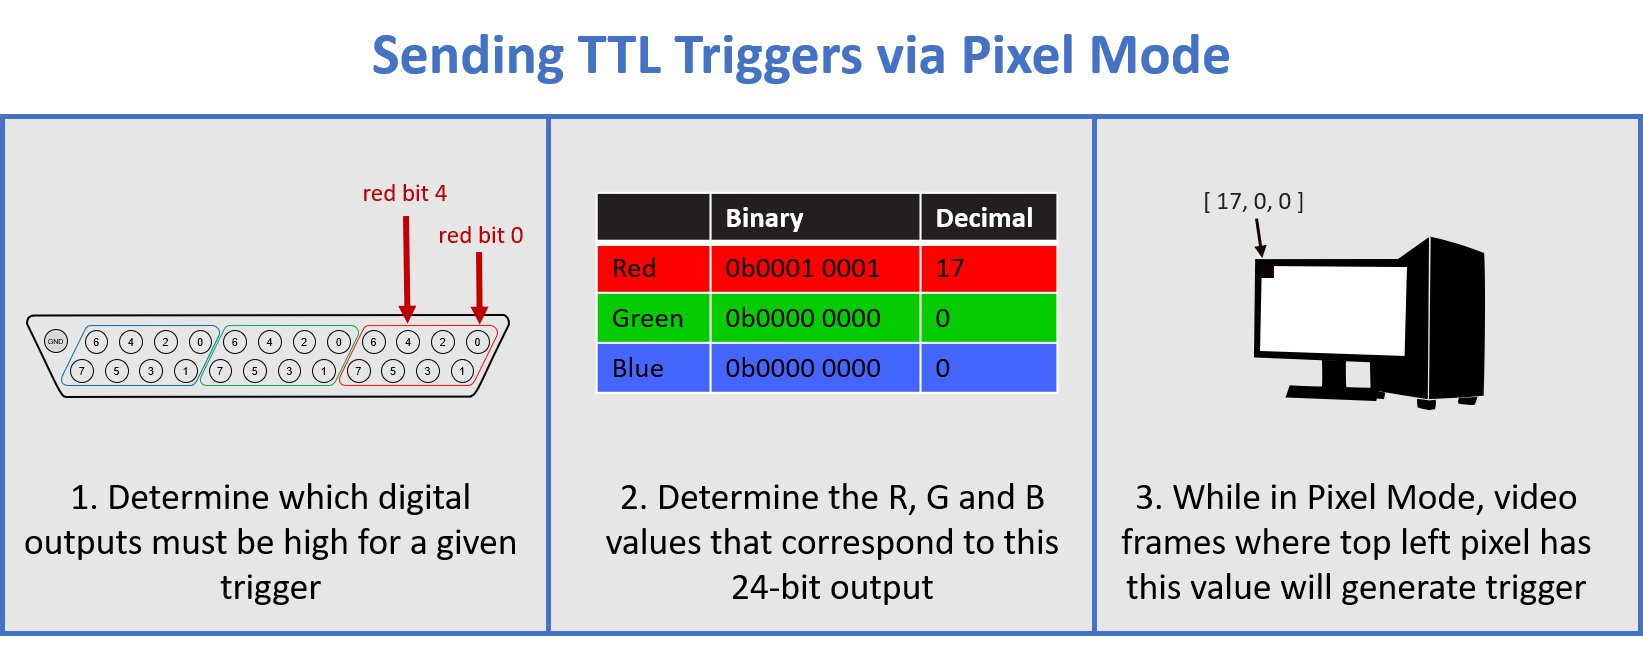
The consequences of dithering for Pixel Mode can be disastrous. Triggers are based on video output; dithering jitters this output, and so dithering will jitter your trigger values as well. This is particularly bad when the trigger value happens to correspond to a binary representation that is on the cusp of the next significant bit, e.g. from 7 (0b111) to 8 (0b1000). In this case, dithering can cause an entire swath of pins to change state, as the example below demonstrates.

Dithering and Colour Lookup Tables (CLUTs): Colour value reassignments
A CLUT is a list of pre-defined colours that the graphics pipeline consults when drawing images. CLUTs are typically 3-column tables of red, green and blue pixel values. When setting up a display, the user can optionally tell the graphics pipeline to use a specific CLUT to set the final colour output. The CLUT may contain values, for example, that are gamma corrected such that the display’s output will have a linearly increasing luminance.
Once a CLUT is enabled, images are assigned a colour value that corresponds to a row in the CLUT. The graphics pipeline will then generate an image with the RGB colour values listed in that row.
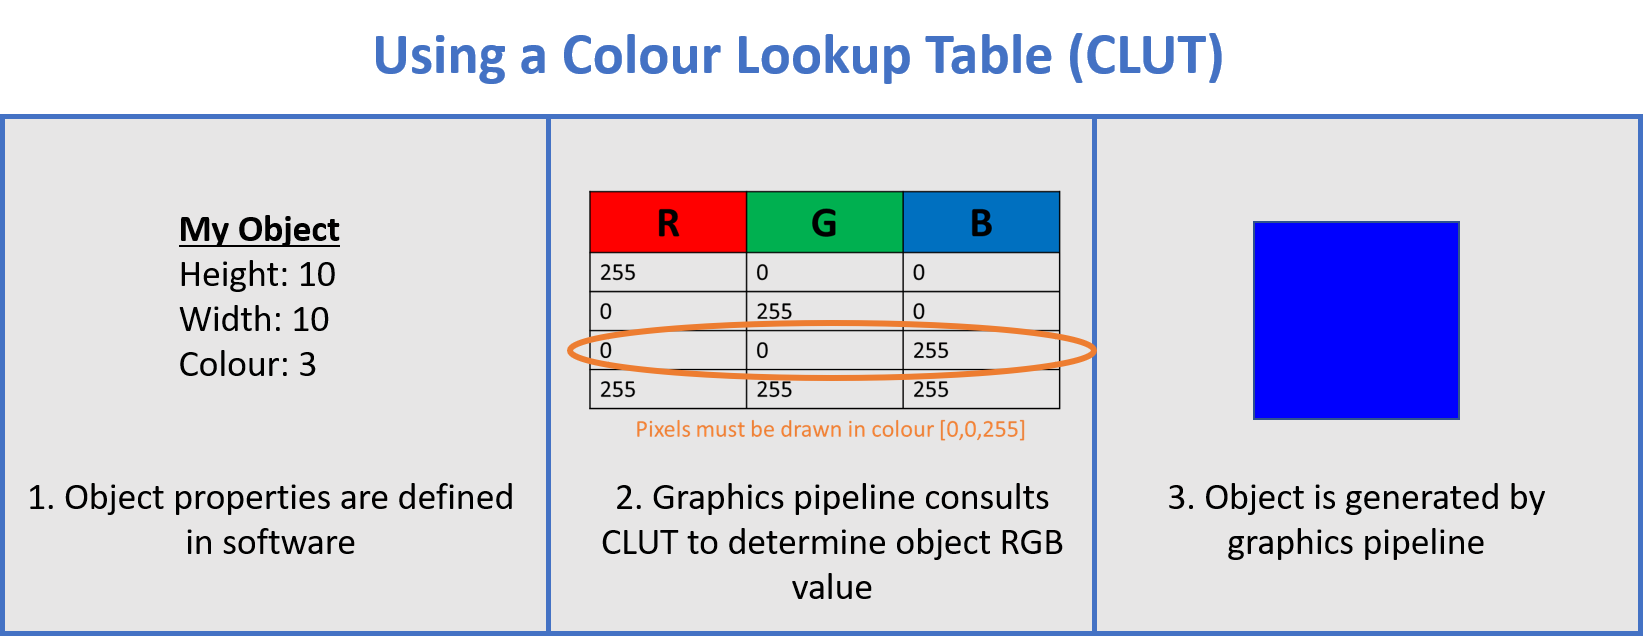
CLUTs can be invoked at multiple levels in the graphics pipeline. They may be implemented in software before the image data is passed to the graphics card, or they may be used by the GPU itself.
Some of VPixx’s special video modes, like M16 mode, make use of custom CLUTs that are loaded directly into our hardware. In this case, the graphics card draws the initial image and passes it to the display. The display hardware then interprets the image’s colour as an index to a CLUT stored on the device, and presents the image with the colour value specified in that CLUT. This strategy allows VPixx displays to overcome bandwidth limitations inherent in the video transmission protocol.
Of course, if your graphics card is dithering output, this poses a problem for hardware CLUTs. You may set your image colour to a specific value, with the goal to index a particular row in the hardware CLUT. If this value is dithered by your graphics card, it will end up pointing to a different row in the CLUT and your image will drawn in the wrong colour.
Diagnosing dithering in your graphics pipeline
There are several ways to diagnose dithering in your graphics pipeline. Below are some different methods you can try. Note that these methods require specialized hardware to measure the video output after it leaves the GPU. As such, you need to use VPixx equipment during your tests.
Using LabMaestro (Windows and Linux)
Requires software revision 1.8 or higher (Windows) or 1.9 or higher (Linux). To download our most recent software tools, see Software Download & Information
Open LabMaestro with your display connected and powered on.
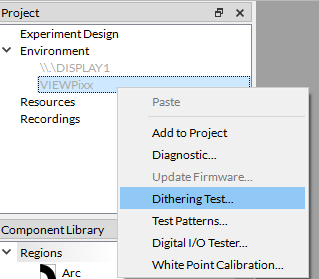
Right-click the display in the Environment section of the Project Panel on the left side of the program interface, and select Dithering Test.
The dithering test widget will open, and a narrow bar of colour gradients will appear across the top of your display. Use the dropdown menu in the widget to select the correct display and run the test. Any discrepancies in the display output will be reported in the righthand results column.

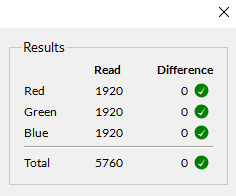
Note that closing the widget will also remove the coloured bar at the top of the display.
Using the built-in tools in Psychtoolbox (all operating systems)
The creators of Psychtoolbox have created a low level test for dithering, which is included in the toolbox download. Simply open MATLAB with your VPixx device connected and powered on, and enter the following:
DatapixxGPUDitherpatternTest
The test will output its assessment to the command window. The documentation for this function can be found here.
Using the vline command (all operating systems)
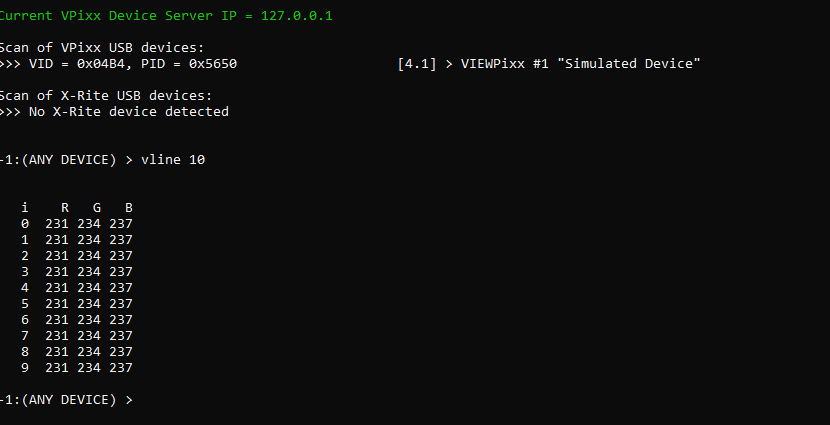
Our software API includes a command called “vline,” which returns the RGB values of the top line of pixels on the display. Vline will show the output values as they are received by the screen; if there is a mismatch between your expected output and the values returned by vline, this is evidence of dithering.
Our MATLAB/Psychtoolbox and Python APIs both include a vline command, as does our command-line program VPutil. Use the tabs below to see code example for how to run a vline test using one of these tools and a simple grayscale ramp. You may wish to alter the tested RGB values for further diagnostics.
We strongly recommend running this code several times in a row, as dithering is inconsistent across frames and may require a few runs to detect.
Using VPutil (macOS)
-
Use software of your choice (e.g., Microsoft Paint, Powerpoint) to display a window with no border across the top of the display.
-
Open VPutil with the device connected and powered on.
-
Type ‘vline ‘ where is a value between 1 and maximum horizontal resolution, and hit enter.
Disabling dithering
If you detect dithering by your GPU, you will need to disable it. Below are a few methods to try. After each attempt, it is a good idea to run one of the tests listed in the to double-check that dithering has been properly disabled.
Using Psychtoolbox (all operating systems)
Psychtoolbox has invested serious time and effort developing tools for graphics pipeline management. If you have a copy of MATLAB (or Octave) with the Psychtoolbox installed on your test computer, you can run the following commands to attempt to turn off any dithering detected in your system.
Linux users should run PsychLinuxConfiguration prior to these steps to ensure a proper set up. You will need to reboot your system for any changes in configuration to take effect.
BitsPlusImagingPipelineTest;
This first test will prompt you with which device you are using; enter ‘d’ for any VPixx hardware. The test will then launch a comprehensive graphics pipeline assessment. It will create a sequence of onscreen windows and may take a minute or so to complete. Summary output and any errors will be printed to the command window.
Following this test, you may also run:
BitsPlusIdentityClutTest([], 1);
This will select a graphics card CLUT, and display content on the screen using the specified colour mapping. If everything is working well, you should see text that changes colours, with a central square that rotates quickly and smoothly. There should be no jittering or randomly shifting pixel values aside from the text.
If this is not what you see, you can try cycling to another CLUT by pressing the space bar, and try to find one which does not use any dithering. Once you hit Escape to exit the test, you must save the selected CLUT by answering ‘y’ to the prompt in the command window.
Using your graphics card control panel
Most graphics cards have a manufacturer-specific control panel or settings manager that allows you to manually adjust graphics output characteristics. Some of these managers have explicit options to disable/enable dithering. For example, NVIDIA X Server Settings for Ubuntu (using the NVIDIA proprietary drivers) has a pane under their GPU ‘Controls’ tab that lets the user turn off dithering via drop down menu.
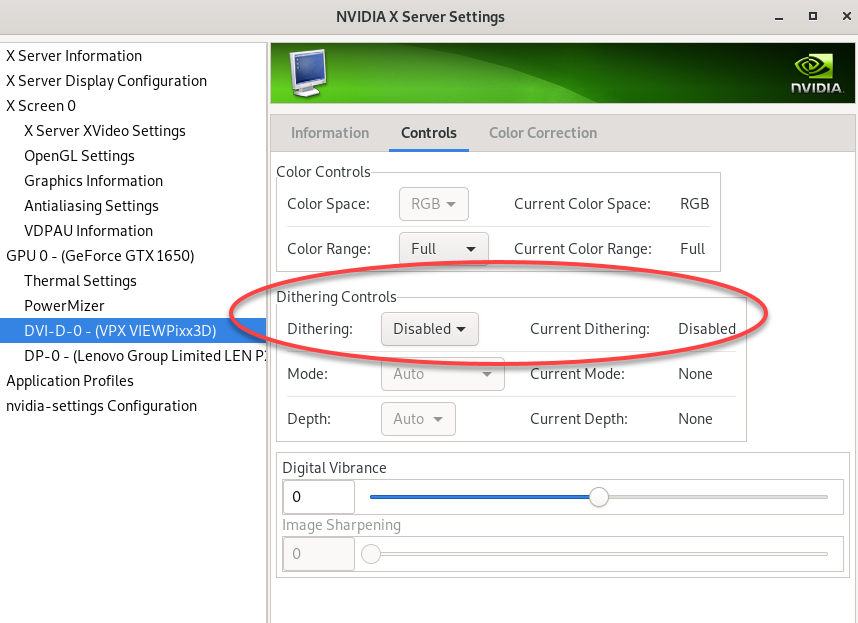
The exact location of these options is highly graphics card and OS specific. You may need to dig around in your graphics card settings to find the option to disable dithering, if it exists.
Manually disabling dithering is not guaranteed to shut it off, especially if you have multiple screen configurations. We strongly recommend testing for dithering after changing your settings, to verify the change was actually applied to the configuration you are using in your experiment. You should also test to ensure the changes persist after a full system reboot, as they may revert to a default on restart.
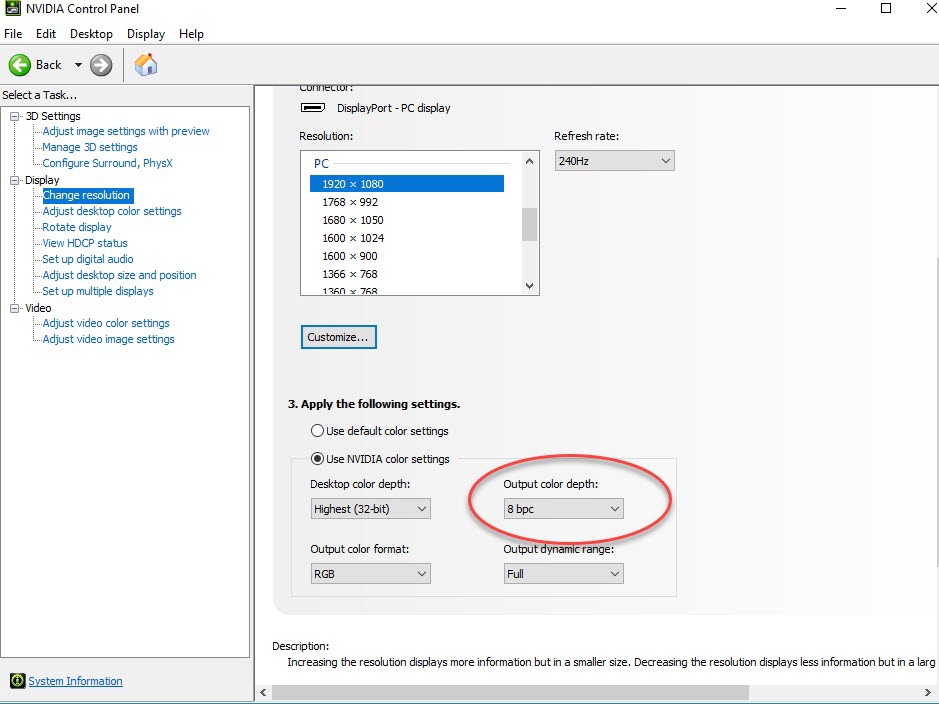
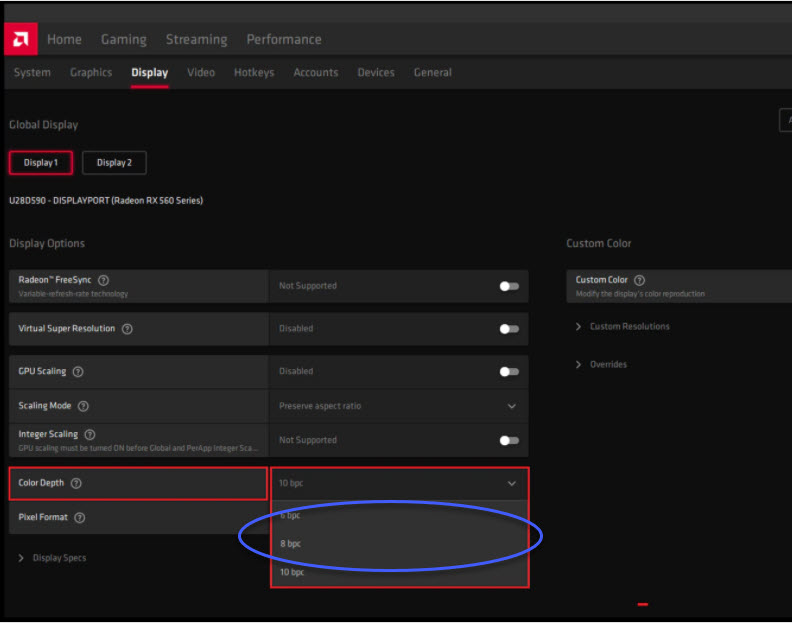
In some cases, there may not be an explicit method for disabling dithering, but you can adjust your graphics card settings in order to effectively turn it off. This is true for a lot of Windows graphics card settings. Rather than having an explicit reference to dithering, they instead allow the user to set the bit depth under the ‘color settings.’ Setting your output colour depth to 8 bpc (bits per colour) can discourage your graphics card from trying to dither its way up to a higher bit depth.
Editing registry and configuration files (Windows and Linux)
Below are some more advanced methods of disabling dithering on Windows and Linux systems. Proceed with caution!
These methods vary by graphics card brand, and in some cases by the specific graphics card drivers the user has installed. The recommendations below require directly editing system configuration settings, and so the changes are more likely to persist following system reboot.
Disable dithering on AMD cards in Windows by editing the Windows Registry
-
Open the AMD Catalyst Control Center by right-clicking somewhere on the desktop. Navigate to:
Preferences -> Advanced View -> Information -> Software
And note down the 2D Driver File Path, which will tell you the registry location. -
Open the Windows Registry Editor and locate this path.
-
To disable dithering on DisplayPort, create a new 32-bit DWORD value called DP_DisableDither and set the value to 1.
-
To disable dithering on DVI, create a new 32-bit DWORD value called TMDS_DisableDither and set the value to 1.
-
Restart your machine for the changes to take effect.
Disable dithering on NVIDIA cards (with proprietary drivers) under Linux by editing the xorg.conf file
-
Switch to runlevel 3 using:
teleinit 3 -
Log in to the root account, and open the xorg.conf file
/etc/X11/xorg.conf -
Under the ‘Screen’ section, add the following line:
Option "FlatPanelProperties" "Dithering=Disabled" -
Save your changes. You can revert to runlevel 5 with
telinit 5
Summary
Dithering is a technique applied by your graphics card, wherein pixel colour values are temporally or spatially “jittered” to produce the illusion of a greater colour depth on a display. This can cause problems for specific VPixx tools that require pixel identity passthrough, i.e., the 1-1 mapping of pixel value assignment and display output. We recommend testing for dithering using our software tools to avoid unpredictable behaviour. Other software packages like Psychtoolbox also provide comprehensive testing for dithering. Once diagnosed, dithering can be disabled via software like Psychtoolbox, GPU control interfaces, and sometimes in low-level registry editors.
New tools for diagnosing and disabling dithering may become available in the future. If you discover a strategy for disabling dithering and would like to share it with the vision science community, please send an email to support@vpixx.com, and we will add your findings to this page.

