Introduction
This page explains how to set up your displays in LabMaestro and outlines key parameters to consider.
Before you begin, you should:
-
Have LabMaestro installed and running
-
Have a display connected to your computer
-
Be familiar with the Environment and Devices Overview
Adding a Display to a Project
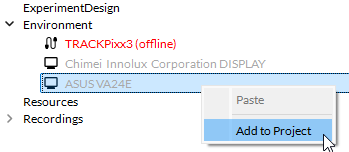
LabMaestro will automatically detect all displays connected to your computer. To add a display to your project, right-click the desired display and select Add to Project.
Display Properties
Adding a display to your project opens a window that lets you access your device’s properties. Display properties include:
|
Setting |
Description |
Options |
|---|---|---|
|
Read-Only |
||
|
Name |
The name of your display. |
None |
|
Device Type |
The type of your display. |
Monitor, Projector |
|
Manufacturer |
The manufacturer of your display. |
None |
|
Model |
The display model, if available. |
None |
|
Serial Number |
The serial number of your display. |
None |
|
Hardware Revision |
The hardware revision number of your display, if applicable. |
None |
|
Firmware Revision |
The firmware revision number of your display, if applicable. |
None |
|
Resolution |
The resolution of your display. |
Editable from your operating system’s control panel/display settings. |
|
Scaling |
The scaling ratio of the image shown on your display. |
Editable from your operating system’s control panel/display settings. |
|
Physical Size |
The physical dimensions of your display. By default, reported in centimeters. |
None |
|
Refresh Rate |
The image refresh rate of your display. This value, reported in Hz, corresponds to the number of images rendered per second. |
Editable from your operating system’s control panel/display settings. |
|
Pixels per Inch |
The number of pixels across one inch of physical size on your display.
This value is computed automatically from the measured display size and resolution. |
None |
|
Read & Write |
||
|
Viewing Distance (cm) |
The distance between your display and the participant’s eyes. You must set this manually to match your lab setup.
This value is used to automatically determine the appropriate stimulus size when specified in Degrees of Visual Angle. |
Positive floating point value. |
|
Pixels Per Inch (cm) |
Manually measure the pixels per Inch of your display. If defined, this value will override the one in the read-only Pixel Per Inch property. |
None |
Frame-Locked Presentation
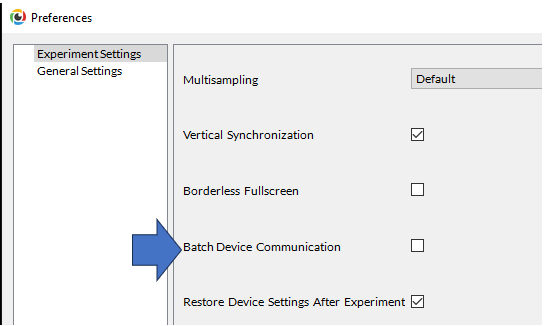
In general, all events in LabMaestro (e.g. the appearance of regions, the onset of digital, analog or audio I/O recordings and schedules, the polling of mouse and keyboard events) are synchronized to the refresh rate of the main display; specifically, by default, they are synchronized to the “vsync” signal that signifies the start of the very next video frame, sent from your graphics card to the display. There is an option called “Batch Device Communication” which allows all events/device commands to execute exactly one vsync later, instead of on the very next vsync; This setting ensures that there is enough time to present your stimuli and then send the communication with the VPixx hardware. Otherwise, without this setting, if your stimuli are complex or other events on the computer occur at the same time, a frame can be dropped, causing VPixx device communication to occur before your regions are drawn. Batch Device Communication can be enabled in the Preferences menu, under “Experiment Settings”
Extended/Mirrored Desktop
If you have multiple displays connected, it is generally recommended to use them in “extended” mode rather than “mirror” mode. When two displays are mirrored, the operating system treats them as a single display, often with the resolution and refresh rate of the lower-resolution/refresh-rate display; therefore, LabMaestro will detect only one of the mirrored displays (the one with the lower resolution/refresh rate). For this reason, we strongly recommend using all connected displays in extended mode, especially the main display. For optimal system performance, we generally recommend disconnecting any unnecessary displays, as multiple displays increase the workload on your graphics card and processor.
LabMaestro Timing Diagnostics
Stress Test
To help you diagnose or characterize your system’s performance, LabMaestro has a “stress test” that can be run with a VPixx device (e.g., DATAPixx3 or VIEWPixx). The stress test measures your system’s (GPU/CPU) ability to consistently output frames at the refresh rate of the connected VPixx display (e.g., 120Hz), and checks for any dithering (i.e., the modification of pixel values by your graphics card).
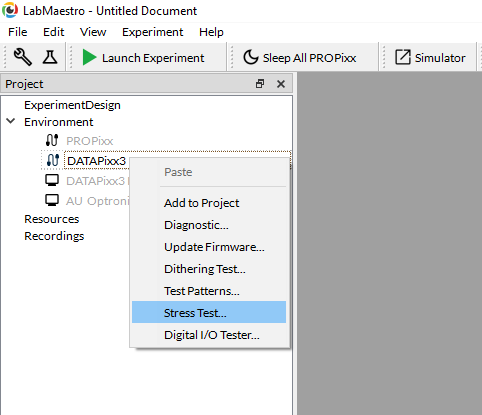
To run the stress test, right-click on the VPixx device (e.g., DATAPixx3 or VIEWPixx) and select “Stress Test”.
In the Stress Test window, select the Target Display to run the stress test with, and click the Start button to begin the test.
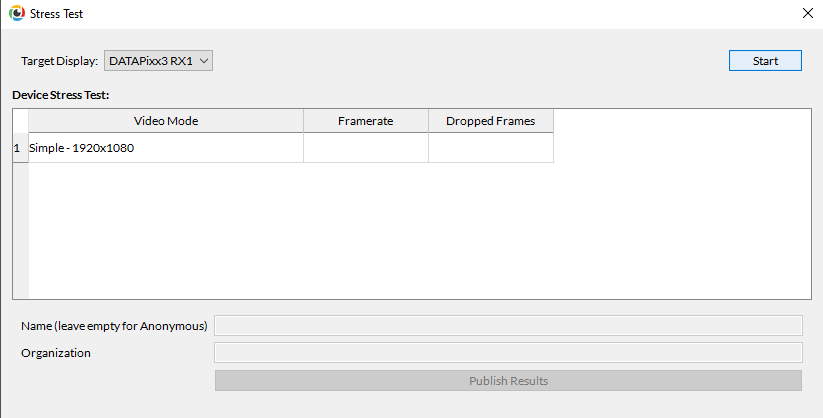
The test will take approximately 10 seconds to complete, and the results will be output in the window. You will see the average measured framerate of your system, as well as the percentage of frames that were dropped, at the display’s refresh rate. You can publish the results by pressing the “Publish Results” button; the published results will be accessible to other VPixx/LabMaestro users.

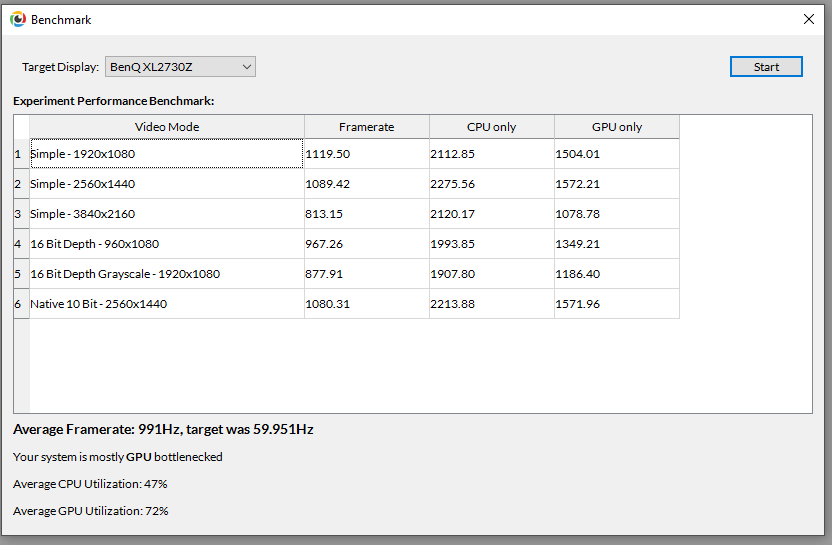
Benchmark Test
In LabMaestro, you can also test your GPU and CPU’s general capabilities, unbounded by the connected display’s refresh rate. The test will measure the maximum frame rate your GPU and CPU can output at different resolutions and bit depths; the results will also report the percent GPU and CPU utilization during the test and whether the GPU or CPU is the bottleneck. This test does not require any VPixx hardware.
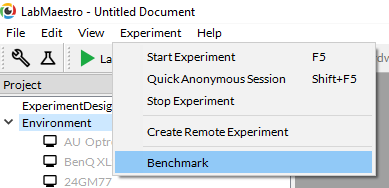
You can run the Benchmark Test by going to Experiment → Benchmark.
Then in the Benchmark window, select the target display that you will display the test images on, and click the Start button to begin the test.
Related Links
Understanding CLUTs, M16 Mode and Color Transparency
Color Calibration
Gamma Calibration