Introduction
This page presents the LabMaestro Experiment structure, including all underlying design elements. After reading this page, you will :
-
Understand what structural elements exist in the LabMaestro Experiment Builder.
-
Understand how to use these structural elements to design experiments.
-
Understand how these structural elements interact during an experiment run.
Prerequisites
-
LabMaestro is installed and activated.
Experiment Design Elements
Project
A LabMaestro project is the highest-level structural element and includes all underlying elements of the experiment (design, components, data). LabMaestro saves projects as .lm files. LabMaestro automatically creates an untitled project on application startup.
For example, consider a template experiment in which you show Gabor patches of different frequencies and orientations to a participant. The Project panel shows all elements saved within the .lm file.
For more information on projects and .lm files, please refer to this page.
Experiment Design
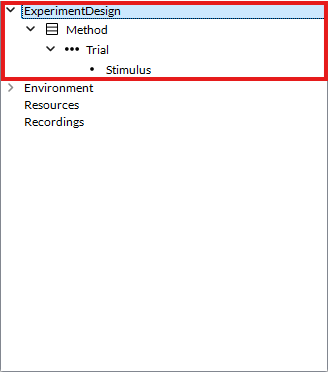
The LabMaestro Experiment Builder relies on multiple structural elements to build an experiment. Experiment Design serves as the top-level organisational framework, nested within the Project Panel. It outlines the various "steps" of an experiment, from the moment the participant sits down at the testing computer until they leave. VPixx Technologies intends LabMaestro to facilitate the creation of experimental designs, primarily through built-in Methods and Timelines.
Below is a list of all reference terms for these elements, along with what they include.
Methods
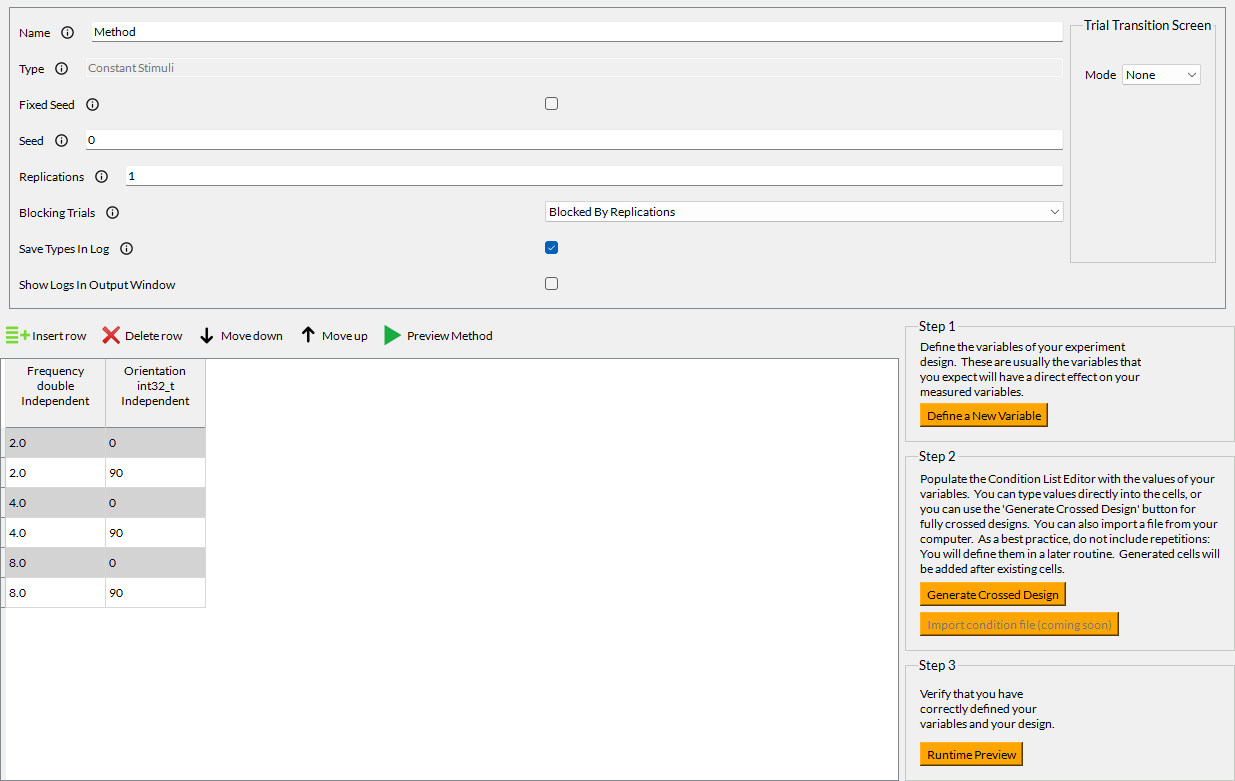
Methods represent the secondary level of the design structure and specify how independent variables will behave during this step of the experiment. Methods also control the number of trials, conditions, and variables that can influence the experiment's flow or stimuli. Elements you define in a method component are passed to its child timelines.
For example, in our template project, the Method element could include specific pairs of frequency and orientation that comprise the Gabor stimulus, along with other parameters, such as the number of repetitions and trial randomization.
For more information on available method components and their properties, please refer to this page.
Timelines
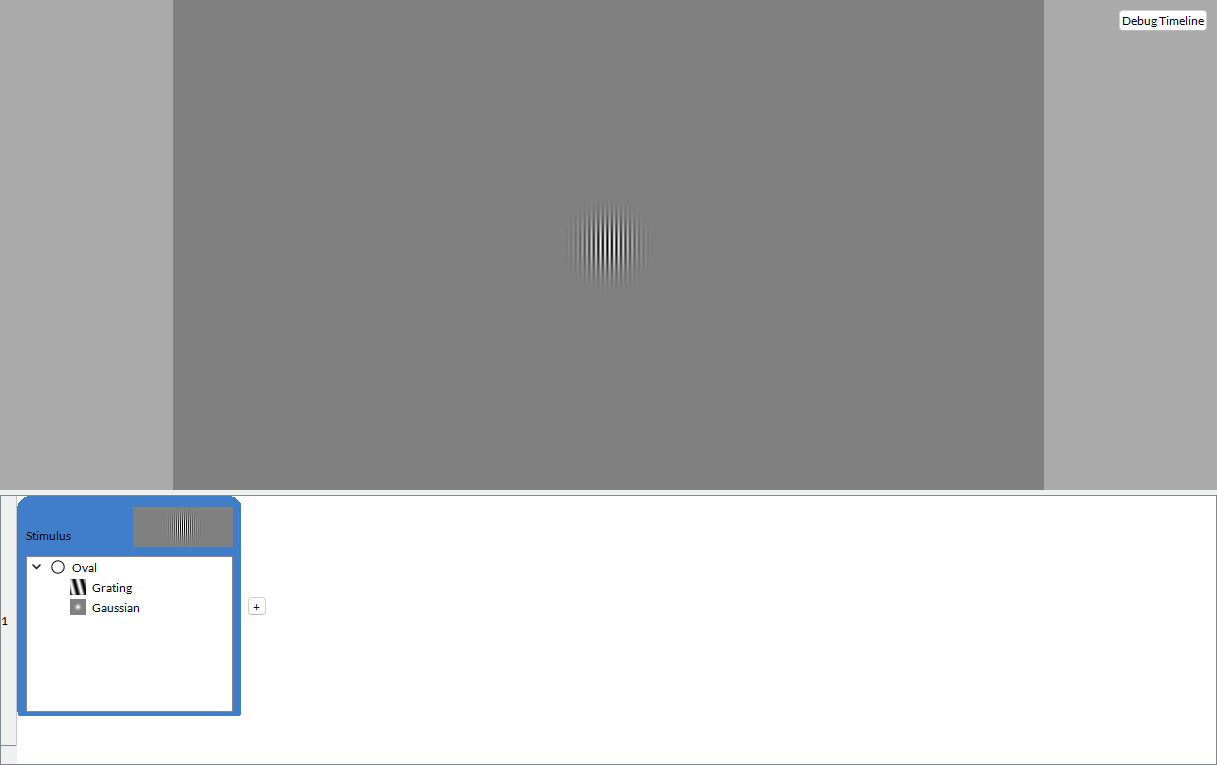
Timelines represent the third, deepest level of the Experiment Design. Timelines dictate the presentation, appearance, and timing of individual Components during the experiment. Timelines can be used alone, for example, to present an instruction screen. Timelines can also be driven by Methods, enabling easy implementation of stimulus changes on a trial-by-trial basis. You can create timeline-specific variables that are needed only during a specific timeline.
LabMaestro offers a timeline preview window that lets you visualise how a timeline will appear during an experiment run. In our template project, the timeline element includes the region where the stimulus will be displayed, as well as both the Grating and Gaussian patterns that create the Gabor stimulus.
For more information on how timeline elements interact, please refer to this page.
Epochs
An epoch is a structural container, or division within Timelines, that groups and organises sets of components, actions, or data in a meaningful and coherent manner.
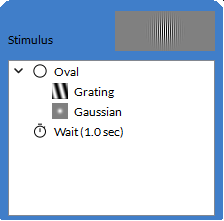
The Timeline is a way to organise components in a specific order. It is divided into Epochs. Epochs are helpful because they visualise and summarise a subset of components. To this end, the epoch headers include a thumbnail that renders the regions and patterns created within the Epoch, scaled to fit the thumbnail window. By default, Timelines consist of only one Epoch. Clicking on the + buttons on either side of the Timeline adds a new epoch in this location. If you have more than one Epoch, you can move them around by clicking and holding an epoch, then dragging it to a new location in the experiment design.
For more information on how epochs and timelines dictate the timing and behaviour of experiment events, please refer to this page.
Components
Components are at the core of the experiment design hierarchy. They are the building blocks used for the experiment. You can find these components in the component library panel in the user interface and add them to timelines. Once added to a timeline, you can define their properties from the property panel to control their behaviour during the experiment.
Components can be combined within an epoch to create complex visual stimuli, such as a Gabor patch, or to record a subject's inputs while they complete the experiment. Components come in three different types: regions, patterns and commands.
In our template project, we only need one Timeline and Epoch to present a visual stimulus. We combine an Oval region with a Grating and a Gaussian component to create a Gabor patch, then add a Wait command for the desired presentation time.
For more information on components and a list of all base components included in LabMaestro, please refer to this page.
Resources
Resources are digital media files packaged within LabMaestro Project Files (*.lm). Common resources are audio files, images and movies. You typically use resources in Epochs through the relevant Components.
For example, you can control playback of *.wav audio files through the Play Sound, Pause Sound, and Resume Sound commands; image and movie resources may be displayed through a Picture Pattern and a Movie Pattern.
Resources are encoded and decoded by software or hardware tools that compress and decompress digital media files, such as video and audio. These can include a variety of file types and content forms.
For more information on using resources, please refer to this page.
Designing an Experiment
When designing an experiment, you can interact with three User Interface (UI) elements that offer various options for experiment design.
The Project Panel
Interacting with the Project Panel offers the most complete and flexible way to add elements. There are two ways in which you can add elements:
-
Drag, then drop a component from the Component Library or the Shared Component Library under Experiment Design. This will add the component to your Experiment flow. You can only drag components at a level where they are logical in the experiment structure (ex. you can add a Gaussian component under an Epoch, but not directly under Experiment Design).
-
Right-click Experiment Design (or any other component), and select Add (or Add Shared) to show a contextual menu from which you can select the desired component. Only components that can be added directly under the right-clicked level will be shown.
If you need to reorder elements, you can drag them from their original position to the desired location directly in the Project panel.
The Timeline View
The Timeline View offers a more visually intuitive way to add and edit components within a timeline. When using the project panel, you can drag elements from the Component Library to the desired location within the Timeline View, or add them directly by right-clicking the desired position. When added to an Epoch in this way, a region will appear in the center of the Timeline preview for this Epoch, and a Pattern will appear centred within the target Region.
Method objects cannot be added or edited in the timeline view; you must add them via the Project Panel.
The Visual Timeline Preview
Starting in version 1.11, you can now add regions and patterns directly on the timeline preview, as well as manually adjust region size, orientation, and centre from the timeline preview window, similarly to how you would adapt shape properties in other design software.
To add a region, select a region component in the component library and drag it to the desired position on the timeline preview window. Once placed, you can move the region by dragging it on the timeline preview.
You can also place patterns within regions by dragging a pattern from the component library onto the desired region in the timeline preview. Should you place a pattern in an area in which there are no regions, you will be prompted to add one. The region will be added alongside your pattern.
Selecting a Region
By clicking on a region visible in the timeline preview, you can select the region you wish to edit. LabMaestro will approximate a bounding box fitted to the size of your region, represented by a blue/yellow checkerboard pattern, as shown in the image below.

If two regions have perfectly overlaid bounding boxes, only the top-most region will be selectable from the timeline preview.
Moving a Region
To move a selected region, click anywhere inside the bounding box. Your mouse cursor will turn into a four-directional arrow, confirming that you can now drag the region anywhere within the preview window. The center.x and center.y properties of the selected region will automatically update as you drag it to the desired location.

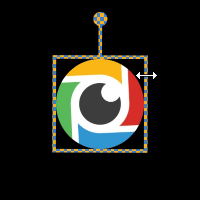
Resizing a Region
To resize a region, drag your cursor to one of the bounding box edges. As you resize a region, the geometry.width and geometry.height properties will update accordingly. Depending on where you position your cursor, these properties will be adjusted in the following ways;
-
Dragging your cursor to the left or right edge adjusts the region's width.
-
Dragging your cursor to the top or bottom edge adjusts the region's height.
-
Dragging your cursor to the corners of the bounding box lets you adjust both width and height simultaneously.
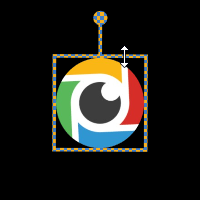
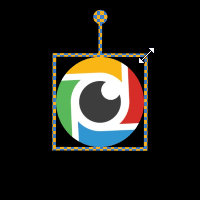
Rotating a Region
To rotate a region, drag your cursor to the circle on top of the bounding box. Your cursor will change to a hand, signalling that you can rotate your region. The orientation.degrees property of your region updates as you rotate it.

Related Links
Understanding Timeline Behavior
Components: Building Blocks of Experiments