Introduction
This page details the Method components available in the LabMaestro Experiment Builder and how they interact with their underlying Timelines.
After reading this page, you should:
-
Be familiar with the available Method components.
-
Understand how to edit Method properties.
-
Understand how method properties impact the experiment.
Prerequisites
-
LabMaestro is installed and activated.
Method Components
Method components allow experimenters to manage variables related to their experimental design, such as stimulus properties (e.g., colour, size, presentation time, spatial frequency), and streamline their definition. Method components are the top-level components and can be added directly under Experiment Design in the Project Panel. Upon opening a Method component, a window will open.
As of Version 1.12, the layout of method components was improved to optimize user experience.
You can generally divide this window into two halves. The top half shows method properties and allows the experimenter to control how the experiment behaves. The bottom half, or Condition List, allows experimenters to define variables and build their experiment design across all trials.
Method Component Properties
Each Method component type has its own properties. Below is a detailed overview of each available Method component type and its editable properties.
Simple Method
This component was named Constant Stimuli in LabMaestro versions 1.11 and below.
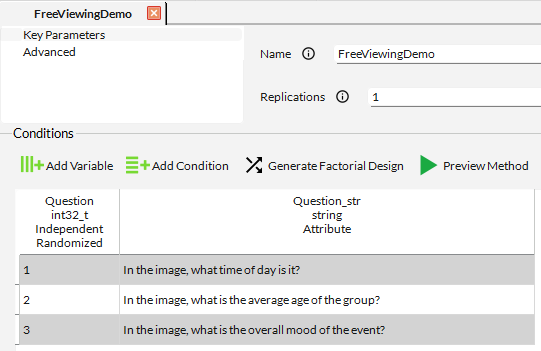
The Simple Method component enables control of experimental variables for designs that influence the visual stimulus as a function of various parameters. This component is flexible and can serve as a base for many vision science experiments. Its aim is to provide a quick, easy way to start an experiment while also allowing flexibility for more advanced designs.
Simple Method components have the following properties:
Key Parameters
-
Name. Component reference name. Use this name when accessing a method property. Must be unique to avoid conflicts.
-
Type (Read Only). Type of the component, as defined in the component library.
-
Replications. Define how many times to repeat all trials in the Condition List.
Advanced
-
Trial Transition Screen. Define the trial transition type for this component. Options include wait time and wait key.
-
Fixed Seed. Toggle on to define a static seed to control random behaviour during the experiment. Generally used for testing and confirming that you can replicate random behaviour. In most cases, this should be off during data collection.
-
Seed. Define the seed that controls random pattern behaviour if Fixed Seed is On.
-
Save Types in Log. Toggle On to save the trial type to the output log file.
-
Blocking Trials. Define the blocking method for trials.
-
Blocked by Replications will show all possible trials once before replicating them.
-
For example, if 5 trials are defined in the condition list and Replications is set to 2, replications would follow a ([1-2-3-4-5][1-2-3-4-5]) design.
-
-
Blocked by Conditions will show all trials of a condition for the appropriate number of replications before proceeding to the next condition.
-
For example, if 5 trials are defined in the condition list and Replications is set to 2, replications would follow a ([1-1][2-2][3-3][4-4][5-5]) design.
-
-
Fully Randomized shows trials in a completely random order.
-
-
Show Logs in Output Window. Toggle On to produce logs in the LabMaestro output window.
For an example of a complete experiment using a Simple method, please see this page, which shows a LabMaestro implementation of the Stroop task.
Staircase Method
Method component to enable standard staircase procedures for experiments. This classical method is often used when visual stimuli must react to participant responses during an experiment.
Staircase components have the following properties:
Key Parameters
-
Name. Component reference name. Use this name when accessing a method property. Must be unique to avoid conflicts.
-
Type (Read Only). Type of the component, as defined in the component library.
-
Save Types in Log. Toggle On to save the trial type to the output log file.
-
Dependent Variable. The name of the dependent variable. You can use this name in Expressions to dynamically reflect changes in component properties.
-
Starting Value. Initial estimate of the dependent variable value.
-
Minimum Value. Define the minimum value for the dependent variable.
-
Maximum Value. Define the maximum value for the dependent variable.
-
Inputs. Define possible participant inputs. You can define inputs that will increase the value of the Dependent Variable and others that decrease it.
-
Starting From. Define the starting point of the staircase method in your experiment, generally a timeline under your staircase component.
-
Default Step. Define the default variation in the dependent variable value after each trial.
-
Steps. Define more precise step values based on the number of reversals during the task. Allows you to reduce the step size to capture more minute variations after multiple reversals.
Optional Parameters
-
Maximum Number of Reversals. Define the maximum number of reversals. Once this number is reached, the part of the experiment related to this method component ends.
-
Maximum Number of Attempts. Define the maximum number of trials. Once this number is reached, the method component ends regardless of how many reversals are observed.
-
Fixed Seed. Toggle on to define a static seed to control random behaviour during the experiment. Generally used for testing and confirming that you can replicate random behaviour. In most cases, this should be off during data collection.
-
Seed. Define the seed that controls random pattern behaviour if Fixed Seed is On.
-
Thresholds.
-
Fixed Value Replication. Toggle On to enable replications at fixed values of your dependent variable.
-
Trial Blocking. Define the blocking method for trials and replications.
-
Blocked by Replications will show all possible trials once before replicating them.
-
Blocked by Conditions will show all trials of a condition for the appropriate number of replications before proceeding to the next condition.
-
Fully Randomized shows trials in a completely random manner.
-
Trial Transition
-
Trial Transition Screen. Define the trial transition type for this component. Options include wait time and wait key.
For an example of a complete experiment using the Staircase method, please see this page, which shows a LabMaestro implementation of a contrast sensitivity measurement task.
Quest Method
Method component allowing manipulation of an experimental variable using the QUEST Bayesian algorithm (Watson & Pelli, 1983). This method is similar to the staircase method, but the step size dynamically varies after each reversal based on predefined parameters.
Quest components have the following properties:
Key Parameters
-
Name. Component reference name. Use this name when accessing a method property. Must be unique to avoid conflicts.
-
Type (Read Only). Type of the component, as defined in the component library.
-
Save Types in Log. Toggle On to save the trial type to the output log file.
-
Dependent Variable. The name of the dependent variable. You can use this name in Expressions to dynamically reflect changes in component properties.
-
Guess. Initial estimate of the dependent variable value.
-
Standard Deviation Guess. Standard deviation on the initial estimate. The higher the value, the more quickly the estimate will fluctuate between trials.
-
Minimum Value. Define the minimum value for the dependent variable.
-
Maximum Value. Define the maximum value for the dependent variable.
-
Inputs. Define possible participant inputs. You can define inputs that will increase the value of the Dependent Variable and others that decrease it.
-
Starting From. Define the starting point of the staircase method in your experiment, generally a timeline under your staircase component.
-
Default Step. Define the default variation in the dependent variable value after each trial.
-
Steps. Define more precise step values based on the number of reversals during the task. Allows you to reduce the step size to capture more minute variations after multiple reversals.
Optional Parameters
-
Maximum Number of Reversals. Define the maximum number of reversals. Once this number is reached, the part of the experiment related to this method component ends.
-
Maximum Number of Attempts. Define the maximum number of trials. Once this number is reached, the method component ends regardless of how many reversals are observed.
-
Fixed Seed. Toggle on to define a static seed to control random behaviour during the experiment. Generally used for testing and confirming that you can replicate random behaviour. In most cases, this should be off during data collection.
-
Seed. Define the seed that controls random pattern behaviour if Fixed Seed is On.
-
Thresholds.
-
Fixed Value Replication. Toggle On to enable replications at fixed values of your dependent variable.
-
Trial Blocking. Define the blocking method for trials and replications.
-
Blocked by Replications will show all possible trials once before replicating them.
-
Blocked by Conditions will show all trials of a condition for the appropriate number of replications before proceeding to the next condition.
-
Fully Randomized shows trials in a completely random manner.
-
Quest Parameters
-
Beta. Define the slope of the Weibull psychometric function.
-
Gamma. Define the probability of success at an intensity of 0.
-
Delta. Define the estimated rate of unwilling mistakes (i.e., finger mistakes).
-
Grain. Define the precision of the estimate.
-
Range.
Trial Transition
-
Trial Transition Screen. Define the trial transition type for this component. Options include wait time and wait key.
Condition List
The Condition List, located at the bottom half of the editing window for method components, allows you to define independent variables expected to affect your dependent variable.
The steps below detail how to set up a Condition List for an experiment.
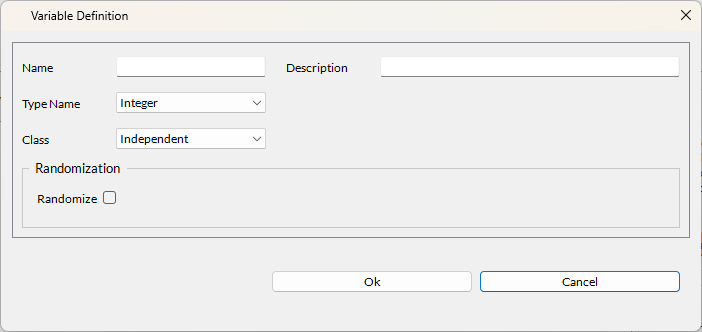
Step 1 - Define Variables
As a first step, you should create variables for each independent variable in your experiment. You can do this by pressing the Define a New Variable button. Each variable has the following properties:
-
Name: The variable reference name.
-
Description: Small, optional description for experimenters to know what this variable represents.
-
Type Name: The value type for this variable. The type can be any of those compatible with LabMaestro Expressions.
As of Version 1.12, Resources (Picture, Movie, Audio) are now also supported within condition lists. This allows users to populate a condition list with all relevant stimuli for each trial/condition.
Components that rely on resources (e.g., Play Sound, Picture Pattern) can now accept condition list variables as inputs to their Resource property, allowing greater flexibility in experiment design.
-
Class: Variable level of importance. Can be independent (split or blocked), which will tie with the requested number of Replications defined in the method properties, or an attribute.
-
Randomize: Toggle on to randomize the order of occurrence of the defined variable values.
Step 2 - Populate Variable Values
As a second step, populate the condition list with the expected values your variables will take during the experiment.
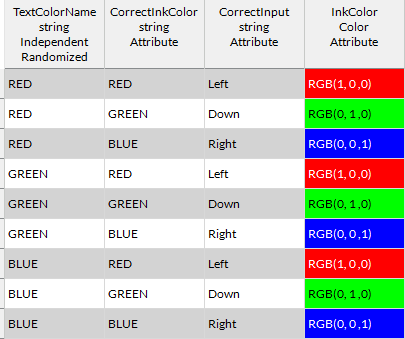
As an example, taking the condition list from the StroopTask - Ink method of the Stroop Effect template experiment, we can see the independent parameter (TextColorName) has three possible values, which can all appear in three different colors (RGB(1, 0, 0), RGB(0, 1, 0), RGB(0, 0, 1)). The correct input is tied to the ink colour, and not to the presented word. With these 9 trials defined in the condition list and run across 10 fully randomized replications, this experiment would total 90 trials, with each of the 9 possible trial conditions appearing fully randomized throughout the experiment.
Step 3 - Validate Experiment Flow
Once you have populated your Condition List, you can test your method by pressing the Runtime Preview button to confirm that your experiment behaves as desired. This requires the underlying Timelines to have been prepared.
Related Links
Values and Expressions: Dynamic Content