Introduction
This template experiment aims to replicate findings on the Stroop Effect (Stroop, 1935). Two timelines are included in this experiment: one in which participants must name the colour of the ink used to write the word (Red, Green, or Blue), and one in which they must name the word written. The timelines are preceded by a practice task comprising three trials.
From the data collected in this experiment, we can replicate the finding that interference is stronger in the condition where ink colour must be named, as well as in trials in which the ink colour and word are incongruent. Incongruent trials are associated with more errors and slower reaction times.
Prerequisites
-
LabMaestro is installed and activated.
Project Files
Step 1 - Define variables in the Constant Stimulus Method
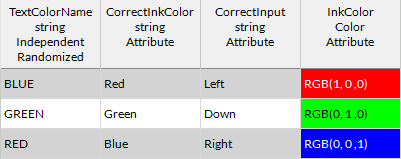
This type of experiment can be built using a Constant Stimulus method. Here, we can define four variables to handle all attributes of the experiment. Let’s have a look at the StroopPractice - Ink method component to see what these are:
-
TextColorName (String). This is the variable we use for the displayed colour words during the task. Here, we gave it three possible values: RED, GREEN, and BLUE.
-
CorrectInkColor (String). This variable is kept for the data file and is here to intuitively record the colour of the presented ink on a given trial.
-
CorrectInput (String). This variable gives the appropriate input for a given trial. In our experiment, we paired RED with the Left arrow key, GREEN with the Down arrow key, and BLUE with the Right arrow key. If you choose to add BROWN and PURPLE colours, you could pair them with additional keys.
-
InkColor (Color). This variable stores the RGB values for the respective ink colours. Here, RED was defined was defined as RGB(1, 0, 0), GREEN as RGB(0, 1, 0) and BLUE as RGB(0, 0, 1), to keep this as simple as possible.
Step 2 - Build the Trial Timeline
As shown in the image above, the practice task consists of three congruent trials to familiarize the participant with the task. Let’s have a look at the trial Timeline to see how elements are arranged.
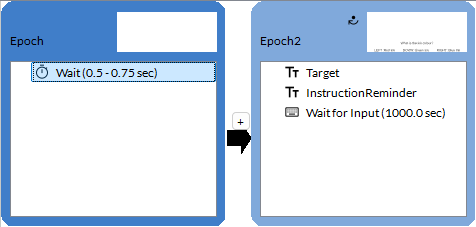
Below is a list of noteworthy elements that have been modified for the task to work properly:
-
Inside the Target text region, the Text property is defined as the TextColorName condition variable defined in the Constant Stimulus method. This makes it so the written text is the value of the TextColorName variable.
-
Inside the Target text region, the Colour property is defined as the Colour condition variable defined in the Constant Stimuli method. This makes it so the ink colour corresponds to the RGB triplet defined in the Colour variable.
-
The Epoch2 epoch loops until the input registered in Wait for Input is the same as the one stored in the CorrectInput variable.
Step 3 - Apply the Timeline to Experimental Conditions
Now, we can look at how the condition variables are defined for the two experimental Epochs: one in which the participant must name the ink colour, and the other where they must name the written word. These condition lists are repeated nine times, for a total of 90 trials per condition.
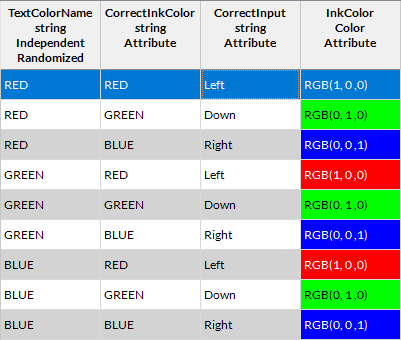
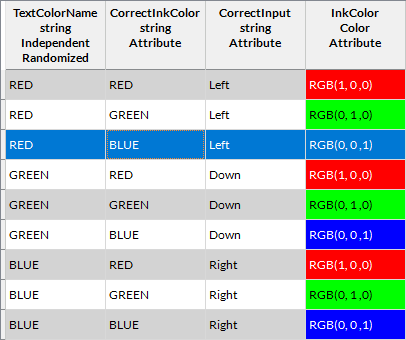
The trial timeline is otherwise identical to the practice condition, except for the InstructionReminder element, which varies depending on the task.
Step 4 - Data Analysis
You can export the project data to analyze it in a third-party software. All of the necessary information to measure classic findings using the Stroop task is included in the data file. It is possible to compile error rates and compare reaction times across congruent/incongruent trials. For instance, using the Anonymous data provided with the template, you can obtain patterns similar to those reported by Stroop (1935) and by MacLeod (1991), who reviewed and replicated Stroop's results.
For a more direct replication of Stroop (1935), you could also add BROWN and PURPLE colours with some modifications of the condition lists.
Related Links
Customizing Stimuli with Mathematical Functions and Expressions