Introduction
This page details how to build LabMaestro timelines and how they translate into the flow of an experiment. By the end of this page, you should:
-
Understand how to build an experiment timeline with the LabMaestro Experiment Builder.
-
Understand how to manipulate experiment flow using LabMaestro elements.
-
Understand how components behave over time.
Prerequisites
-
Have LabMaestro installed and activated.
Timeline Flow
Timelines dictate the presentation, appearance, and timing of individual components and associated events during the experiment. Underlying them are Methods, user-defined groups of components that aim to facilitate grouping related elements of the experiment flow.
LabMaestro initializes timeline variables to their appropriate values at the start of a timeline.
Timelines flow from left to right, from the leftmost to the rightmost Epoch.
Conditional Branches
Timelines can include Conditional Branches, allowing dynamic progression based on the result of Expressions. You can create epochs handling both True and False condition outcomes to implement paths or outcomes based on a participant’s response, such as creating feedback screens.
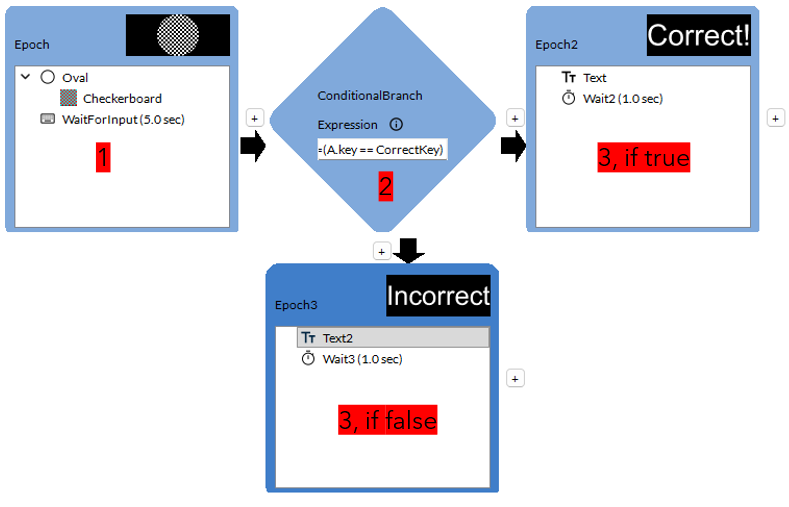
Epoch Flow
Within an epoch, all components are executed sequentially from top to bottom. It is similar to following a cookbook’s instructions or running a program. LabMaestro draws visual Regions higher up in an epoch before drawing those lower. As with other programming software, this means that regions drawn later will appear on top of earlier visual regions, as if on multiple layers.
Within epochs, certain Commands add more precise flow control and navigation. These include Wait for Input, which pauses execution until user input is received, and Wait, which pauses execution for a specified time.
By default, LabMaestro deletes all visual regions at the end of an epoch. You can toggle this on or off with the HideOnExit Epoch property. However, we can also hide them within an epoch using the Show/Hide Region Commands.
Entry and Exit Conditions
By default, when implementing an experiment design, all Epochs within Timelines will be displayed and executed only once. However, some experiment designs may require more flexibility, and users may wish to:
-
Display an epoch only if a condition is met based on a variable defined in a Constant Stimuli (Condition List) method, and keep the rest of the timeline untouched.
-
Repeat the content of an epoch for a specific number of times.
-
Continue to show an epoch until the conditions are met.
To accommodate this, epochs can include an EntryCondition and an ExitCondition, allowing epochs to begin and end based on specific requirements. These provide control over whether an epoch is displayed and the conditions under which it terminates, based on user-defined criteria. They provide functionality similar to if, while, and repeat (for) programming control flow.
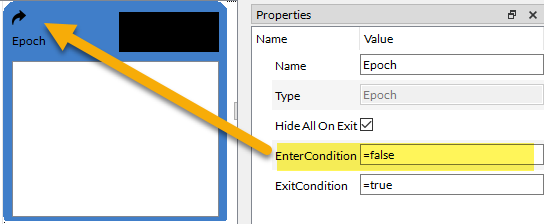
EnterCondition: If the expression evaluates to true, LabMaestro will execute the instructions within the Epoch. If it evaluates to false, the timeline will ignore this Epoch and proceed to the next one.
If EnterCondition is set to false or includes a customized expression, an arrow icon indicates that LabMaestro may potentially ignore this Epoch during the experiment.
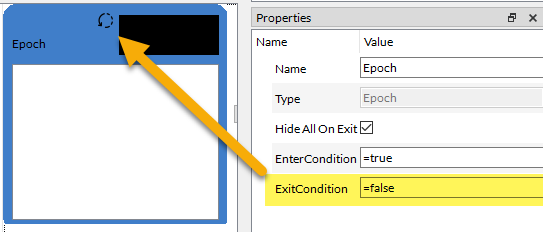
ExitCondition: If the expression evaluates to true, the timeline will continue to the next Epoch.
If it evaluates to false or contains a custom expression, a loop icon indicates that LabMaestro will re-evaluate the current Epoch until the exit condition returns true.
If the ExitCondition of Epochs always evaluates to false at runtime, it results in an infinite loop. As in a traditional programming language, the experiment cannot proceed further. However, if you hold down the Esc key, it will break out of the infinite loop and exit the previewed timeline or launched experiment. LabMaestro will exit to the editor window.
You can edit the enter and exit conditions from the properties panel to control the experiment flow. These fields must evaluate to a true or false Boolean value. Typical implementations will use simple Expressions to refer to a given object property or variable. You can write more complex expressions using Booleans, Logical Operators, and Relational Operators to evaluate comparisons between two values.
Use expressions to dynamically control experiment flow, including executing an epoch upon a correct response, continuing an epoch for a custom duration, and implementing a timeout.
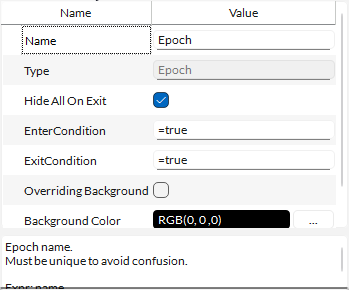
As of Version 1.12, you can now override the background colour from an epoch’s properties. Simply toggle the Overriding Background property and select the desired Background Color. Colour selection is done via the LabMaestro Colour Interface.
Visual Stimulus Rendering Behaviour
LabMaestro renders visual stimuli differently from other experiment-building software. This information is critical to optimizing your use of LabMaestro to run vision science experiments.
The Rendering Queue
When creating an epoch in LabMaestro, an epoch’s elements are ordered from top to bottom. However, LabMaestro renders all elements simultaneously until a “wait” type command is encountered (mostly Wait and WaitForInputs). Elements are added to a “rendering queue” and are rendered on the next frame refresh. Elements stay in the rendering queue until one of three events occurs:
-
You hide a region element using the “Hide Region” command.
-
An epoch with the “Clear on Exit” property set as “True” ends.
-
The timeline ends.
Events While Waiting
One key difference between LabMaestro and other experiment-building tools is that LabMaestro renders all visual stimuli on every frame, regardless of whether they change. For example, if you use LabMaestro to display a circular region and wait 10 seconds before adding a pattern, the circle is rendered on every frame for the duration.
For users familiar with other rendering software, this is equivalent to executing a Flip command on every frame.
This flexibility in LabMaestro’s design allows easy implementation of dynamic changes to stimulus properties without requiring further user adjustments.
Demonstration
To better understand visual rendering, we can review a visual rendering demo. You can download the demo here:Rendering_Demo.lm
This simple demonstration has only one timeline with one Epoch executed only once (the exit condition returns true). The Epoch contains four elements:
-
An Oval region, with default values for properties.
-
A Radial pattern nested in the region, with speed set to 0 degrees/second. Its orientation property is defined as time*10.
-
A Text component gives information on the total rotation and wait time since experiment onset. The text expression is defined as “Wait time: {floor(time)} seconds. Rotation: {round(time*10)} degrees.”
-
A Wait blocking command lasting for 30 seconds. Once this time ends, the experiment window closes.

Running the demonstration shows that, even though the timeline waits 30 seconds after the initial rendering of visual elements, all elements update on every frame: the pattern keeps rotating, and the text values are updated correctly. The expressions for the radial pattern orientation and the Text element are computed on every frame, allowing the visual stimuli to update accordingly.
For those familiar with other experiment-building software, this is not what would happen if you used a similar command (e.g., WaitSecs(30) using MATLAB/Psychtoolbox); it is more akin to nesting your visual stimulus rendering inside of a “while” loop timed to last for 30 seconds.
Related Links
Values and Expressions: Dynamic Content
Customizing Stimuli with Mathematical Functions and Expressions