Introduction
This page explains value types, how to use expressions, and shows examples of how values and expressions can dynamically alter certain experimental elements.
By the end of this tutorial, you should:
-
Know the different types of values and expressions available in LabMaestro
-
Know how to define expressions for component properties
-
Know how to use expressions for experiment flow and parameter control
Prerequisites
-
LabMaestro is installed and activated
Values
Definition
Values refer to the data assigned to a particular Component property or variable within an experiment. For example, if x = 12, then we can say that x has a value of 12.
Value Types
LabMaestro supports the following value types:
|
Value Type |
Description |
Sub-properties |
|---|---|---|
|
Integer |
Integers can be positive, negative, or zero. They do not include decimal places. Useful for counting, indexing and discrete data (e.g., Likert values) |
None |
|
Floating |
Positive, negative or zero. Supports decimal places. Useful when precise calculations involving decimals are required. |
None |
|
Boolean |
Logical, can be either "True" or "False." Not case-sensitive. If used in a mathematical expression, True is interpreted as 1, and False is interpreted as 0. |
None |
|
Text |
A string of text characters. Should be formatted as ="text" to ensure a string literal is used. |
None |
|
Colour |
A three-value list of red, green and blue components of a colour. Currently uses RGB255 (values between 0 and 255 supported for each colour channel). |
.red .green .blue |
Global Objects
There are a few special elements that appear in most experiments but are not explicitly represented in Timelines. You can access these elements via expressions by using the right syntax. Below is a list of such special values and examples of how to invoke them:
Display
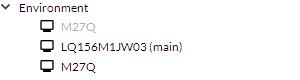
Component for the main experiment display. This is available when a display is assigned to the project. If more than one display is assigned to the project, Display refers to the display in the Environment with the (main) descriptor beside it:
As of release 1.10, Display has the following properties. Most of these properties are determined by metadata provided by the display manufacturer. Some of these properties, including Pixels Per Inch and Viewing Distance, can be edited by the user by double-clicking on the display in the Project pane.
See Monitor Pixel Density and Degrees of Visual Angle for details.
|
Property |
Type |
Description |
|---|---|---|
|
Name |
String |
The name of the display |
|
ViewingDistance |
Float |
The distance between the participant's eyes and the center of the display, in centimetres. Default value is 57.3. |
|
Width |
Float |
The display's physical width in centimetres. |
|
Height |
Float |
The display's physical height in centimetres. |
|
BitDepth |
Int |
The display bit depth, in bits per colour |
|
RefreshRate |
Float |
The display refresh rate in Hz. Note that, due to how it is calculated, it is not unusual for this value to have several decimal places. |
|
PixelsPerInch |
Float |
The display's pixel density, in pixels per inch. |
ExperimentDesign
You can use this component to access variables defined in the ExperimentDesign of your experiment in an expression. For example, you can use =SubjectID directly to display it on screen.
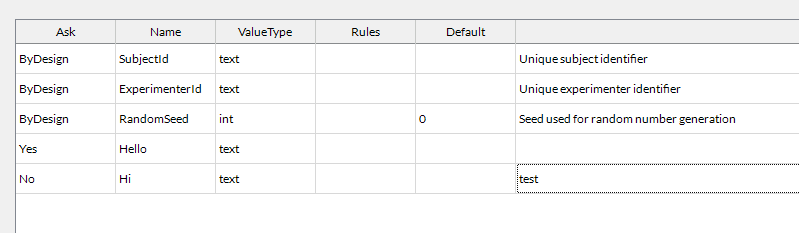
You can also create your own variables to access them in the code. The 'Ask' property must be set to Yes (or ByDesign) for the item to be accessible in the code. In the picture below, you would be able to access SubjectId, ExperimentId, RandomSeed, and Hello directly in expressions.
Expressions
Definition
Expressions are formulas used as values in an experiment. When invoking a value containing an expression, the formula is evaluated, and the result is used as the value. For example, if variable x has a value defined as the formula 12 * 2, then the value of x is the result of that formula (24).
To assign an expression to a value field, we use the = sign.
This general approach to using = for expressions is common in other software tools, notably Microsoft Excel. As in Excel, expressions in LabMaestro support a variety of mathematical, logical, and referential operations. They also use a specific syntax.
Values and expressions are powerful tools for creating dynamic experiments in LabMaestro. For a complete list of all supported operators and functions, please consult the Expression Reference.
Using expressions to Invoke Other Values
You can use expressions to invoke other values stored within an experiment. You can combine this with other kinds of operations to drive the progression of the experiment. When invoking other values via expressions, it is important to remember the following:
-
Variable and property names are not case-sensitive. E.g., Colour.RED, COLOUR.RED, colour.red and Colour.Red will all work. Similarly, Boolean values (e.g., True or False) are also not case-sensitive.
-
Variable and property names do not use spaces.
-
String literals (e.g., text strings) should use double quotes, e.g., “my text.”
-
LabMaestro provides several options for previewing experiment designs. Previews only have access to locally available information and may not always be complete. We suggest using the Launch Experiment feature to validate expressions.
Expression Autocomplete
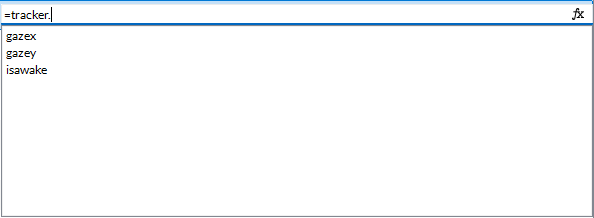
When entering = in a field compatible with expressions, an autocompletion menu will appear, listing all functions available in LabMaestro. You can navigate this menu with the up and down arrows on your keyboard or via your mouse. This is similar to how spreadsheet software (e.g., Microsoft Excel, Google Sheets, OpenOffice Calc) operates.
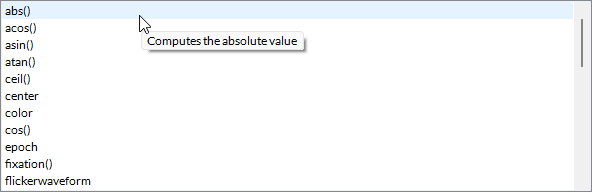
Hovering your mouse over a function displays a tooltip that explains what it does.
As you write more elements of your expression, the menu will automatically refine and include only valid functions. For instance, adding the a letter after = will only suggest valid functions with names starting with the letter a. If you enter the name of an object (e.g., the tracker global variable) followed by a period (.), only existing properties of this object will be suggested in the autocompletion menu.
Expression Editor
The expression editor can be used for more complex expressions or as an easier-to-use interface. The expression editor is accessed by pressing thefx icon located at the rightmost end of an expression field (as you can see in the screenshot above).

The expression editor is divided into two sections: on the left is the expression itself, broken down into nodes that must be filled, while on the right is the expression list, which includes functions/operators paired with tooltips that explain their use.
Entering Expressions using the Expression Editor
The expression editor separates expressions into nodes, represented as {} while empty. By either clicking a function in the expression list or manually typing a function, the node will be filled, addingchild nodesfor each argument, if applicable. Autocomplete is disabled in the expression editor.
As an example, let us enter the abs function in the first node:
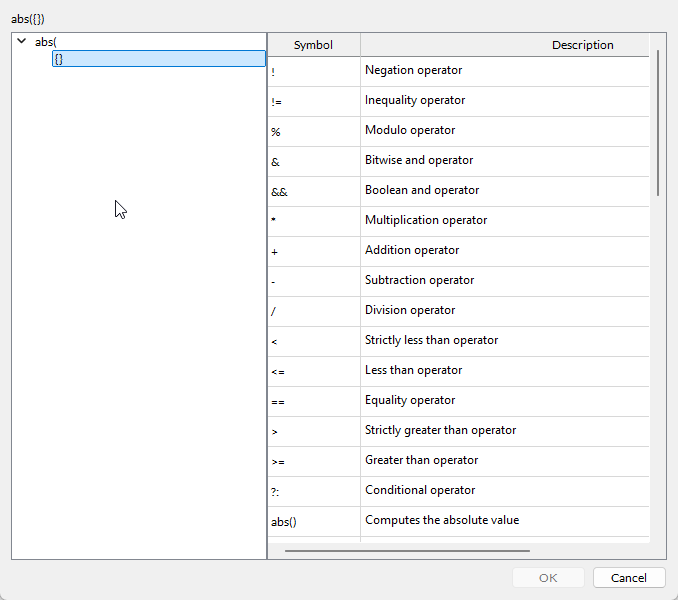
absfunction requires one argument (a numeric value), one child node is created.
We can then enter a value inside the empty child node, which can be a numeric value, an expression that returns a numeric value, or a timeline variable. Here, we could apply the absfunction to a custom timeline variable (named variable). We can simply enter the variable name, which will appear in the right section of the Expression Editor window.
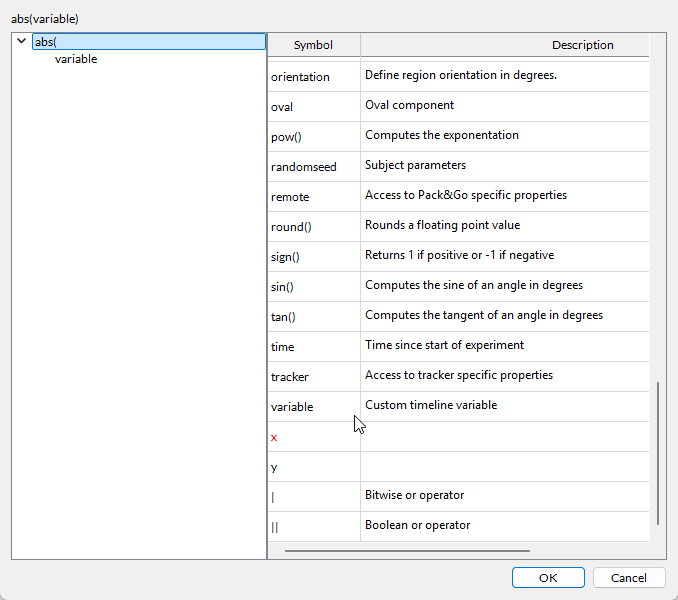
Once your expression is valid (all nodes have been filled with appropriate values), the OK button will become available at the bottom of the expression editor window. Pressing this will fill the field from which you opened this window with the expression you defined (in this case, =abs(variable)).
Common Uses of Expressions
In this section, we review different types of variables and property values, and how they can be invoked within an expression.
Custom Variables
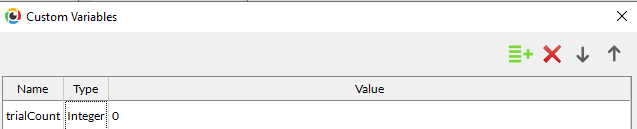
Custom variables are values not tied to a specific part of your experiment. Instead, they are 'free-floating' variables that can be modified as needed anywhere inside your Timeline. Custom variables are initialized by selecting the Timeline in the Project panel, then selecting Custom Variables from the Properties menu. Custom variables can be edited within an Epoch using the Set Variables Command. All value types defined above are compatible with custom variables.
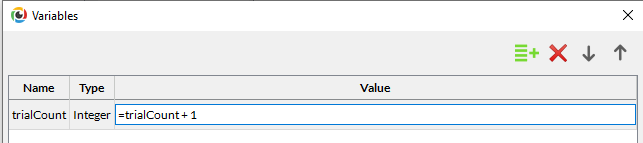
Custom variables are invoked directly in expressions using their variable names. Let's consider a common custom variable, trialCount, which tracks the number of iterations of a trial, and suppose we want to update this value after each trial and exit an epoch when 20 trials have been completed.
We can create a custom variable by clicking on our desired timeline, then editing the Custom Variables property.
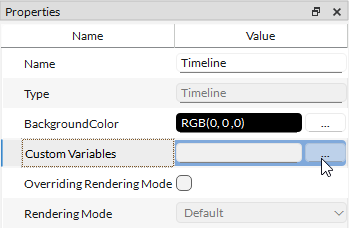
This opens a contextual window from which we can define custom variables within this timeline.
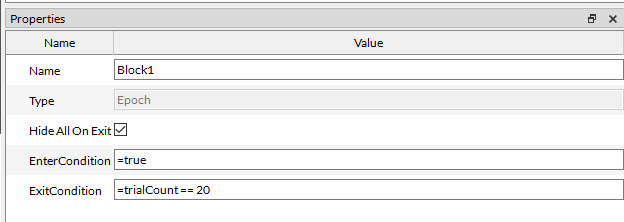
To exit an epoch when the trialCount reaches a certain value, we can modify the ExitCondition of that epoch using an expression. Specifically, we set the exit condition to be true when the current trial count equals 20. This uses the logical operator ==, which means" ""“is equal to.""“
See the reference section on Comparison Operators for more details.
Condition List Variables
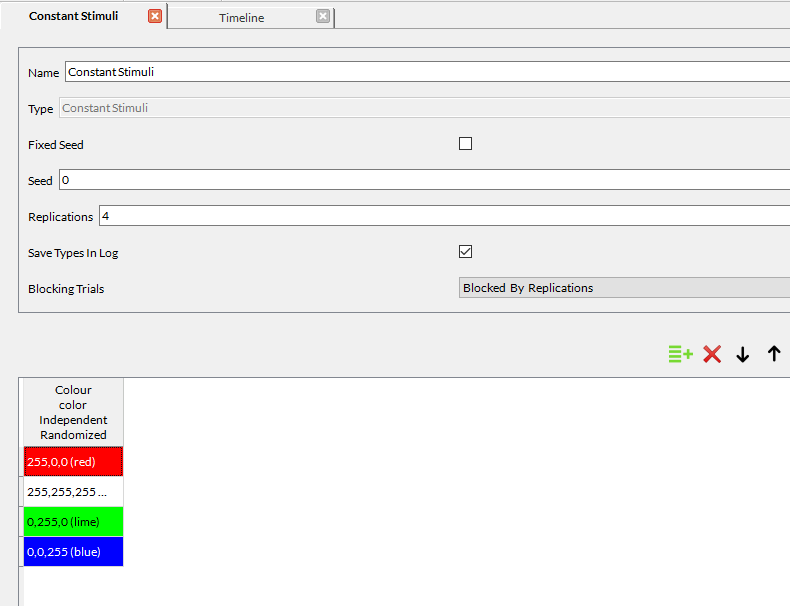
Condition List variables are implemented through Method Components. They may be autogenerated, manually defined, or some combination of the two.
Consider a simple conditions list with four rows of colour values, stored as the independent variable Colour.
In this experiment timeline, we have an epoch with a single stimulus, an oval region called myTarget.
If we want myTarget's colour to update to the next colour value in the Condition List when we press a key, we can set myTarget's RGB colour values as follows:
-
Red = Colour.red
-
Green = Colour.green
-
Blue = Colour.blue
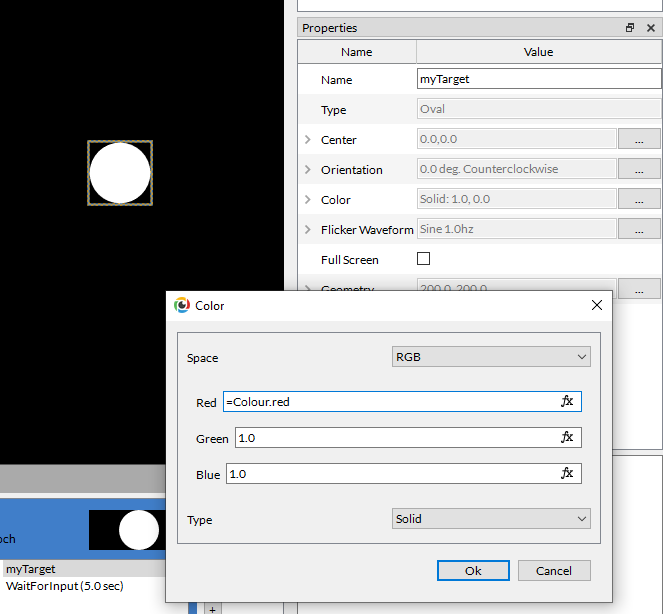
We then use the command WaitForInput to listen for a keypress. Since Colour is a list of conditions, the keypress causes the epoch to loop, and we move to the next stored R, G and B value of Colour, which updates myTarget's colour accordingly. Once all stored values have been processed, the epoch ends.
Note that the Condition List variable is invoked using the name of the variable (Colour) and its sub-properties are indexed via dot indexing (e.g., Colour.red). All value types defined above are compatible with Condition List variables. If a Condition List variable does not have sub-properties, it is simply called via the variable name.
Component Properties
Properties are values attached to a component. For example, the Oval Region has the following properties, which can be accessed by selecting the component from the Project menu or Timeline, and checking the Properties menu.
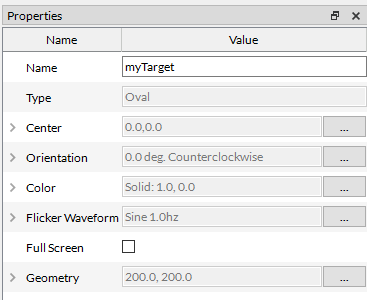
These values are typically referenced via the following format:
=myComponentName.PropertyName
Note the absence of spaces. Some property field labels have spaces for readability; these spaces should be omitted when calling a property value in an expression. E.g., Full Screen becomes myTarget.FullScreen.
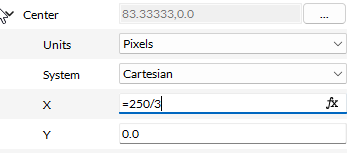
Some properties have sub-properties. Consider the novel region property"" "“Center," ""“which contains a pair of x and y coordinates that define the center of the oval region. Center also has the sub-properties System and Units, which are used to interpret the x and y values.
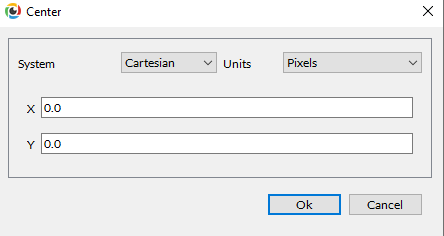
To index the sub-properties of a property, use an additional dot index. For example, this Oval Region is called myTarget, so to access the sub-property x, we would use the syntax: myTarget.Center.X
If you are assigning a value to a property or sub-property within a component (property A), and the value refers to another property within the same component (property B), you do not need to spell out the entire component name of B when assigning A.
For example, if you update myTarget.Center.X to be 50, and you want myTarget.Center.Y to equal myTarget.Center.X, in the y field, you only need to write =x.
The exception to this is if you also have a Conditions List variable or a Custom variable named x. If this happens, LabMaestro will prioritize 1) Conditions List variables, and then 2) Custom variables over 3) Component properties (Center.X), in that order. In case of a conflict with a higher priority variable, you will need to spell out Center.X explicitly to ensure the right value is assigned.
Similarly, if you have a Conditions List variable or Custom variable with the name center you would not want to invoke Center.X when assigning the y value, since this will point to the Conditions List or Custom Variable called Center first and return an error.
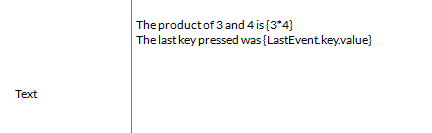
Invoking Values Within a Text Field
To invoke an existing value or the result of an expression within a text field, we use {}. Note that the = is not necessary in this case.
For example:
List of Common Expression Errors
LabMaestro will outline a field in red if it cannot interpret an expression. Hover your mouse over the expression to see the error code.
The table below lists common error codes and their meanings.
|
Error Type |
Description |
Example/Error Message |
|---|---|---|
|
Typecheck Error |
There is an error with the value types used in the expression. This occurs when operands have mismatched types or when compare operations have different types for true and false branches. |
Operator did not have the same type. Left-hand side has type [ ], while right-hand side has type [ ]. Property expects an expression of Integral type, but was provided an expression of Numeral type. |
|
Token Error |
This error occurs when a number is too large or when a string is embedded in a number, rendering conversion impossible. |
Number is too big to fit. Lexer could not read literal starting with number value. |
|
Parser Error |
This error occurs when parsing the expression fails, such as when parentheses are missing. |
Found conditional operator ? but no : for else branch. Missing closing parenthesis in function definition. |
|
Scope Error |
Occurs when something does not exist within the scope of the expression, such as a nonexistent variable or function. |
Identifier [ ] not found. Method [ ] must issue a result. A common error is failing to add quotation marks (“”) around a string. For example, =LastEvent.Key.Value== "Space" |
|
Cycle Error |
Occurs when there is a cycle within the expression where the result of an expression is needed by something else, which in turn is needed for the expression itself. |
Identifier [ ] pointed to a property containing an expression that led to a cycle. |
Related Links
Customizing Stimuli with Mathematical Functions and Expressions