Overview
This page explains how to perform Gamma Calibration for your experimental displays using the LabMaestro software. This calibration ensures that displayed colours are linearized and should be performed independently for all displays.
Before you begin, you should:
-
Have LabMaestro installed and running
-
Have the display you wish to calibrate connected to your computer.
In addition, to calibrate your display gamma using LabMastro, you must own an X-Rite device purchased from VPixx Technologies (I1 Display Pro or I1 Pro3).
Before starting a calibration, make sure your device is at its operating temperature. It is recommended to turn on your device 20-30 minutes before performing the calibration.
Calibration Requirements
As a first step, right-click on the display you wish to calibrate in the Project panel, under Environment, and select Add to Project. Once this is done, the display properties will appear, which include a Calibration section.
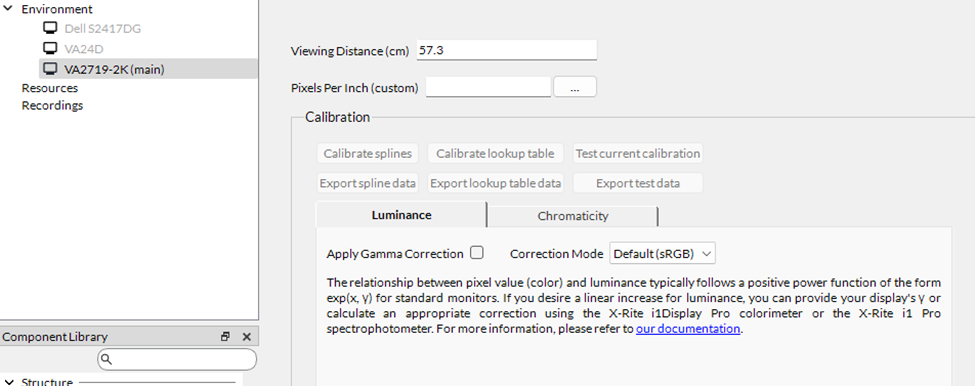
Calibration Process
There are two choices of calibrations you can perform:
-
Short spline calibration. This method is a seven-point calibration per colour channel interpolated using splines. The spline calibration also computes power function coefficients that can be used directly in rendering. This process is quick, but because it relies on interpolation, it may not be as accurate as lookup-table calibration.
-
Lookup table calibration. This method measures 256 points per colour channel and uses a lookup table for interpolation. This process is longer, but returns a more precise calibration.
To perform the calibration, place your device as instructed in the user manual to ensure proper luminance measurements on your display. Once set up in an environment matching your experiment environment, you can press Calibrate splines or Calibrate lookup table to begin calibration. Your device will measure red, green, blue, and white luminance calibration points.
Do not use your computer during the calibration. Any process that:
-
Covers part of the display (opening a new window)
-
Changes in the brightness of the display (changing the “active” window)
is prone to adding errors to your calibration.
Calibration Results
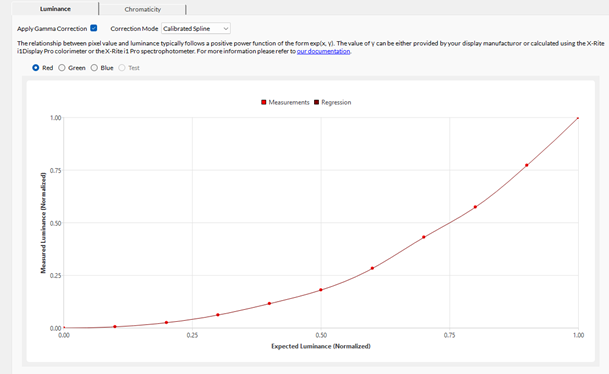
Once calibration is complete, the Luminance tab will contain an output plot showing the expected luminance relative to measurements and the fitted regression. You can use this graph to visualize red, blue, and green corrections independently. This page also lets you select from the different correction modes.
For spline calibration, the choices are sRGB, Calibrated Spline, Calibrated Power Fit, or Manual correction.
The choices for the lookup table calibration are sRGB, Calibrated Lookup Table, or Manual correction.
Toggling the Apply Gamma Correction checkbox will apply this correction whenever the experiment is launched.
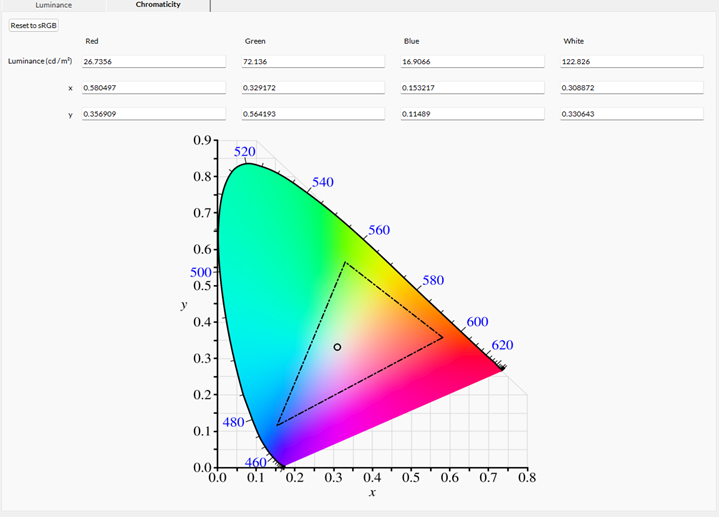
Navigating to the Chromaticity tab, you will see the luminance and chromaticity values for red, green, blue, and white.
Press the Export spline data or Export lookup table data buttons to access calibration data in other software for further analysis or reporting.
Validation Process
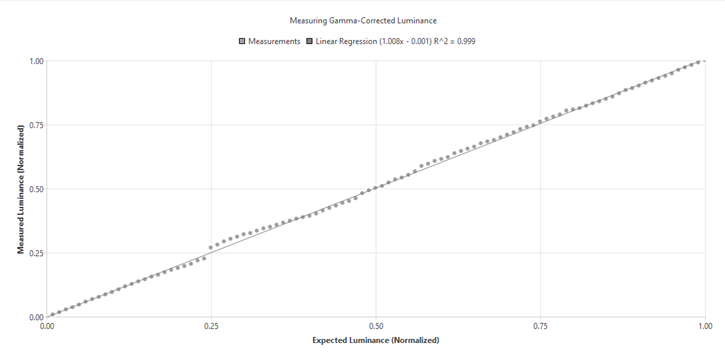
To verify the calibration quality, press Test current calibration. LabMaestro will validate the display’s calibration across all measured gray levels. In the Luminance tab, the Test output shows a graph of all luminance measurements, fit with a linear regression model. As with calibration data, you can export it to a CSV file by pressing the now-available Export test data button.
Related Links