
Product Overview
The TRACKPixx3 2 kHz eye tracking system includes an infrared illuminator. During operation, the infrared lamp illuminates the eyes with invisible infrared light, which reflects off the cornea. This reflection, along with the darker pupil, is captured by the TRACKPixx3; our image processing algorithm converts this into an estimate of the participant’s gaze. Infrared light is used because it reduces the influence of ambient lighting, is non-intrusive, and allows for precise tracking of eye movements.
This documentation focuses exclusively on the infrared illuminator. For our TRACKPixx3 camera hardware manual, see: TRACKPixx3 Eye Tracker.
VPixx offers three different models of infrared illuminators, with different peak wavelengths and operational ranges:
|
Product code |
Name |
Application |
Ideal operating range (measured from camera-eyes) |
Recommended TRACKPixx3 lens |
|---|---|---|---|---|
|
VPX-TRK-9000 |
InfraRed Short-Range 850nm illuminator |
Humans |
40 - 90 cm |
50 mm |
|
VPX-TRK-9002 |
InfraRed Short-Range 940nm illuminator |
Non-human primates |
40 - 90 cm |
75 mm |
|
VPX-TRK-9010 |
InfraRed Long-Range 850nm illuminator |
Humans |
100 - 180 cm |
75 mm |
These units are interchangeable and may be used with the same TRACKPixx3 unit for different research configurations. Note that depending on the application, you may need to change the lens on the TRACKPixx3 in addition to the illuminator (see chart above). Illuminators and lenses may be purchased directly from VPixx Technologies as needed.
This page provides hardware, installation and safety information for all three of VPixx Technologies Inc.’s infrared illuminators. The information provided here applies to all three models unless otherwise specified.
Product Details
Infrared emitter
The infrared emitter contains an array of infrared light-emitting diodes behind a glass panel. The rear of the unit features a slot for mounting it on the TRACKPixx3 mounting bracket and a port for the LEMO interface cable.
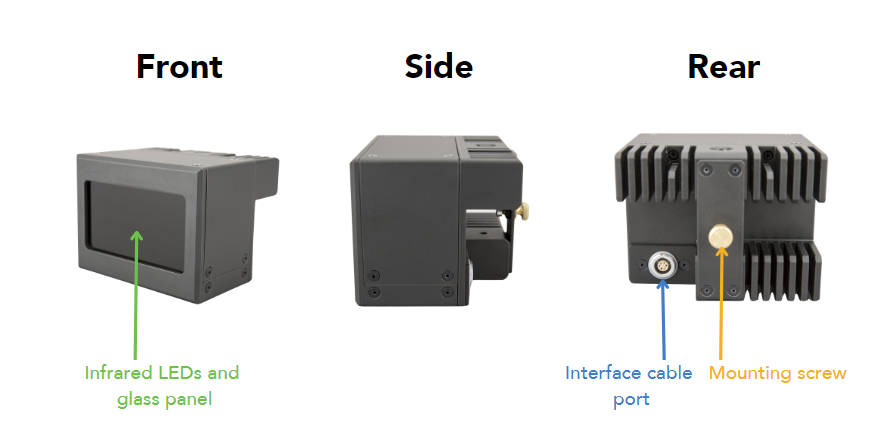
Interface cable
The infrared illuminator has a 6-pin LEMO female port on the rear of the unit. The interface cable connects this port to a 7-pin LEMO port on the back of the TRACKPixx3 camera. The wiring is a straight connection (e.g., 1-1 mapping of pins) except for pin 7 on the TRACKPixx3 camera end, which is floating.
The connection from the TRACKPixx3 provides power and configuration settings to your illuminator. For pin assignment, expand the section below.
Assembly and Installation
What’s included
The following components are included in your infrared illuminator purchase:
-
One infrared illuminator (see Product Overview for the three options)
-
An interface cable
General layout of the TRACKPixx3 system
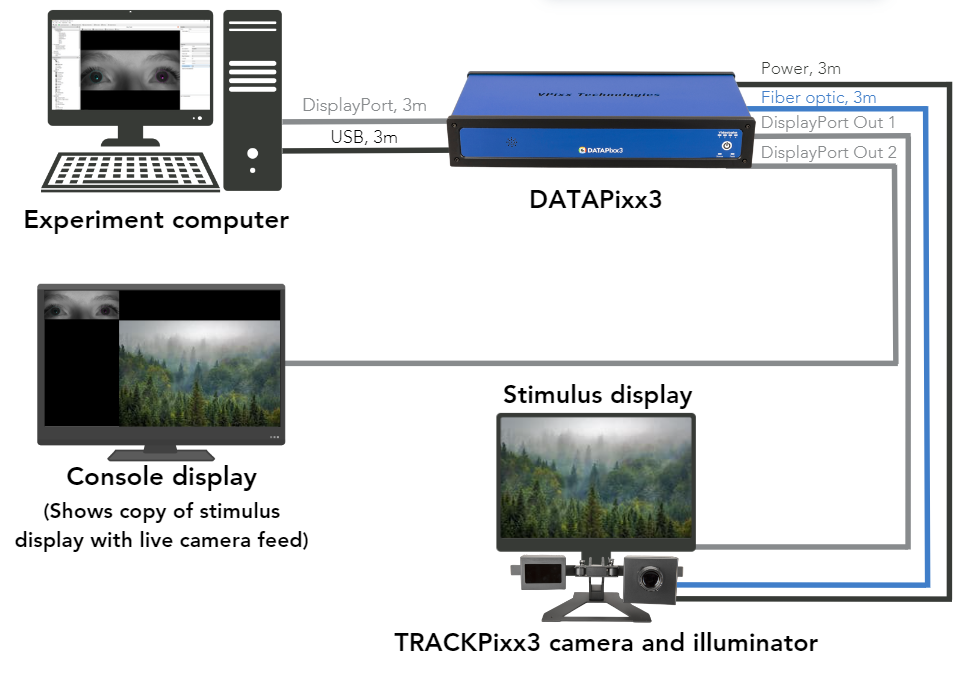
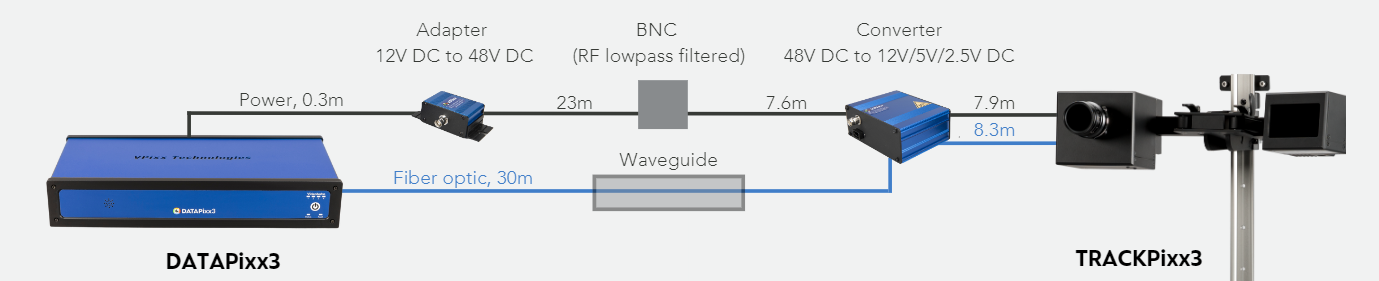
Below are two schematics showing the general layout of the TRACKPixx3 in the tabletop and MRI/MEG configurations. In both cases, the infrared illuminator is mounted opposite the camera on the provided mounting system, and an interface cable connects the two devices.
For more details on installing the full system, see our TRACKPixx3 hardware manual.
Note that a screen mount, as shown in the MRI/MEG installation, can be used in behavioural settings as well. Simply ask our team for your preferred mounting solution when making your purchase.
Mounting the illuminator on the TRACKPixx3 tabletop and screen mounts
The rear of the infrared illuminator has a mounting screw which can be loosened, allowing the illuminator to slide onto the mounting arm of either the tabletop or screen mount. It does not matter which arm you mount it on, provided the camera is mounted on the other side.
Once the illuminator is positioned on the arm, tighten the mounting screw to secure the illuminator in place.
Ideally, the illuminator should be angled to beam directly into the participant’s face. Due to differences in the height, face shape and positioning of different participants, you may be required to adjust the illuminator and camera position/angle for each data collection session. For more general tips on setting up your eye tracker, see our TRACKPixx3 Calibration Walkthrough.
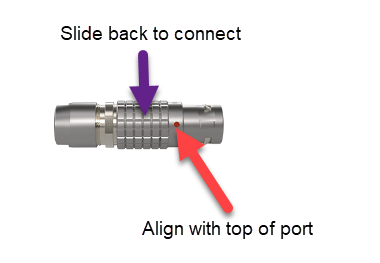
Connecting the LEMO interface cable
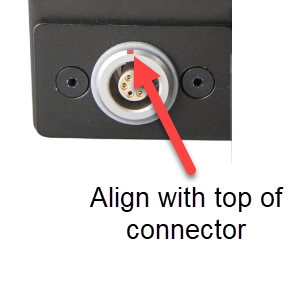
The LEMO connector is designed to fit securely in the illuminator’s interface port. To attach the connector to the illuminator:
-
Identify the 6-pin end of the interface cable
-
Slide back the textured ring on the male connector and align the orange dots on the connector and port:
-
Insert the connector firmly into the port
-
Release the textured ring to lock the connector in place.
-
Repeat this process to connect the 7-pin cable end to the corresponding port on the rear of the TRACKPixx3 camera.

Product Usage
Please read all safety information carefully before using this device.
The infrared illuminator is used in conjunction with the TRACKPixx3 eye-tracking system. Its settings can be configured via the LabMaestro software suite or our MATLAB and Python command libraries.
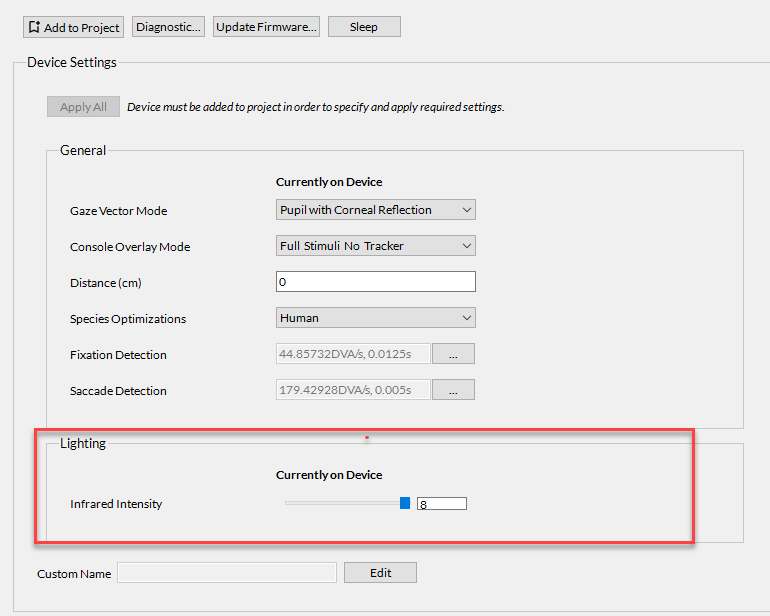
The infrared illuminator has 9 intensity levels, ranging from 0 (fully off) to 8 (fully on). We recommend using a maximum intensity of 8 for all applications. This is the default intensity setting.
LabMaestro
-
In the Project menu, under Environment, double-click on the TRACKPixx3. This will open a settings panel.
-
In the Lighting section, adjust the slider to set the LED intensity:
-
You must add the TRACKPixx3 to a project to apply your settings. Once you have added the TRACKPixx3 to your project, click on Apply All to enable your settings changes.
Product Specifications
|
Specification |
VPX-TRK-9000 |
VPX-TRK-9002 |
VPX-TRK-9010 |
|
Designation |
Short-range |
Long-range |
|
|
Application |
Human |
Non-human primate |
Human |
|
Power requirement |
+12 VDC – 650 mA
|
+12 VDC – 300 mA
|
|
|
Wavelength |
850 nm |
940 nm |
850 nm |
|
Maximum radiation |
15 W/m2 @ 40 cm |
15 W/m2 @ 100 cm |
|
|
Optimal range of use |
40 - 90 cm |
100 - 180 cm |
|
|
Illumination angle |
20o |
6o |
|
|
Operating temperature |
0o C to 70o C |
||
Cleaning and Maintenance
Do not use cleaners that contain any petroleum-based materials such as benzene, thinner, or any other volatile substance to clean any part of this product.
Do not soak or immerse the product in liquid, as it is an electronic device that can be damaged or impaired by moisture. Do not apply pressure to, impact, or rub the sensitive product surface.
Your infrared illuminator does not require calibration and contains no serviceable parts.
To clean, disconnect the power to the unit and wipe the metal chassis and glass surface with a damp microfiber cloth. The port may be optionally cleaned using compressed air.
Troubleshooting your Device
For troubleshooting your TRACKPixx3 eye tracking system, see the troubleshooting section of our TRACKPixx3 hardware documentation: TRACKPixx3 Eye Tracker.
Related Links
Compliance, Safety and Warranty Information
Click on the sections below to expand the relevant information.
Compliance Information

Intertek Safety Mark: Compliance of this product with IEC 60950-1:2005, IEC 62471 is certified by Intertek, an independent testing body.

Caution: Use of controls or adjustments or performance of procedures other than those specified herein may result in hazardous infrared radiation exposure.
For the United States of America
This device complies with part 15 subpart B of FCC rules. Its operation is subject to the following two conditions: (1) this device may not cause harmful interference, and (2) this device must accept any interference received, including interference that may cause undesired operation. This equipment has been tested and found to comply with the limits for a Class A digital device, pursuant to part 15 subpart B of the FCC rules.
For Canada
This Class A digital apparatus complies with Canadian ICES-003.
CISPR warning: This is a Class A product. In domestic environments this product may cause radio interference in which case the user may be required to take adequate measures.
For European Countries
DECLARATION OF CONFORMITY
|
|
Manufacturer’s Name:
Manufacturer’s Address:
|
|
Product Name: InfraRed Short-Range 850nm, InfraRed Short-Range 940nm, InfraRed Long-Range 850nm
|
|
|---|---|
|
2014/30/EEC
|
Electromagnetic Compatibility directive
|
|
The following harmonized standards have been used: |
|
|
EN 61326-1:2013
|
Electrical equipment for measurement, control and laboratory use.
|
|
|
SUPPLEMENTARY INFORMATION
To remain CE compliant, only CE compliant parts should be used with this product. Maintaining CE compliance also requires proper cable and cabling techniques. VPixx Technologies will not retest systems or components that have been modified by customers. Signature: 
|
The following information is only for EU member states:

|
The mark shown to the left is in compliance with the Waste Electrical and Electronic Equipment directive 2012/19/EU (WEEE). The mark indicates the requirement NOT to dispose of the equipment as unsorted municipal waste. For more information call VPixx Technologies Inc. or email us at support@vpixx.com |
Declaration of RoHS Compliance
|

|
This product has been designed and manufactured in compliance with Directive 2015/863/EU of the European Parliament and the Council on the restriction of the use of certain hazardous substances in electrical and electronic equipment (RoHS Directive). |