Product Overview
The 3DPolarizer comes with a DepthQ polarization modulator and four pairs of plastic passive 3D glasses. The system is designed to function with your PROPixx projector to allow 3D stereoscopic viewing. Features include:
-
Up to 480 Hz refresh rate (240 Hz/eye)
-
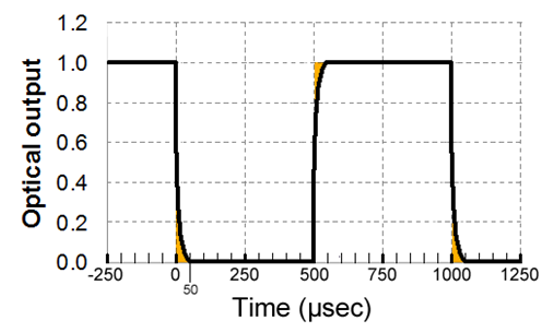
50 µsec symmetrical switching time
-
Perfect alignment of left and right eye images, with no additional equipment or complex image blending required
-
Passive eyewear is inexpensive and compatible with MRI, MEG, OPM and eye-tracking experiments
-
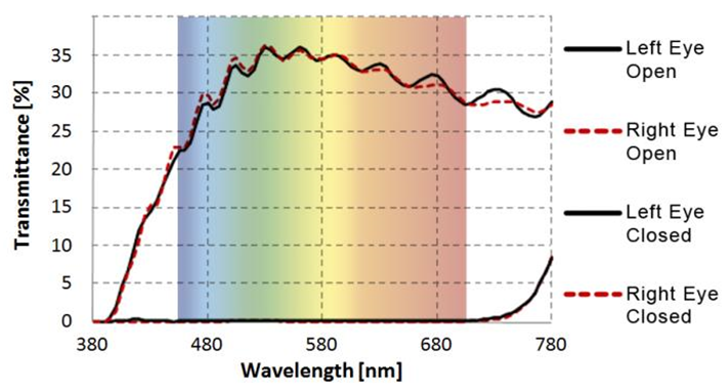
Completely symmetric operation between left and right eyes, with high extinction at all wavelengths for dark states
-
Custom 3D presentation modes that support active crosstalk manipulation and reduction of Pulfrich effects
This page describes the connection and setup procedures as well as the operation of the 3D Polarizer. Compliance, safety and warranty information can be found at the bottom of the page.
Product Details
DepthQ Polarization Modulator
The DepthQ circular polarizer is powered and controlled by the PROPixx projector. Our custom driver ensures symmetric 50-microsecond switching times and minimal crosstalk at up to 480 frames per second (240 Hz/eye).
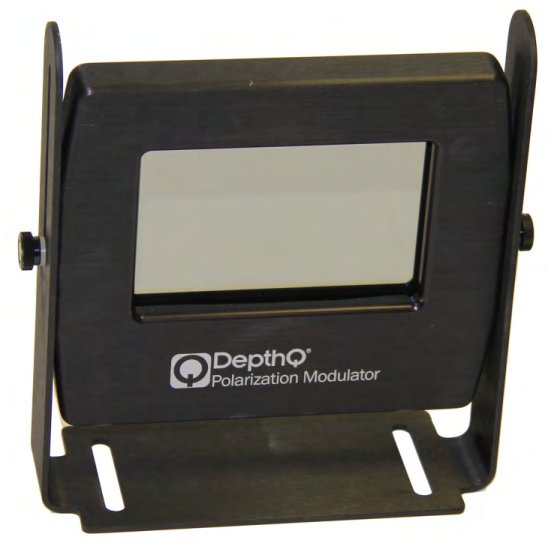
The DepthQ 3D Polarizer offers complete symmetric operation between the left and right eye, along with high extinction, at all wavelengths, for dark states.
Passive 3D Glasses
The 3D glasses provided along with the polarizer are standard plastic circular polarizing filters. These are the same glasses used for 3D movies at the cinema. Many other models of circular polarizing glasses are available on the market, with different form factors and price points (ex., for children). Most, if not all, should be compatible with the DepthQ Polarization Modulator.
If you need a custom lens layout, you can also purchase right- and left-handed circular filter material directly from certain manufacturers (for example, here) and cut it to size. Note that when buying filter material, HE indicates left-handed and HER indicates right-handed polarization.
The glasses filter additional light. A transmission rate of 45% is typical. Importantly, transmission rates vary across individual pairs of commercial glasses; where precise transmission levels are required, we recommend direct measurements using a colorimeter or spectrophotometer. Researchers with target transmission rates may wish to invest in high-quality filter materials such as those linked above.
Assembly and Installation
What’s included:
Your 3DPolarizer kit includes the following:
-
DepthQ Polarization Modulator with attached stand
-
4x plastic passive 3D glasses
-
Interface cable
The polarizer is fragile. Care should be taken to avoid dropping or scratching the unit during installation and use.
Connecting the polarization modulator to your PROPixx projector
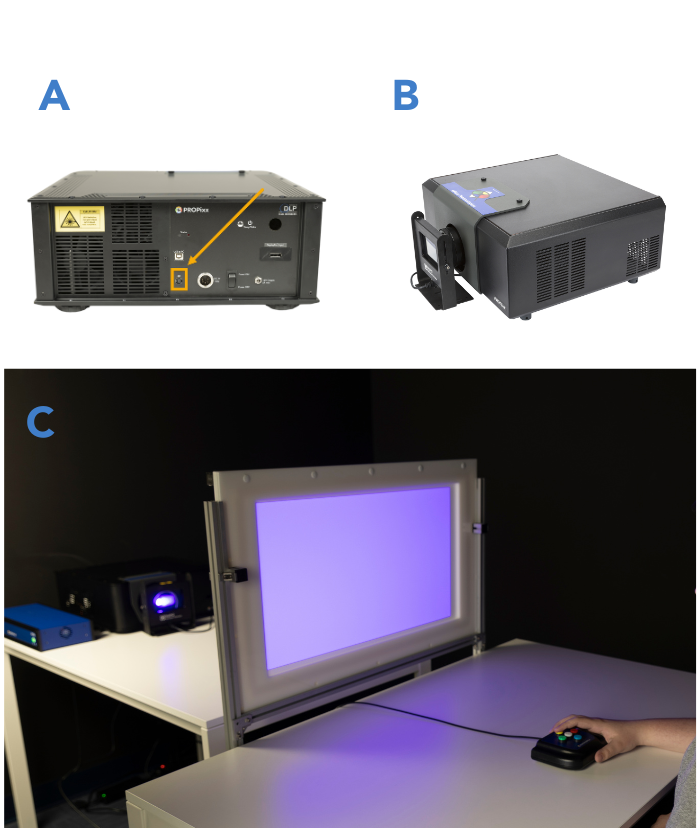
The DepthQ Polarization Modulator is connected to the VESA 3D port on the rear of the PROPixx (indicated in A below). This cable provides both power and signal control to the unit.
The polarizer should be placed in front of the PROPixx lens (shown in B and C below). A distance of 20-50 mm between the lens and filter is recommended.
Screws on either side of the polarizer stand can be used to raise or lower the polarizing window to align with the projector lens. Ensure the window is aligned such that the edges of the projected image are clearly visible and free of shadows/clipping.
When placing the polarization modulator, ensure the logo on the modulator faces away from the lens. A yellow sticker on the top of the unit shows the direction of the light path. The arrow should point away from the PROPixx.
Product Usage
By default, the 3DPolarizer will not display 3D stimuli unless it receives a signal from the PROPixx to do so. When the 3DPolarizer is actively receiving a 3D signal and polarizing your display, the device makes a faint but audible buzzing noise, and you will notice a drop in display luminance.
There are two ways to send a 3D signal to the 3DPolarizer. You can use either a Test Pattern or manually configure your PROPixx to display in 3D in your experiment. See below for more details.
Test Patterns
Test patterns are simple demonstrations of VPixx products. They are preloaded onto VPixx hardware and do not rely on your graphics card or experiment code. They are used to quickly visualize product features and validate system performance, independent of your PC.
Some VPixx devices have test patterns that can be accessed by remote control. For access to all device test patterns, open the LabMaestro application, right-click on the device in the Environment section of the Project pane, and select Test Patterns from the menu. This will open the Test Pattern widget.
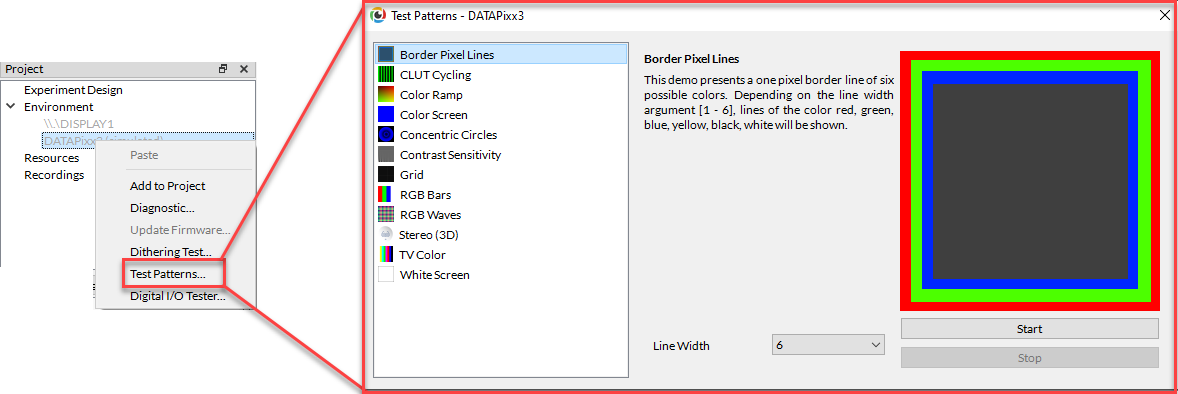
Only test patterns suitable for your selected device will appear in the widget. Each test pattern includes an explanation of the pattern and an example of expected behaviour. Some test patterns include options to adjust the pattern parameters. While a test pattern is enabled, your device will be unresponsive to typical user behaviour (e.g., mouse clicks). Stop the test pattern to return to regular operation.
LabMaestro 1.11 is currently supported under Windows and Linux. MacOS support will be implemented soon. To access test patterns in macOS, open the vputil application and type ‘tp’ to see options.
The 3DPolarizer has two associated Test Patterns that you can use to verify the 3D features are working on your PROPixx:
-
3D Pictures Slideshow: This Test Pattern shows six different high-resolution static 3D images, which demonstrate the 3D capabilities of your hardware. It is compatible with both the 3DPixx and 3DPolarizer accessories. Specific images can be selected by passing a number from 1-6 as the second argument in the VPutil tp command.
-
Stereo Goggles: This Test Pattern presents alternating green and red stimuli. Viewers not wearing 3D glasses will see a temporally fused, static yellow screen. On the right side of the image a sequence of gray lines are each presented in only one of the two eyes. This Test Pattern is compatible with both the 3DPixx and 3DPolarizer accessories.
Using 3D in your experiments
To present a 3D stimulus in your experiment, you will need to configure your PROPixx to be in one of our 3D modes. We have several modes to choose from depending on how your stimuli are configured, what experiment software you are using, and what your research goals are. To learn more about our different supported 3D modes and how to set up a 3D experiment using the 3DPolarizer, see our tutorial: 3D Projection with the PROPixx and 3D Polarizer. This tutorial includes several experiment code examples you can use and modify to suit your needs.
Optimizing your 3D display
The 3DPolarizer system uses circular polarization of an image to produce 3D images. To preserve polarization throughout the light path and ensure a high-quality 3D image, it is important that:
-
Your projection screen is optimized for 3D. For the best possible 3D display, we recommend using 3D-optimized screens that are ‘silvered’ and preserve image polarization. VPixx offers a line of 3D-optimized screens for use with the PROPixx and 3DPolarizer. See this product page for more details.
-
Any mirrors in the light path are first-surface. First-surface mirrors have a reflective coating on the first layer of the glass, minimizing the number of internal reflections that can scatter polarization.
-
The use of hot/cold mirrors and other filters is limited. Certain filters and mirrors, such as those used for some infrared eye-tracking systems, can scatter polarization and create blurry images.
For more details on how to optimize the quality of your 3D display, please see our tutorial: 3D Projection with the PROPixx and 3D Polarizer.
Product Specifications
-
Polarization type: Circular L/R symmetrical, neutral color
-
Maximum number of frames per second: 480 FPS (QUAD4X 480Hz)
-
Switching time: 50 µsec
-
Open transmittance: ~32%
-
Aperture size: 9.84 x 6.11 cm (3.875 x 2.41 in)
-
Operating temperature: +5 to 52 deg C (40 to 125 deg F)
-
Polarized glasses: Glasses are circular and use a standard 0/0 orientation.
-
Kit includes 4 pairs of passive glasses
Cleaning and Maintenance
Do not use cleaners that contain any petroleum-based materials such as benzene, thinner, or any other volatile substance to clean any part of this product.
The frame of the DepthQ Polarization Module can be wiped down with standard cleaning solutions. The polarizing window can be gently wiped with a soft cloth and warm water, and a small amount of gentle soap (e.g., hand soap).
Passive filter glasses should be thoroughly cleaned and disinfected between uses as they come in contact with the participant’s face. These plastic glasses can be wiped down with a disinfectant wipe or even submerged in soapy water for thorough cleaning.
Troubleshooting Your Device
Below are some possible issues you can encounter when using the 3DPolarizer.
|
Issue |
Solution |
|---|---|
|
The image flickers or is unstable in 3D |
Possible frame dropping occurring. See A Scientist's Guide to Frame Dropping for general recommendations. |
|
3D Test Patterns work, but 3D experiment fails/polarizer is not buzzing while experiment runs |
The experiment is not configured correctly. See 3D Projection with the PROPixx and 3D Polarizer for some code examples to use as a guide. |
|
Neither Test Patterns nor 3D experiments work (MRI facility) |
Possible magnetic interference. The DepthQ 3D Polarization Module must be behind the 100 Gauss line to operate normally. Try moving the polarizer away from the bore, allow it to cool down, and see if it begins working normally. |
Related Links
Compliance, Safety and Warranty Information
Click on the sections below to expand the relevant information.
Compliance Information
The following information is only for EU member states:

|
The mark shown to the left is in compliance with the Waste Electrical and Electronic Equipment directive 2012/19/EU (WEEE). The mark indicates the requirement NOT to dispose of the equipment as unsorted municipal waste. For more information call VPixx Technologies Inc. or email us at support@vpixx.com |
Declaration of RoHS Compliance
|

|
This product has been designed and manufactured in compliance with Directive 2015/863/EU of the European Parliament and the Council on the restriction of the use of certain hazardous substances in electrical and electronic equipment (RoHS Directive). |