There are three generations of PROPixx. This guide is for the most recent version, the PROPixx with DisplayPort input, released in September 2023. For details on the older versions, see our legacy hardware manuals here.
Product Overview
The complete PROPixx projection system provided by VPixx Technologies consists of the following components:
-
A PROPixx 1440Hz projector (standard or /MRI)
-
A lens suited to the desired display size and projection distance
-
A DATAPixx3 video I/O hub that acts as a control unit
-
All required DisplayPort video cables and USB cables
-
A remote control for operating the projector
-
A Lens Selection Report prepared by VPixx Staff Scientists
PROPixx /MRI units installed inside a magnetically-shielded MRI room must be combined with a SHIELDPixx shielding enclosure and additional cabling.
In addition to the components listed above, you will need a projection screen provided by VPixx or sourced elsewhere.
Product Details
This hardware manual concerns the PROPixx projector (standard and /MRI units) and PROPixx-specific display features. For data acquisition, triggering, and other I/O integration features, see the user manual for the DATAPixx3.
The projector
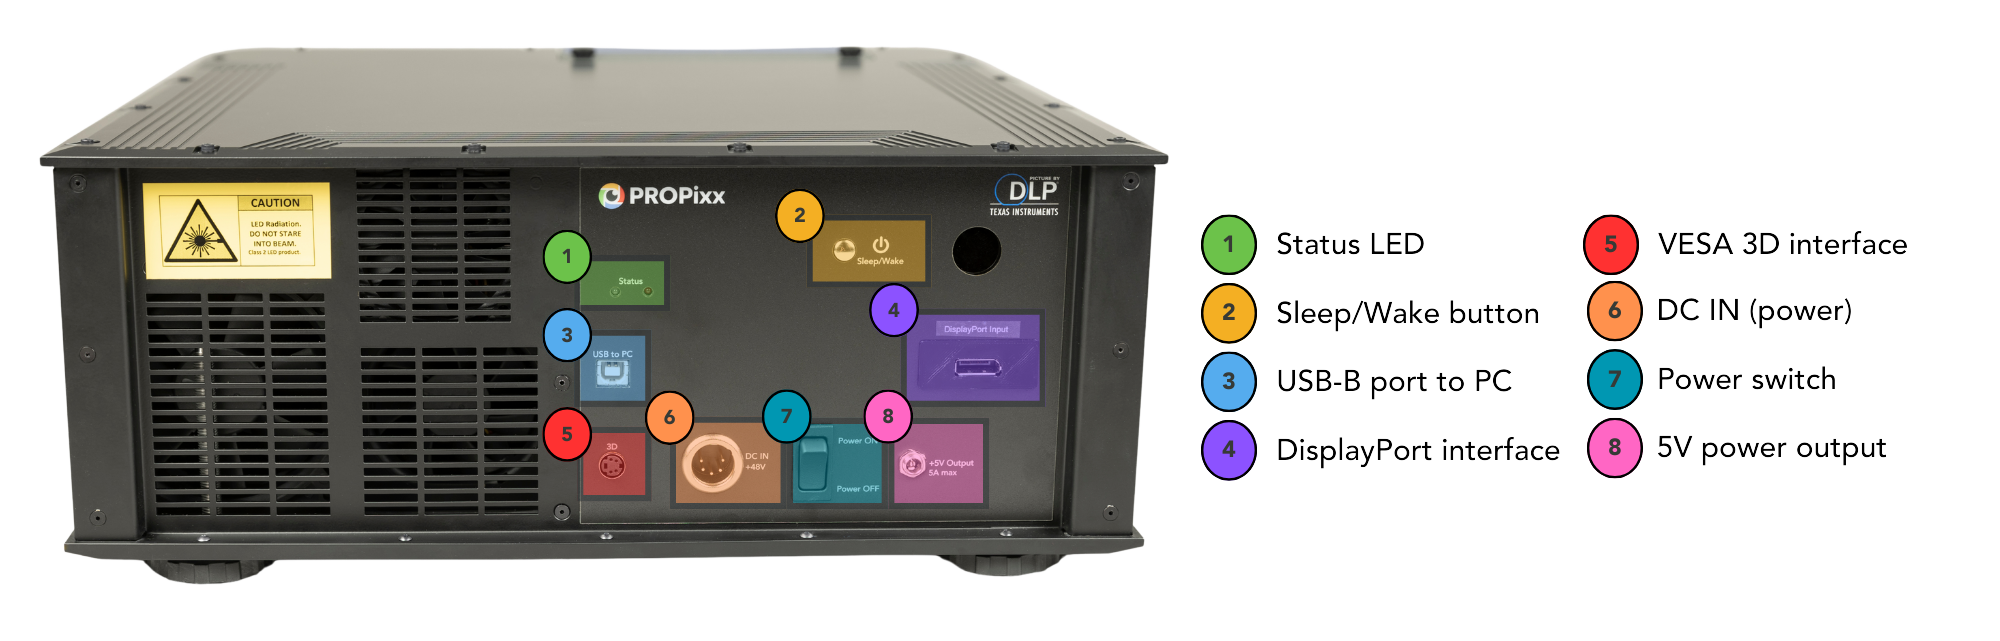
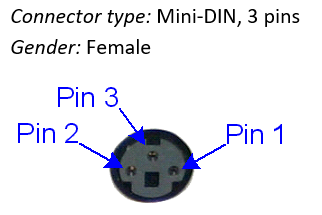
VESA 3D interface
The PROPixx's VESA 3D interface enables 3D stimulus presentation via the 3D Polarizer (sold separately). Below are the industry standard pin labels and their corresponding function.
|
Pin |
Description |
|
|
1 |
+5 VDC ** |
|
|
2 |
GND |
|
|
3 |
VESA_LR (+5 VDC) |
|
|
Shield* |
||
*Shield is tied to the GND by a 0 Ohm resistor inside the DATAPixx3.
**Current limited (400mA).
The remote control
Below is an image of the remote control for the PROPixx projector, with a table of buttons and their functions. Note that some buttons are reserved for future development; these are listed as not assigned for the time being.
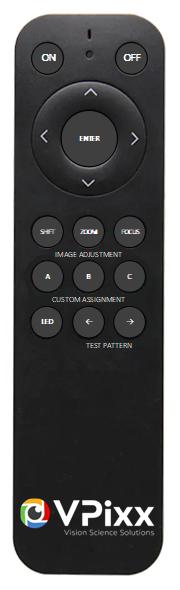
|
Button |
Function |
|---|---|
|
ON |
Wake the projector |
|
OFF |
Sleep the projector |
|
Up arrow |
Not assigned |
|
Down arrow |
Not assigned |
|
Right arrow |
Not assigned |
|
Left arrow |
Not assigned |
|
Enter |
Not assigned |
|
Shift |
Not assigned |
|
Zoom |
Not assigned |
|
Focus |
Not assigned |
|
A |
White grid |
|
B |
RGBW bars |
|
C |
3D test pattern |
|
LED |
Toggle between light source on/off. Useful when the operator wishes to hide the display contents without sleeping the projector. Contents will still appear on the console display. |
|
<- |
Previous test pattern |
|
-> |
Next test pattern |
Test patterns are images loaded into the PROPixx hardware. They are specific to the PROPixx projector can be accessed by toggling the → and ← arrows at the bottom of the remote. These are useful particularly when installing and troubleshooting the projector, as they do not require a video connection to the PC.
|
Test pattern |
Description |
|---|---|
|
None |
Normal operating mode; requires a video signal ifrom the PC |
|
White grid |
A white grid of lines on a black background. Used for ensuring the projector is in focus and well-aligned on the projection screen. |
|
RGBW bars |
Four vertical bars of red, green, blue and white. Used to validate performance of the RGB LED light sources. |
|
3D test pattern |
For use with the optional 3D polarizer and passive 3D glasses. Used to validate 3D stimulus presentation. Note that during this demo, you will hear a quiet buzzing noise from the polarizer. This is normal. |
|
CYM bars |
Three vertical bars of cyan, yellow and magenta. Used to validate performance of the RGB LED light sources. |
|
White screen |
A white screen. Useful for luminance tests. |
|
Black screen |
A black screen. |
|
SMPTE colour bars |
Multicoloured bars. Standard television test card. |
A full list of all test patterns for your system, including descriptions and images of the expected pattern appearance, are available in LabMaestro. See the section below on PROPixx Projector | Test patternsfor more details.
System Requirements
VPixx Software Tools
VPixx Software Tools is a package of APIs and high-level software tools for use with VPixx products. It contains everything you need to connect to, configure and operate our devices from your experiment PC. It includes the following:
-
LabMaestro, a program designed by VPixx Technologies for configuring VPixx hardware and designing/implementing experiments.
-
Datapixx.mex, a library of commands for use with MATLAB/Psychtoolbox and VPixx products
-
pypixxlib, a library of Python tools for VPixx products
The latest version of VPixx Software Tools can be downloaded directly from our website at any time. Support documentation, tutorials, and demos for all of our software tools can be found on our support site: https://docs.vpixx.com/
Supported operating systems
VPixx Software Tools are developed and supported under Windows, macOS and Linux (Ubuntu) operating systems. For an up-to-date list of supported OS versions visit Software Download & Information.
Recommendations for experiment PCs and graphics cards
We regularly receive questions about what experiment PC characteristics and graphics cards we recommend for use with our hardware. Generally speaking, most modern machines and GPUs (i.e., from the last 5 years) should be compatible with our devices. The following minimum video output must be supported:
-
PROPixx projector, VIEWPixx LCD Series: 1920 x 1080 resolution, 120 Hz refresh
-
VIEWPixx3 /OLED: 2560 × 1440 resolution, 120 Hz refresh
Unfortunately, we are not able to exhaustively test commercially available systems and make specific recommendations regarding makes/models.
Recommendations for video adapters
Please use one of the following video protocols from your PC:
-
DisplayPort
-
DisplayPort mini/Thunderbolt
-
USB-C to DisplayPort
We do not recommend converting from other video protocols (e.g., HDMI or VGA) as this can have unpredictable consequences for display behaviour.
Recommendations for console monitors
Implement a console by connecting a 1920 x 1080 LCD monitor to the DisplayPort out 2 on the side of the DATAPixx3. Currently, we recommend the following third-party screens as monitors for use with the PROPixx:
|
Name |
Resolution |
Available from VPixx |
|---|---|---|
|
BenQ XL2411P 24-inch monitor with DisplayPort and Dual-Link DVI |
1920 x 1080 @ 120 Hz |
No |
|
BenQ XL2430B 24-inch monitor with DisplayPort and Dual-Link DVI |
1920 x 1080 @ 120 Hz |
No |
|
1920 x 1080 @ 120 Hz |
Yes, VPX-ACC-1004 |
You may have success with other third-party monitors with the same resolution, but we cannot guarantee it.
The Lens Selection Report
Projection geometry refers to the layout of your research space and the path of the projector beam through it. Care must be taken to ensure the beam:
-
is suited to the desired final display size and projection screen
-
is not clipped by obstacles in or near the light path (e.g., waveguides, heads)
-
is successfully redirected by one or more mirrors, if necessary
A critical part of the planning process for your projection system is selecting a suitable projection lens. The VPixx catalogue includes several lenses with varying throw ratios that determine the magnification factor of the projected image over a given distance.
As part of the sales process, VPixx staff scientists will provide a free, in-depth consultation on your system's planned projection geometry and prepare a report for you with our lens recommendations. This report includes the maximum and minimum image sizes achievable given the selected lens, recommended mirror dimensions, and other information regarding the proposed system layout. A copy of the report is included with your PROPixx shipment for reference.
Lens selection reports are included in the PROPixx sales process as of Fall 2024. Consultations are free and do not commit you to a purchase. You may skip the lens selection consultation; in this case, VPixx is not responsible for any issues with your lens choice. We do not refund lenses.
Moving your PROPixx system? Most lenses can be swapped on-site. Contact VPixx with your PROPixx serial number and new layout requirements, and we can provide a quote for a new lens to use with your existing projector.
See our Example Lens Selection Report here.
Assembly and Installation
What’s included
-
AC adaptor and power cord x2
-
5 mm Allen wrench
-
Remote control and batteries
-
PROPixx projector with lens installed
-
USB cables x2
-
DisplayPort cables x3
-
DATAPixx3 controller
Rear vs. front projection
By default, the PROPixx video is formatted for front projection, where the observer and the projector are on the same side of an opaque screen. Rear projection places the projector behind a translucent screen, on the opposite side of the screen from the participant.
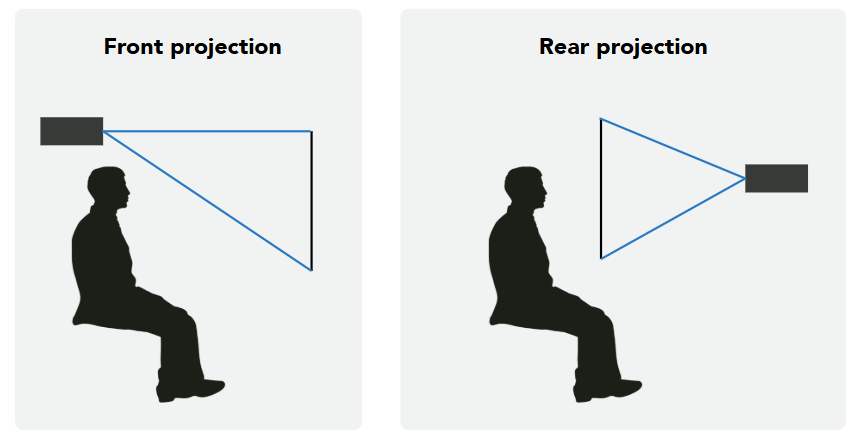
In practice, behavioural labs use either type of projection, while MRI, MEG and OPM facilities almost exclusively use rear-projection.
When rear projecting, the image is flipped compared to front projection. You can horizontally flip your display for rear projection using our software tools. Refer to the section PROPixx Projector | Connecting to your device for more details.
Front projection installations almost always require the use of lens shifting to avoid the light path being blocked by the participant’s head. Lens shifting mechanically translates the projected image without altering it. Refer to the section PROPixx Projector | Lens shifting for more information.
Mounting the projector - On a surface
The projector weighs approximately 15 kg (33 lbs). Use safe handling techniques when lifting the projector. Backup safety chains or wires should always be used with ceiling mount installations.
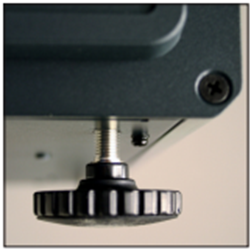
The four adjustable feet under the chassis enable the projector to be lowered onto a flat surface without the risk of hands being trapped between the chassis and the surface. These feet can be used to adjust the height of the projector such that the projected image is level.
Mounting the projector - On the ceiling
The projector is designed for use on a flat surface, but it can also be suspended from a ceiling if your application requires it. Four M4 mounting holes with a 0.7 mm pitch are provided under the projector to allow bolting to a ceiling mounting plate. Refer to the section PROPixx Projector | Product dimensions for a schematic with labelled holes.
It is possible to mount the projector upside-down. The projected image can be flipped vertically in the LabMaestro settings. Refer to the section PROPixx Projector | Connecting to your device for more information.
Some researchers who have elected for a ceiling mount noticed that vibration can be an issue, particularly if the PROPixx is mounted via a single post. If you are installing a ceiling mount, please consider using multiple support struts to reduce the risk of vibration.
Typical system layouts
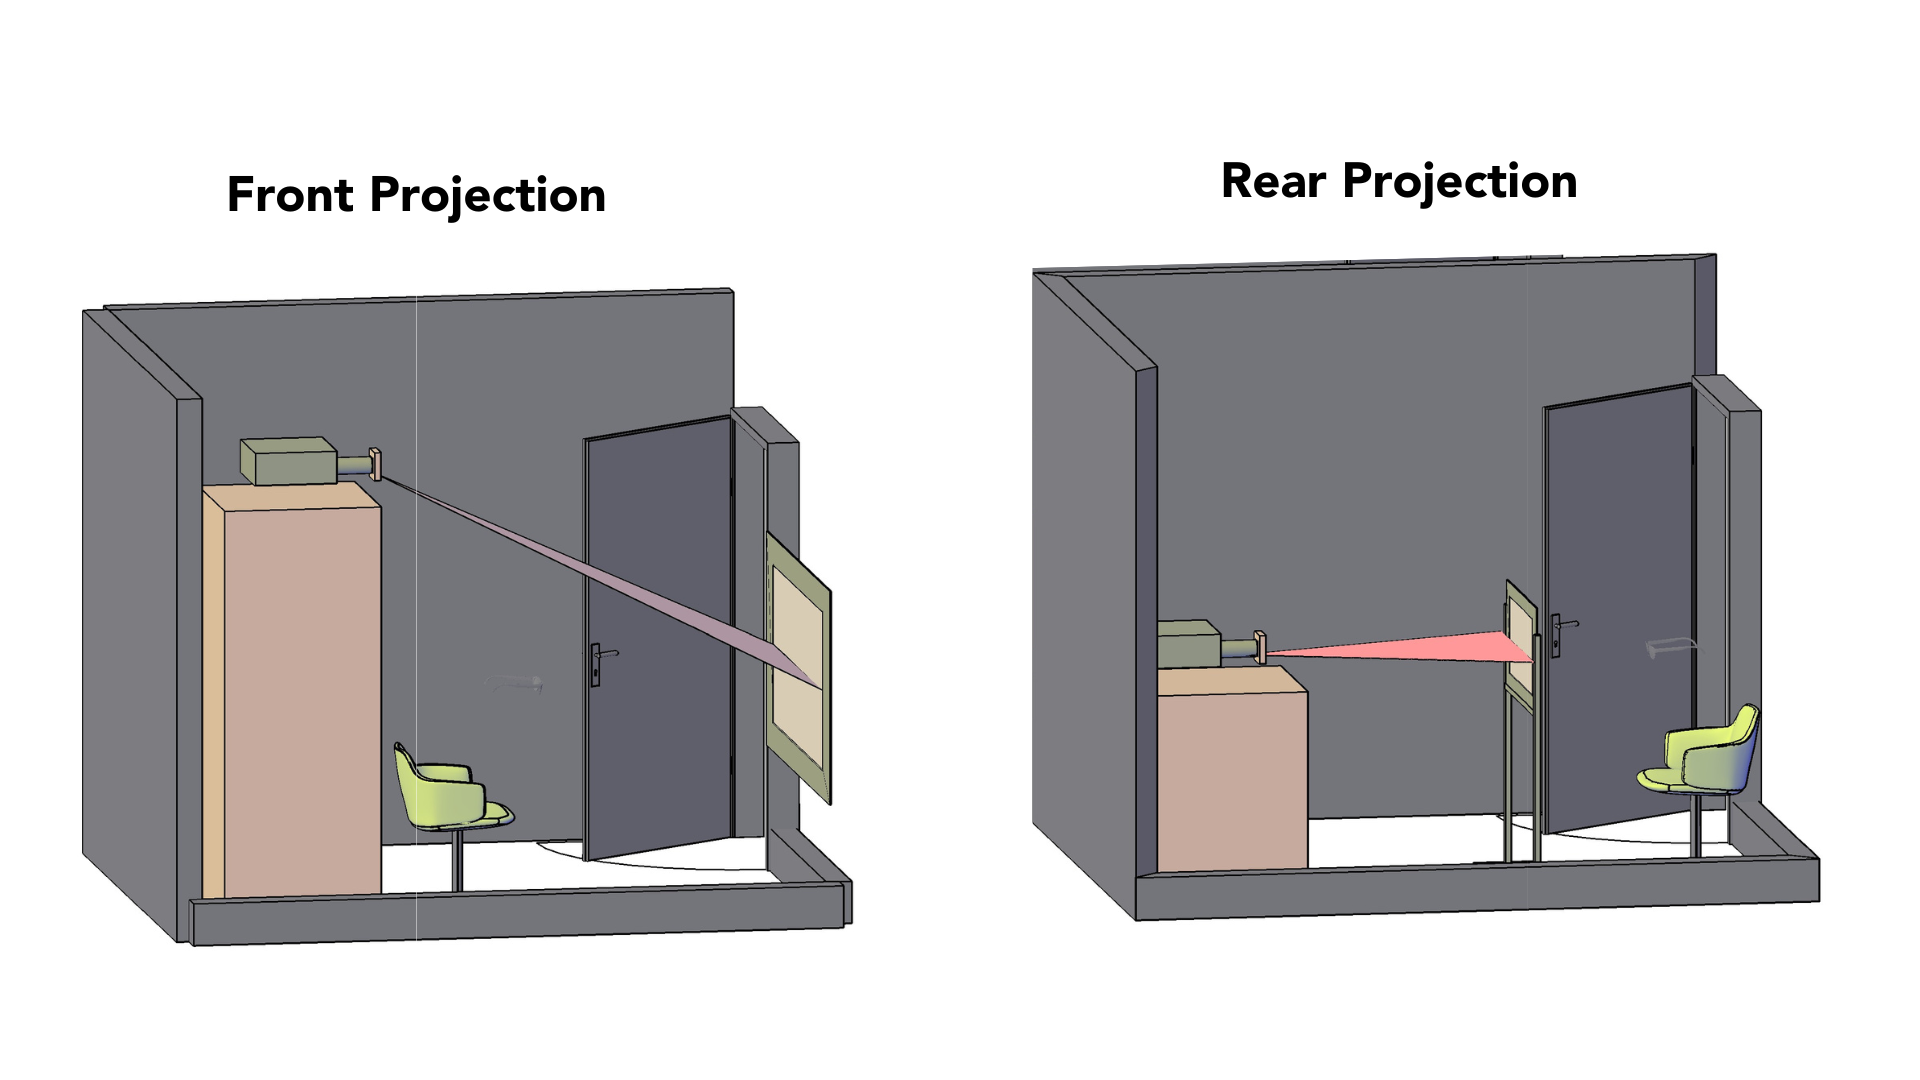
Behavioural lab
Below are two examples of how the PROPixx might be used in a behavioural lab. These schematics illustrate two standard layouts, direct front projection and direct rear projection.
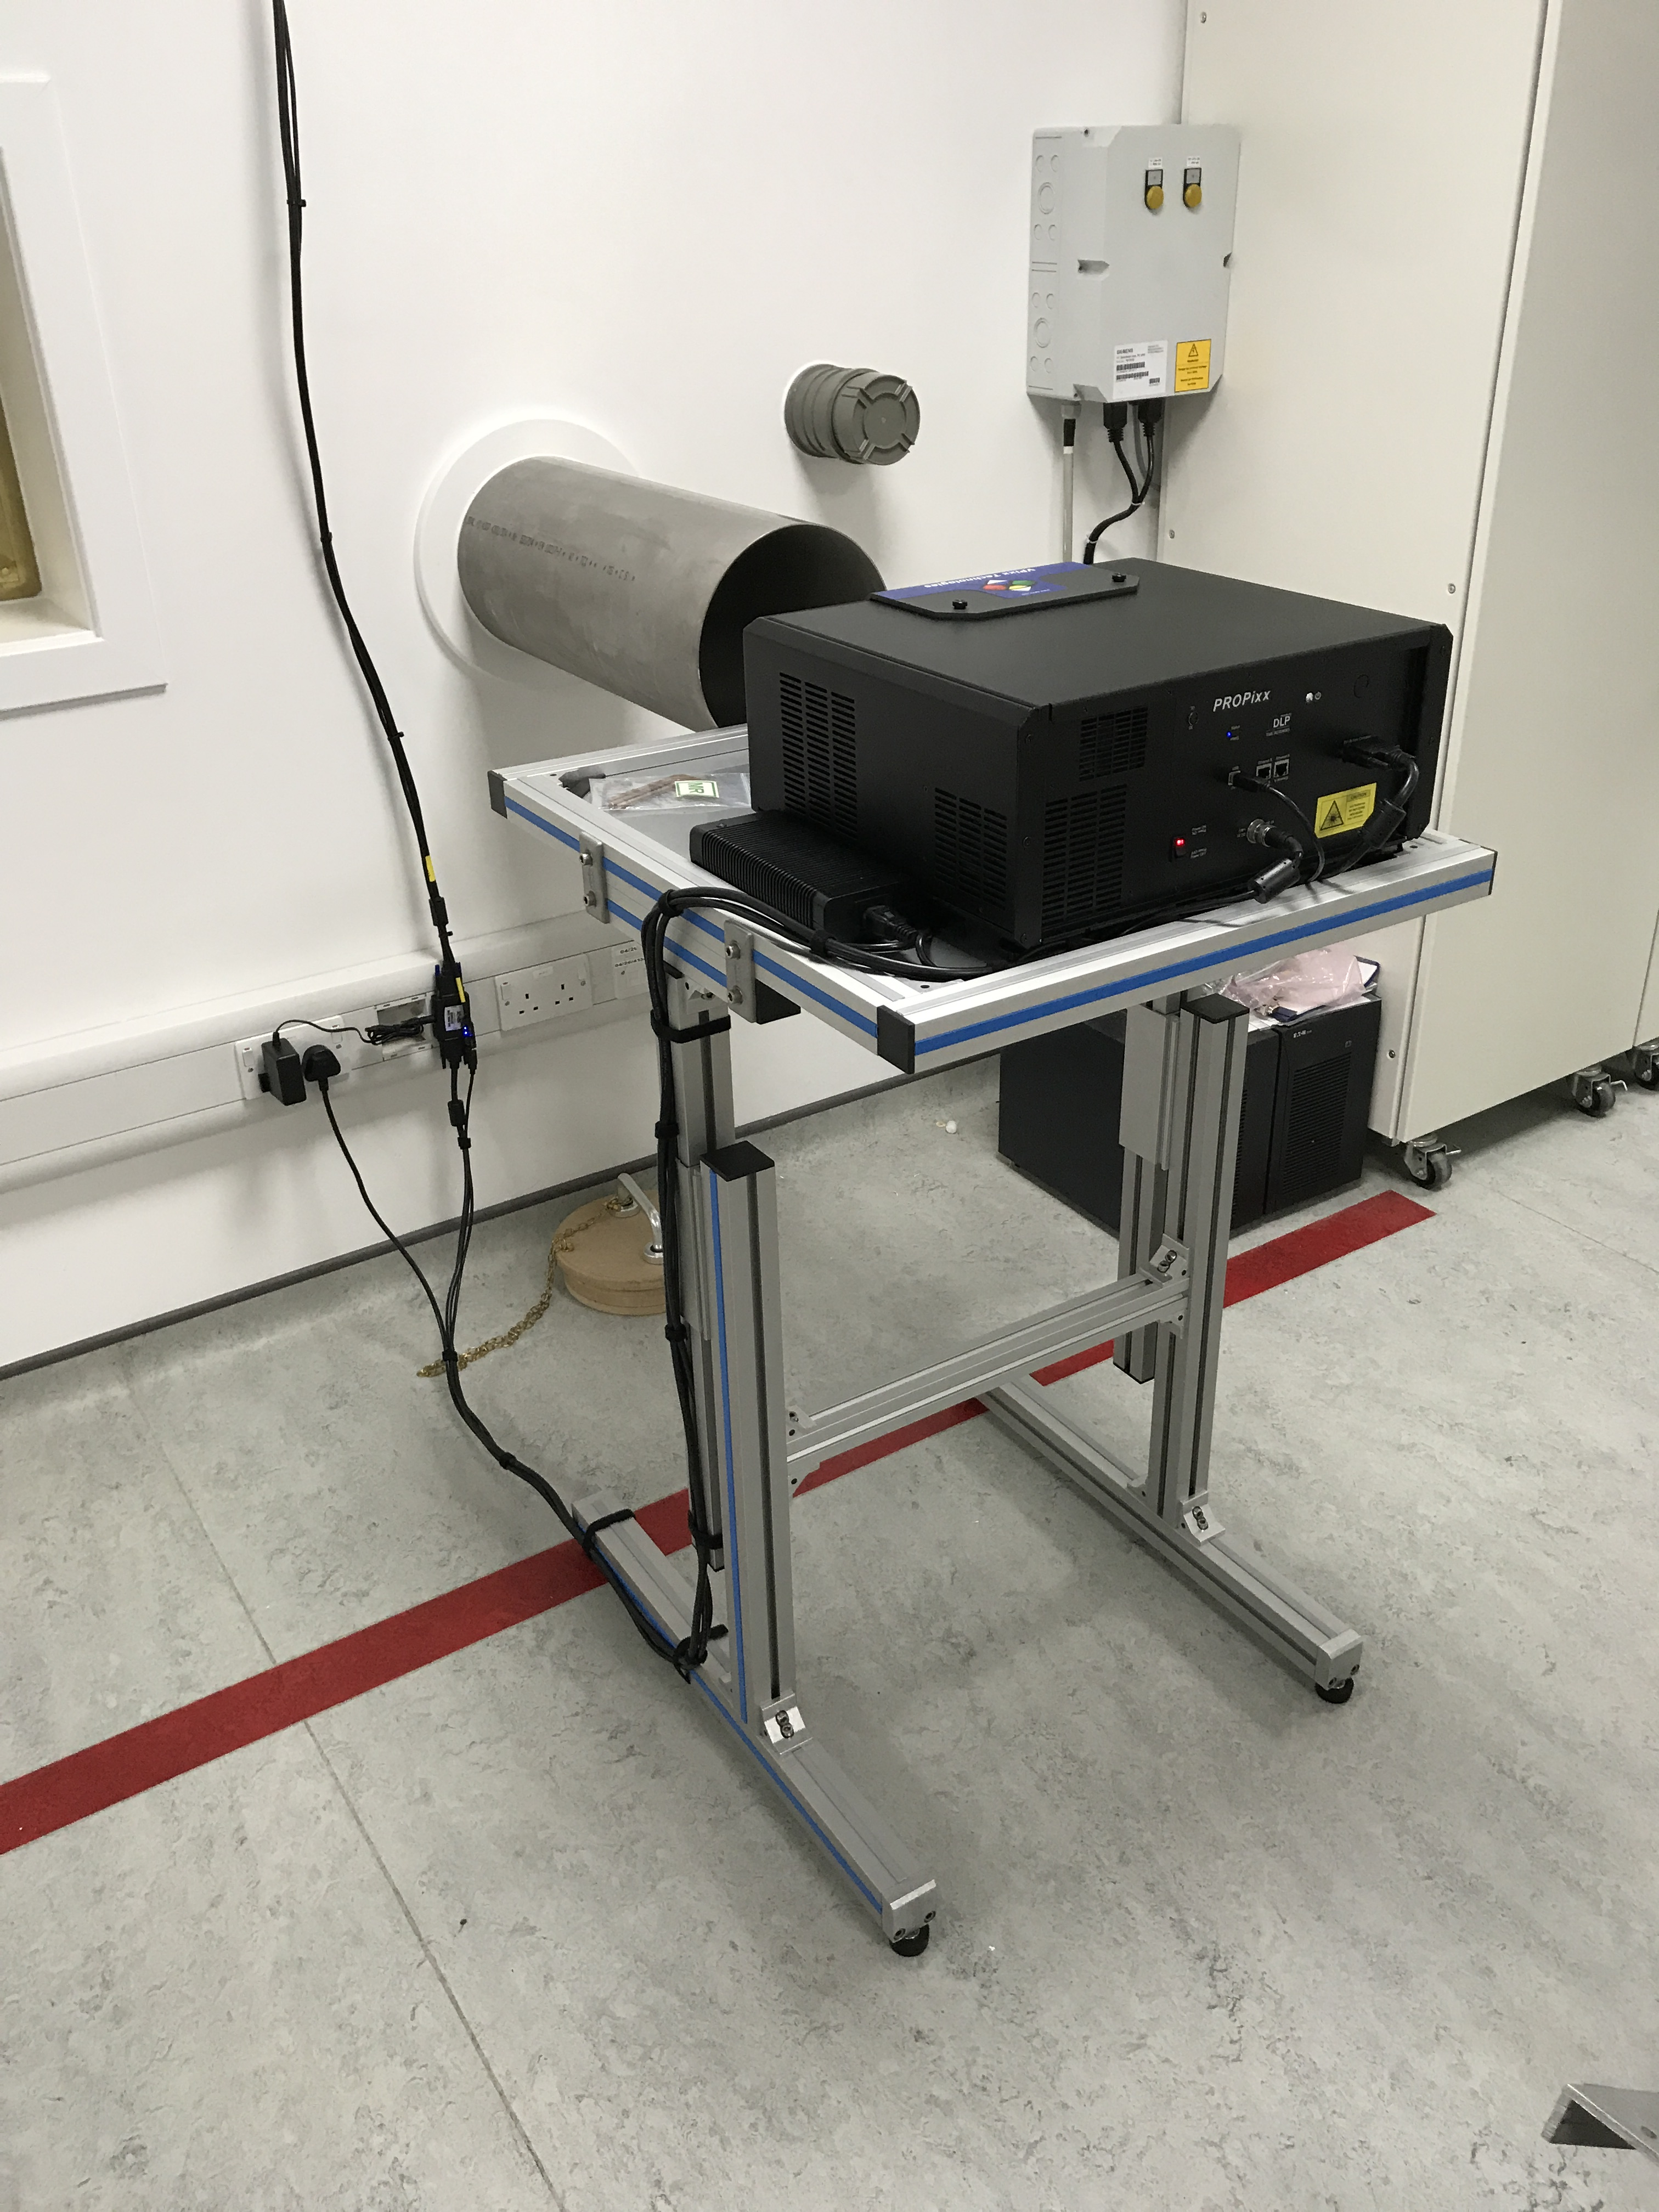
MRI facility (with waveguide)
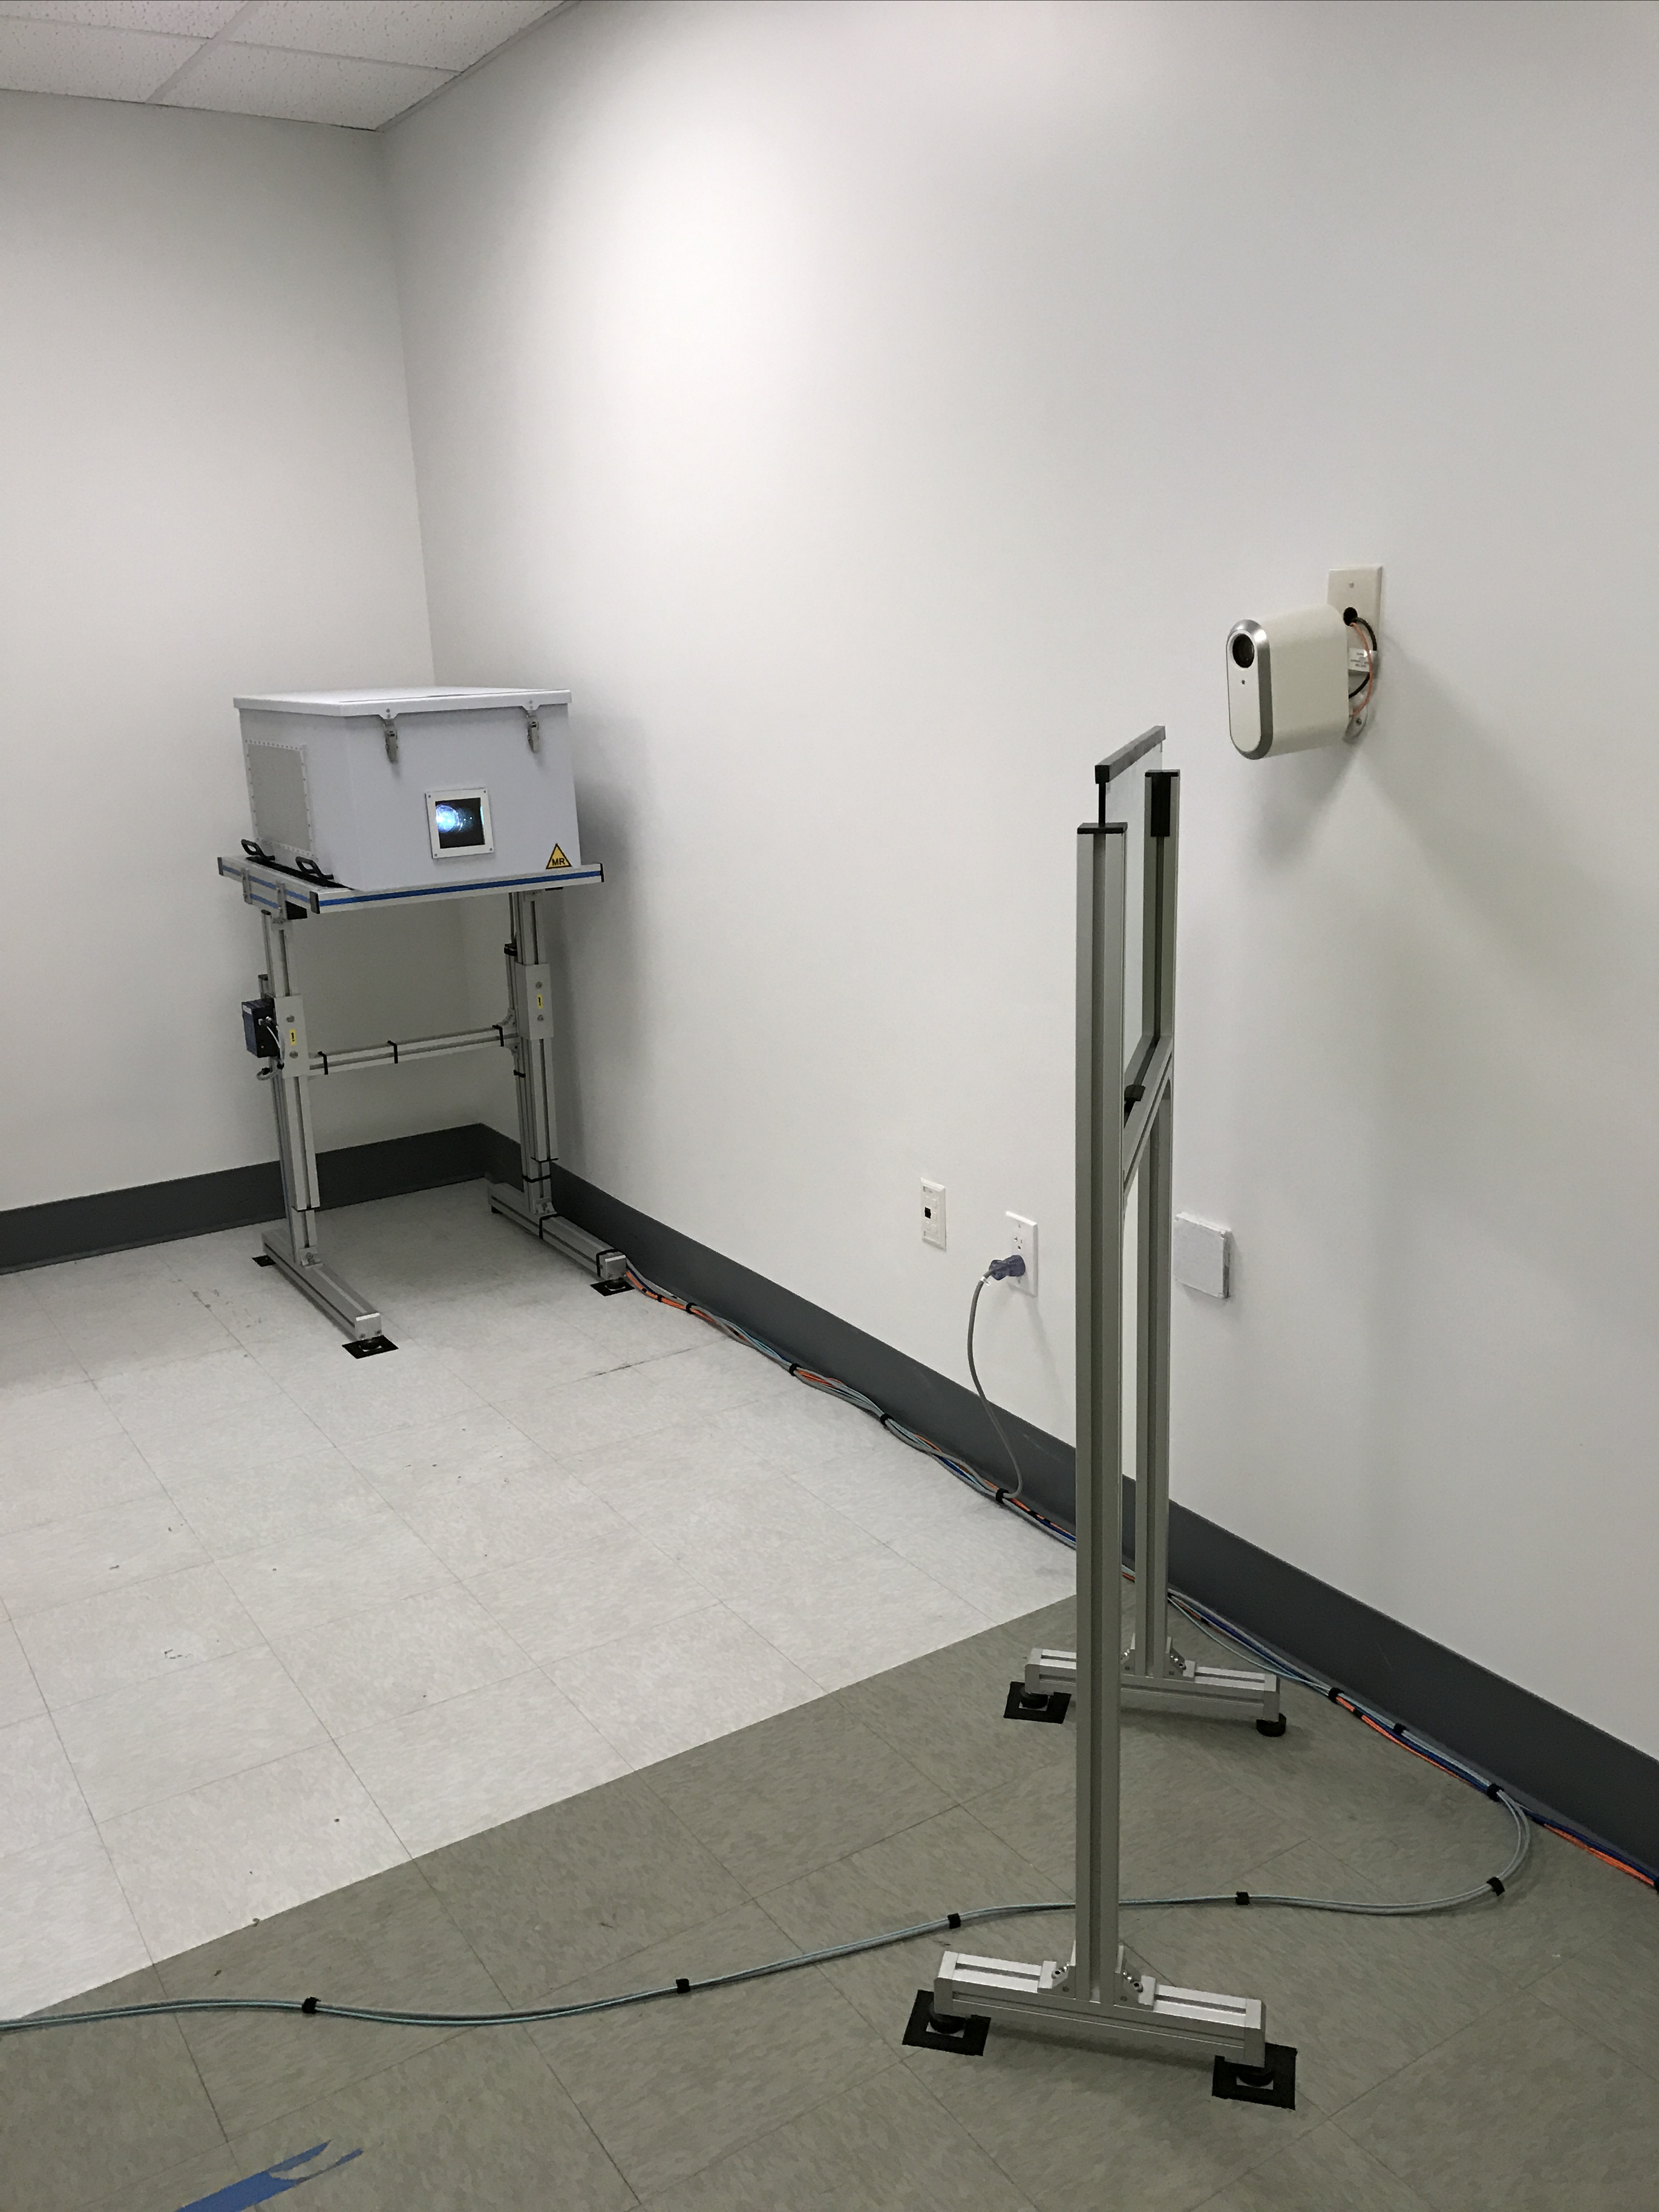
Below is an example of a typical MRI facility with a waveguide. The PROPixx is installed on a stand, allowing the lens to point directly into the waveguide leading to the magnetically shielded room.
MRI facility (with no waveguide)
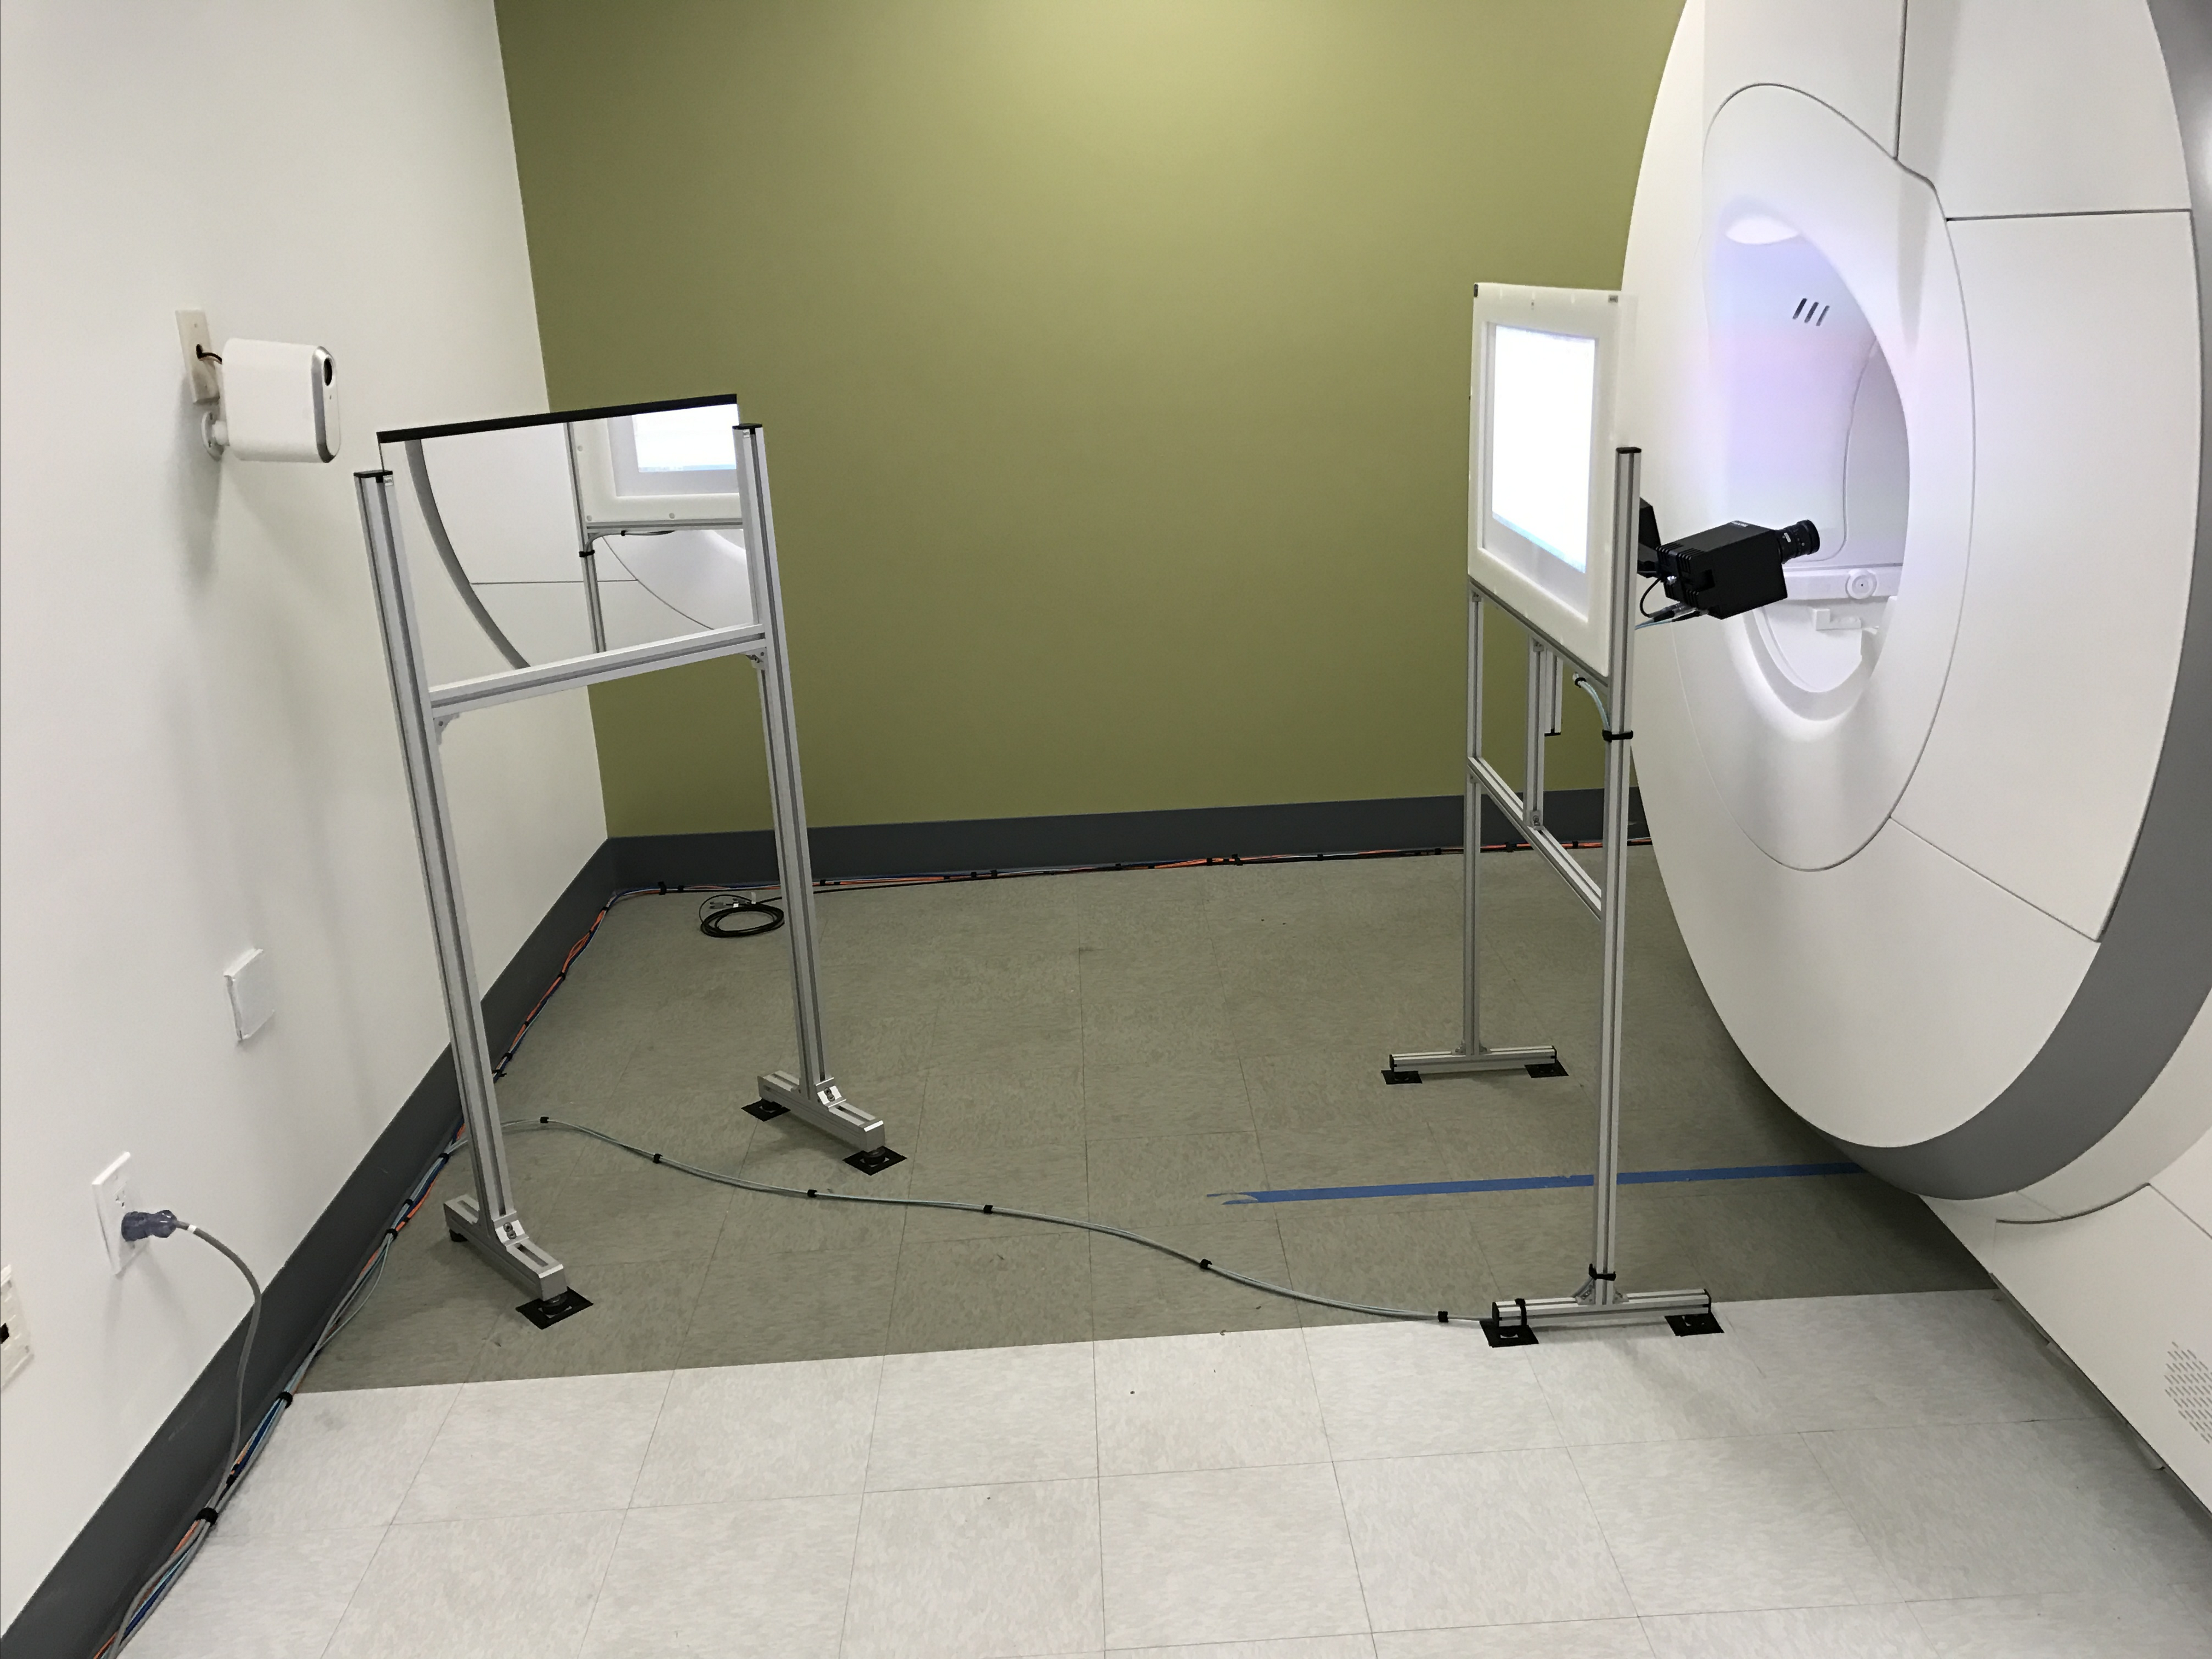
Below is an example of an in-room installation of a PROPixx /MRI inside a SHIELDPixx shielded enclosure. Note that the SHIELDPixx is positioned in the corner behind the 100 Gauss line. A 45-degree mirror is used to reflect the light onto the screen at the head of the bore.
|
|
|---|
MEG/OPM facility
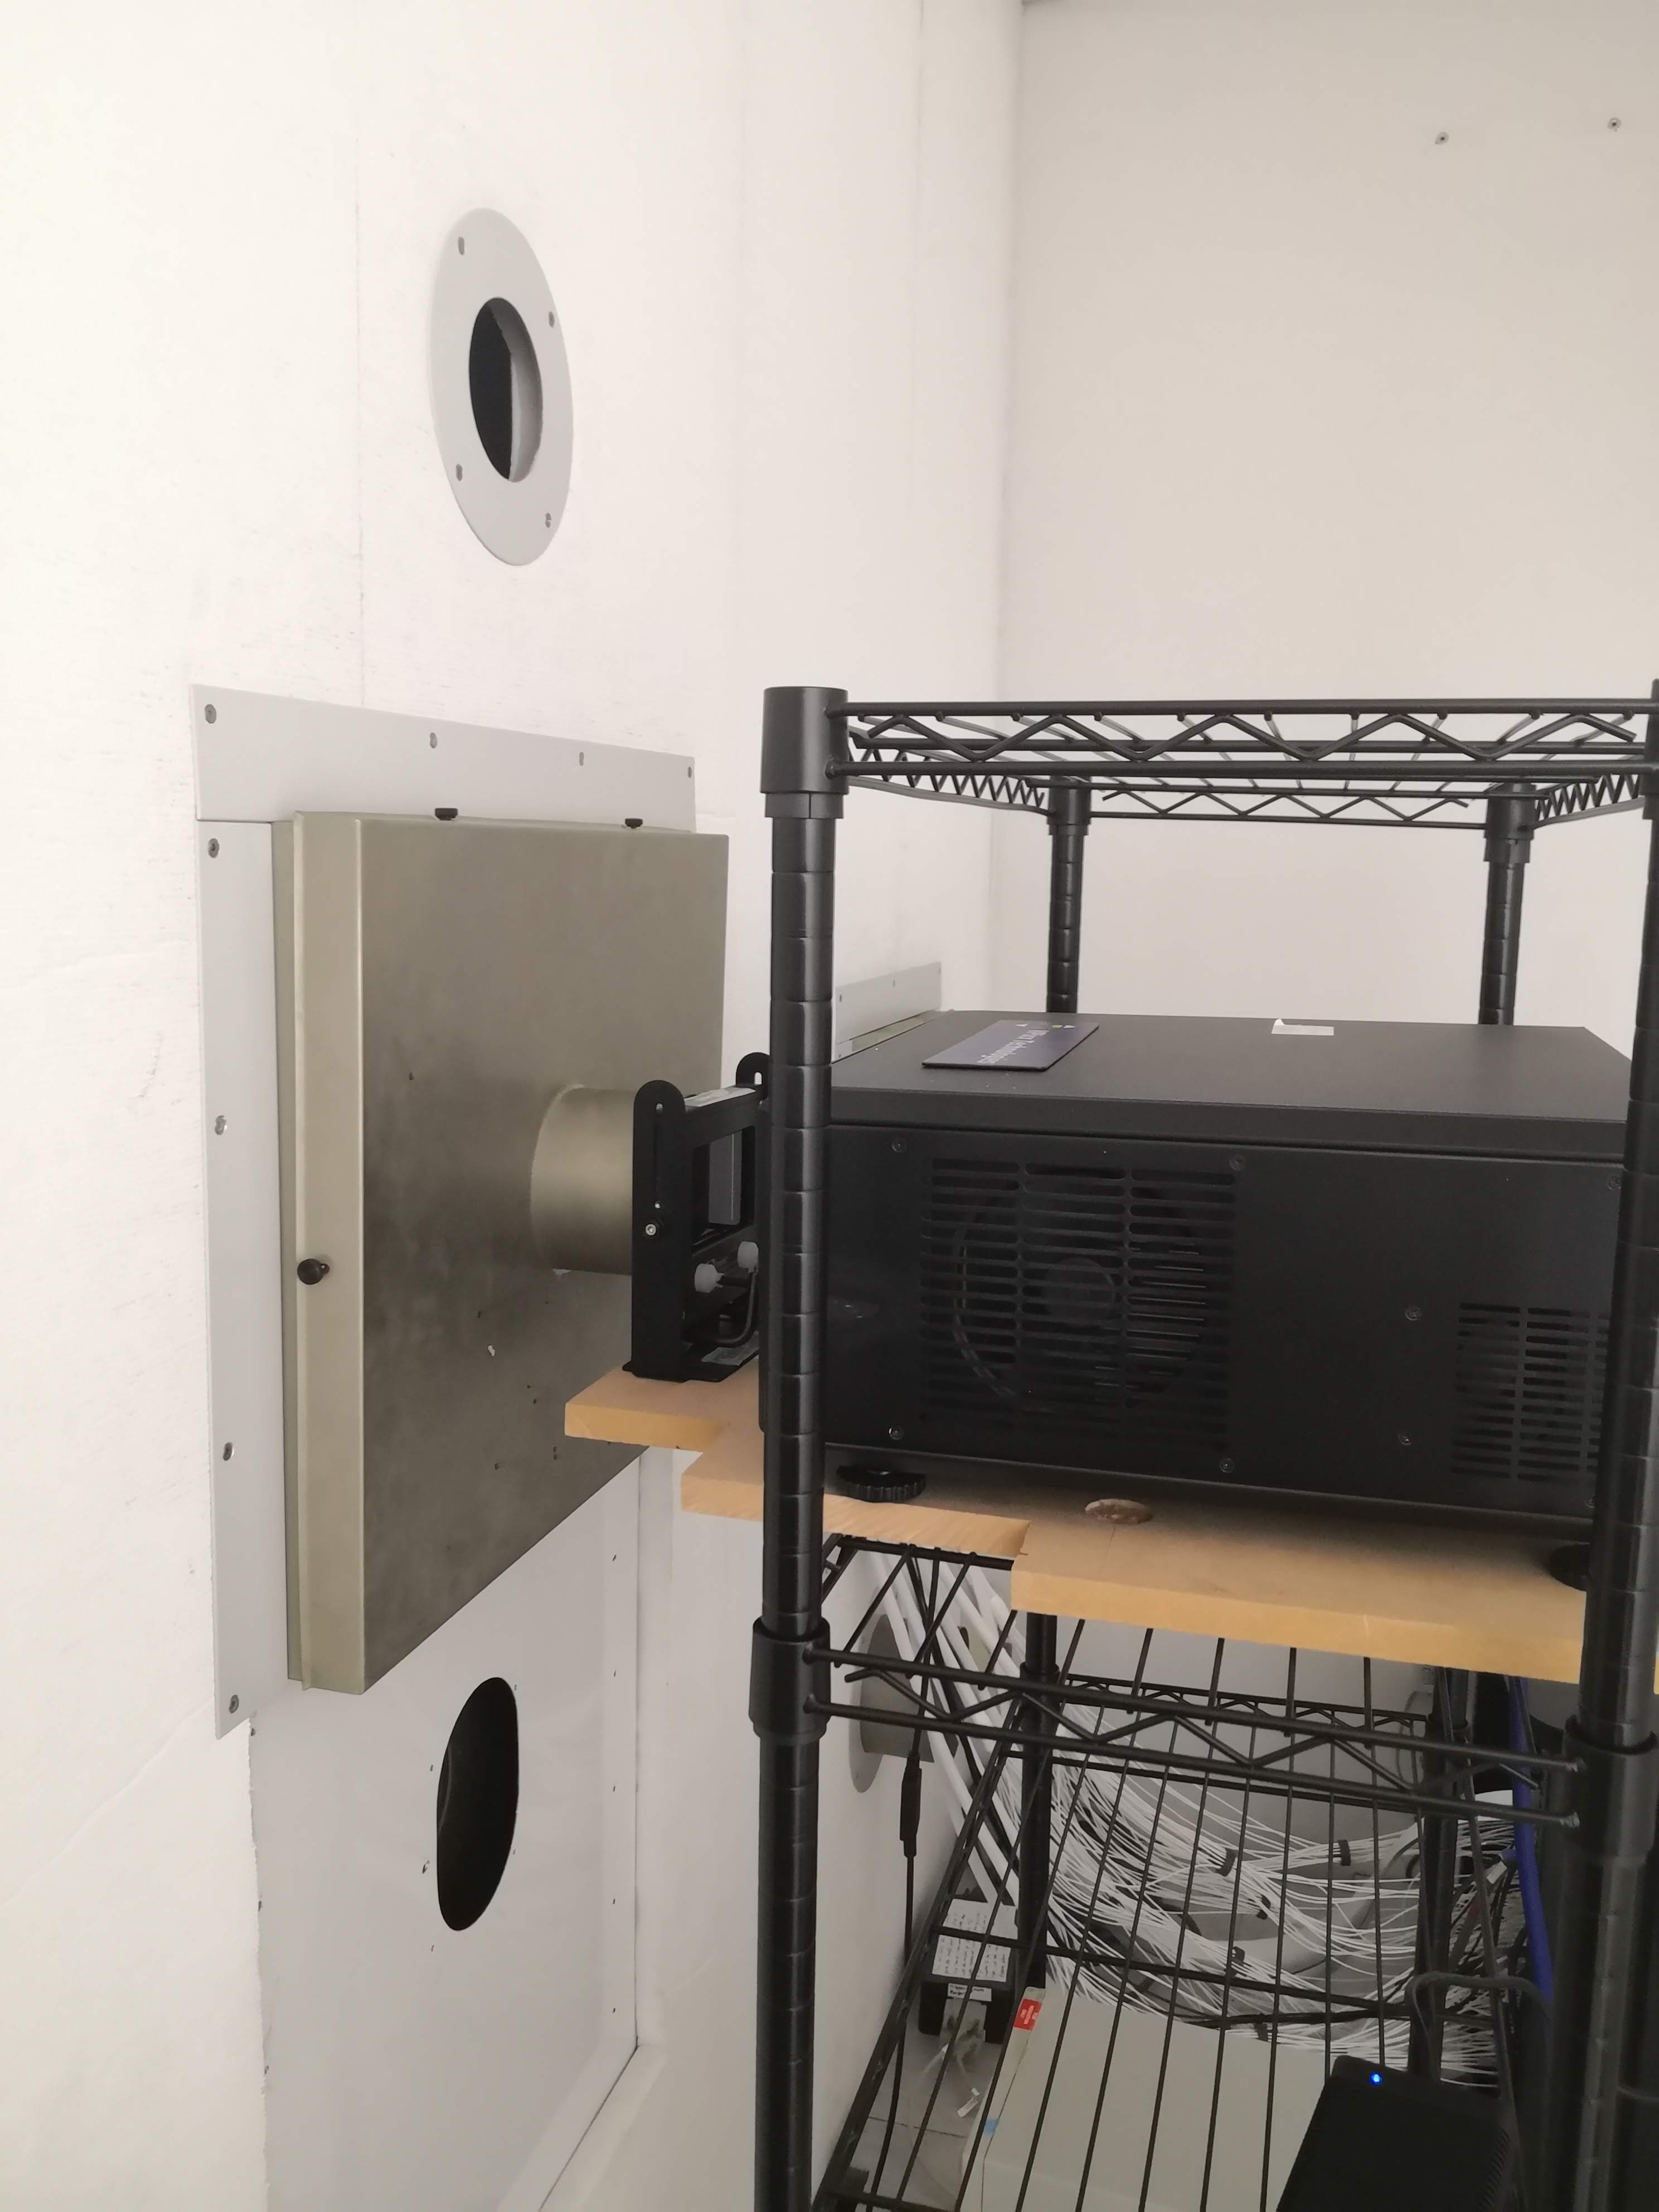
Below is an example of a typical OPM facility. The PROPixx is installed on a shelving unit in front of the waveguide, with the lens pointing into the waveguide leading to the magnetically shielded room. A 3D polaizer is located in front of the lens. The projection screen is placed in front of the participant inside the room. Photos credited to Dr. Alex Wade.
|
|
|---|
Product assembly (Behavioural lab, MRI facility with waveguide, MEG/OPM facility)
Refer to your Lens Selection Report, included with your purchase, for recommended optimal projection distances and the optimal positioning of your projector, screen, and mirror. This information would have been discussed as part of the consultation process before purchase.
Except for the console monitor, all cabling shown below is mandatory for the operation of the PROPixx projection system.
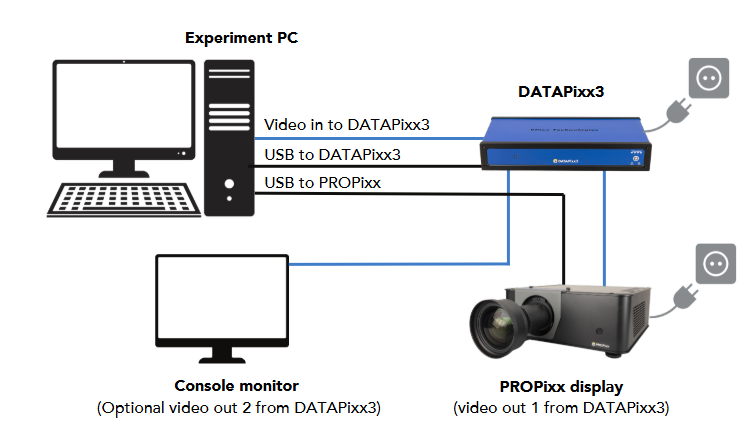
Below are step-by-step instructions for connecting the PROPixx to your system:
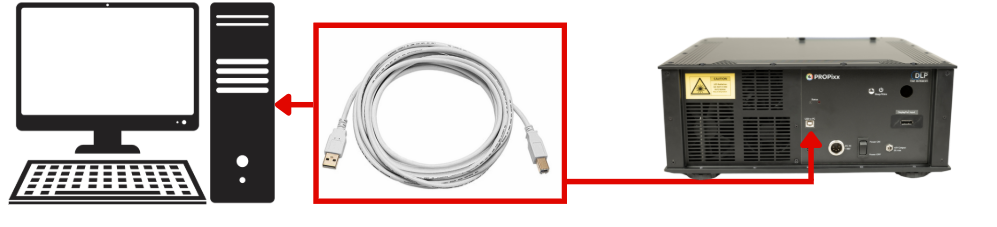
-
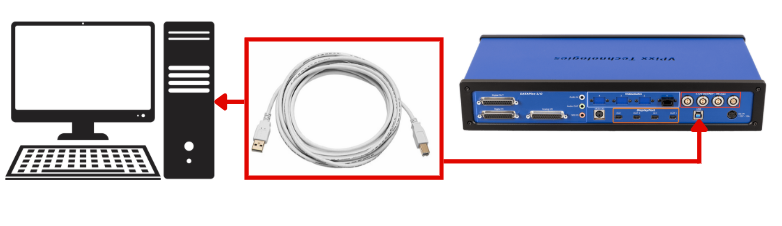
Connect a USB cable from the Experiment PC (USB-A) to the PROPixx (USB-B)
-
Connect a USB cable from the Experiment PC (USB-A) to the DATAPixx3 (USB-B)
-
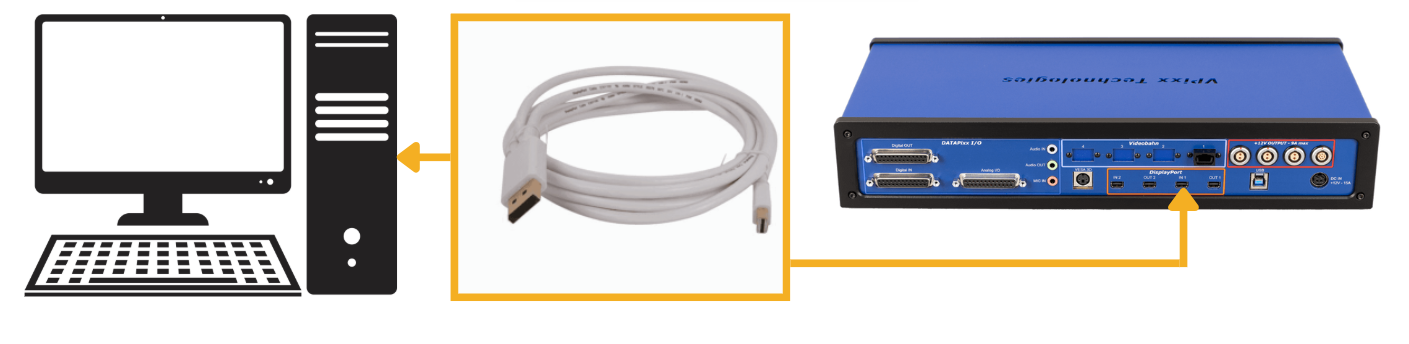
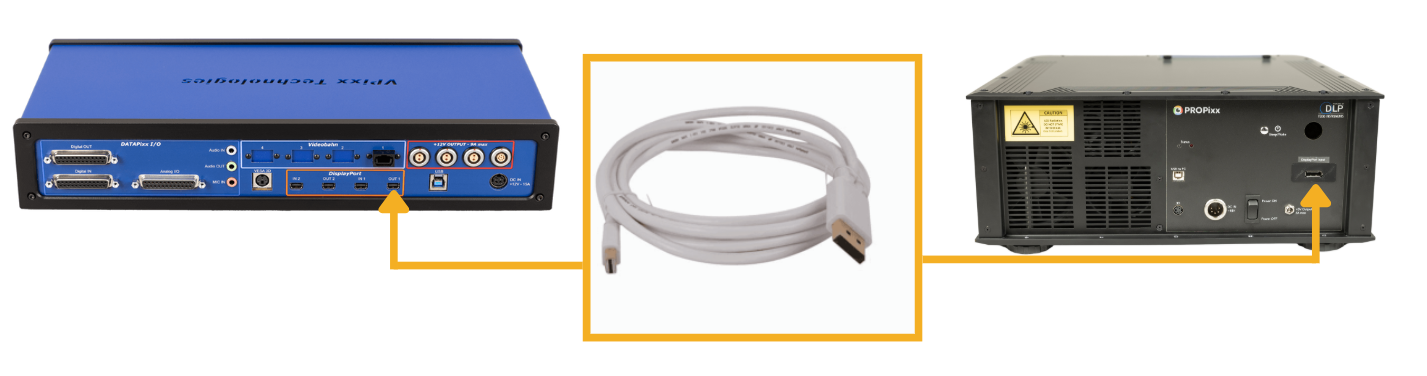
Connect a DisplayPort cable from your Experiment PC (DisplayPort) to the DATAPixx3 IN 1 (DisplayPort mini)
-
Connect a DisplayPort cable from the DATAPixx3 OUT 1 (DisplayPort mini) to the PROPixx video input (DisplayPort)
-
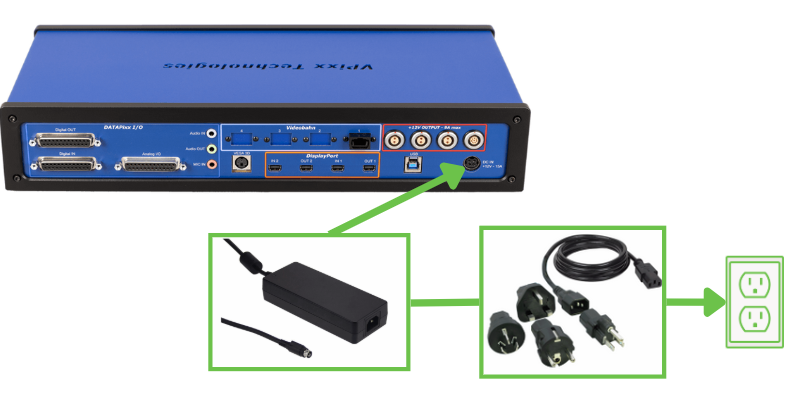
Connect the DATAPixx3 power cable to an appropriate power socket
-
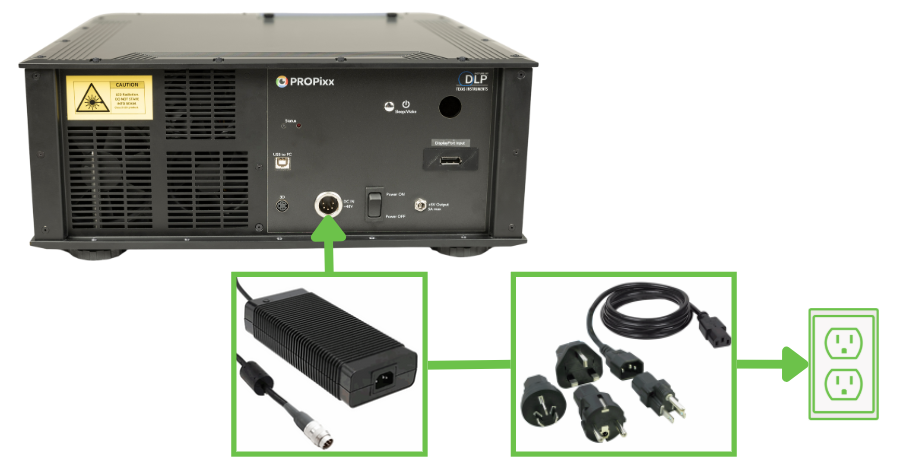
Connect the PROPixx power cable to an appropriate power socket
-
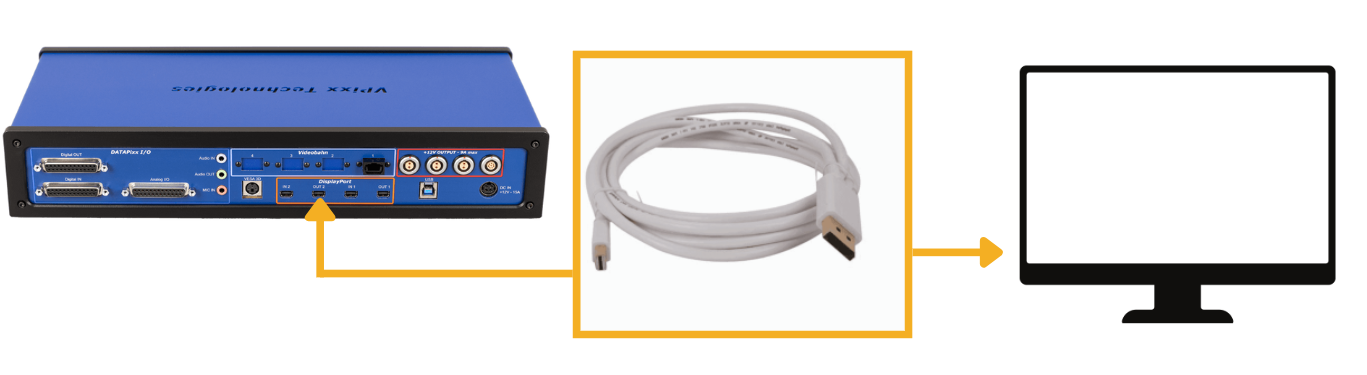
OPTIONAL: Connect your console monitor to a power source, and then connect a DisplayPort cable from the DATAPixx3 OUT 2 (DisplayPort mini) to the monitor.
Product assembly (MRI facility with no waveguide)
Please refer to the user manual for the SHIELDPixx shielding enclosure for installation instructions for the PROPixx /MRI.
Aligning the image
Make sure to check out our VOCAL guidehttps://docs.vpixx.com/vocal/tips-for-positioning-your-projector-and-screen.
Tip: Turn on the projector and use the remote to select Test Pattern A (the white grid). This grid image is designed to assist in installation. Use the projected grid image to help align the projection beam and ensure it is the correct size and in focus. You do not need to have our software tools installed to use this test pattern.
In an ideal situation, the projector should be centred on your projection screen. In practice, this is not always possible. Use the projector surface/mount and adjustable feet to bring the projector as close as possible to the centre. Then, use lens shifting (described below) to refine the image alignment further.
Lens shifting
In many cases, particularly in front-projection layouts, the projector cannot be completely perpendicular to the screen. Commercial projectors often permit some level of tilting, which renders the image trapezoidal rather than rectangular, and use digital keystoning to return the image to a rectangular shape. Keystoning degrades image integrity by warping the original proportions, potentially reducing clarity and spatial accuracy. For this reason keystoning is not supported on the PROPixx.
Instead, the PROPixx lens block can be physically shifted horizontally or vertically to displace the image. The image may be shifted vertically up to 60% of the image’s height, and horizontally up to 15% of the image’s width. Use the interactive demonstration below to see how lens shifting can translate the image based on a given image width:
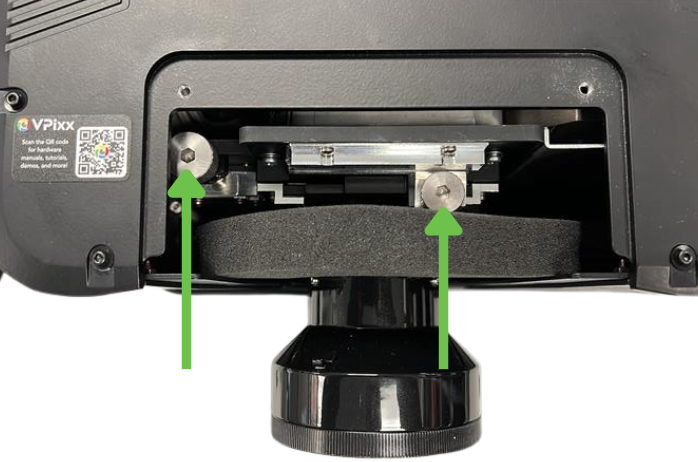
To implement lens shift, unscrew the lens cover plate on the front of the projector and use the provided Allan key to adjust the dials on either side of the lens block. Once you have achieved the desired setting, remember to replace the lens cover plate to protect the interior of the projector from dust and debris.
The fixed super short-throw lens VPX-ACC-6501 (throw ratio 0.73:1) does NOT support lens shifting.
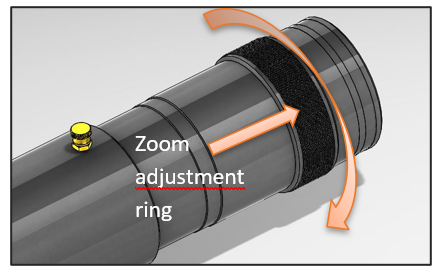
Adjusting the zoom
After centring your PROPixx on the display, locate the zoom adjustment ring on the PROPixx lens and rotate it to adjust the image size as needed.
Adjusting the focus
After setting the zoom to the desired value, you can adjust the focus by first lightly unscrewing the Focus Adjustment screw, then pulling the lens shaft in or out to achieve a clear and sharp image. Once this is done, tighten the adjustment screw.
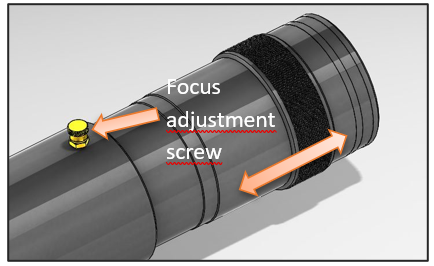
If you cannot achieve a crisp image at your desired size, then you are outside the lens's operating range. This can usually be solved by adjusting the distance between your projector and your screen. Consult your Lens Selection Report for the recommended projection geometry provided by our staff scientists.
Adjust the brightness
In some cases, the projector's default settings are too bright. This can happen particularly with small image sizes. To adjust the brightness, there are two methods:
-
If your projector is equipped with a mechanical iris, you can rotate the iris ring to reduce the brightness.
-
Modify the brightness digitally in your experiment settings.
For more information, please refer to our guide Adjusting PROPixx Brightness.
Product Usage
Connecting to your device
Start by installing the latest version of VPixx Software Tools: Software Download & Information
Once you have installed our software, power on the PROPixx by pressing the rocker switch on the rear of the unit. Power on the DATAPixx3 unit by pressing the power button. Use the silver button on the PROPixx or the remote control to wake the projector.
On your PC, open the LabMaestro application and create a new project. Find your PROPixx in the Project menu, under the Environment tab, and double-click it to open your settings widget.
You can use this widget to do the following:
-
Change display resolution
-
Change brightness
-
Invert your image (e.g., for rear-projection or a ceiling mount)
-
Toggle on/off your existing hotspot correction
-
Conduct a hotspot correction procedure or white point calibration
-
Toggle on special video modes
-
Wake/sleep the projector
-
Run diagnostics
-
Save custom project settings and default settings for your device.
For more details, please refer to https://docs.vpixx.com/labmaestro/using-the-propixx-within-labmaestro.
Warm-up time
Like many displays, the PROPixx requires a brief ‘warm-up’ period to reach a stable operating temperature. This is critical to ensure optimal display uniformity and consistency. We recommend a warm-up period of at least 20 minutes before conducting any research or taking any measurements.
Mirror and screen quality
To make the most of your PROPixx projector, VPixx strongly advises the use of the following:
-
A high-quality, flexible projection screen, optimized for either 2D or 3D applications
-
If mirrors are needed, use front-surface mirrors, which have the reflective coating on the outermost layer rather than behind the glass
These components are critical for maintaining the high quality of the projected image.
As a courtesy service, VPixx provides screens and mirrors optimized for our systems. You can see our list of screens here: https://vpixx.com/products/projection-screens-mri-meg-safe/. For users wishing to source their components locally, we are happy to advise on materials and dimensions.
Console display
The console display is an optional monitor connected to Video Out 2 on the DATAPixx3 control unit (see System Requirements for recommended screens). This display will mirror the contents of the PROPixx display without placing any additional load on your graphics processor.
Researchers typically use the console display to monitor the experiment's progress from their control station. Some special video modes, like M16, allow users to display metadata exclusively on the console (e.g., the real-time location of a participant’s gaze). See this tutorial for an example: Implementing a Real-Time Gaze Follower on the Console.
Test patterns
Test patterns are simple demonstrations of VPixx products. They are preloaded onto VPixx hardware and do not rely on your graphics card or experiment code. They are used to quickly visualize product features and validate system performance, independent of your PC.
Some VPixx devices have test patterns that can be accessed by remote control. For access to all device test patterns, open the LabMaestro application, right-click on the device in the Environment section of the Project pane, and select Test Patterns from the menu. This will open the Test Pattern widget.
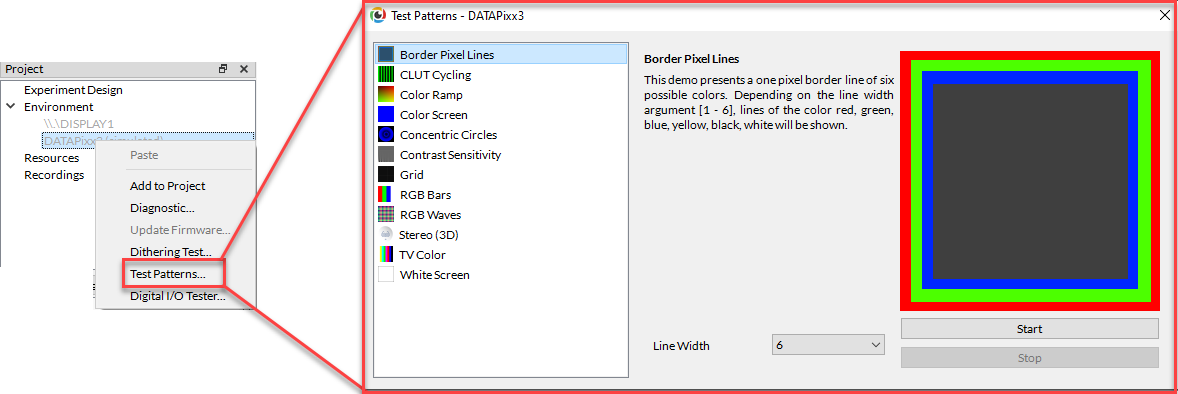
Only test patterns suitable for your selected device will appear in the widget. Each test pattern includes an explanation of the pattern and an example of expected behaviour. Some test patterns include options to adjust the pattern parameters. While a test pattern is enabled, your device will be unresponsive to typical user behaviour (e.g., mouse clicks). Stop the test pattern to return to regular operation.
LabMaestro 1.11 is currently supported under Windows and Linux. MacOS support will be implemented soon. To access test patterns in macOS, open the vputil application and type ‘tp’ to see options.
Test patterns for the PROPixx projector are found in the test pattern widget for the associated control unit (PROPixx Controller or DATAPixx3).
Product Specifications
For details regarding the projector’s technical specifications, including pixel pitch, power consumption and more, consult pages 3-4 of the PROPixx datasheet [PDF]. The following section provides additional details relevant to vision scientists.
Digital light projection (DLP) technology
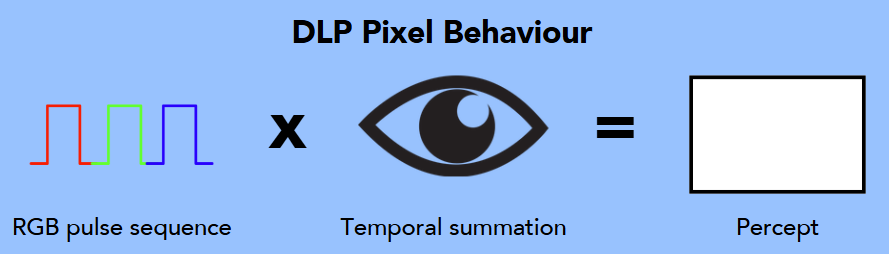
DLP (Digital Light Processing) projection technology uses a digital micromirror device (DMD), which consists of thousands of tiny mirrors that tilt to reflect light either toward or away from the projection lens. Each mirror represents a single pixel and can switch rapidly between ON and OFF states, where light is reflected toward or away from the projection lens. The PROPixx cycles through illumination of the red, green and blue LED light sources, in sync with the DMD, to generate a subframe RGB light pulse sequence that the eye temporally sums into a single perception of colour and brightness for that pixel. This technology allows for precise colour control, high refresh rates, and reduced flicker while avoiding the display artefacts associated with traditional colour wheel projectors.
The temporal properties of DLP projectors make them well-suited to vision science. Each ‘pixel’ operates simultaneously, which means the entire display illuminates at once (as opposed to the scanning raster pattern of a CRT, or the row-by-row updating of an LCD). For more details on the temporal properties of the PROPixx, including photodiode recordings of several high-speed refresh rate modes and sequencers, see: Temporal Characteristics of the PROPixx DLP Projector.
Native resolution and refresh rate
The PROPixx projector can achieve refresh rates and resolutions between 60 and 1440 Hz. The table below summarizes these options.
Real-time resolutions are driven directly by your graphics processor. For instructions on setting these resolutions on the PROPixx, see: Real time refresh rates.
Sequencers use custom video protocols designed by VPixx. Use the hyperlinks in the table to learn more about each mode.
|
Refresh rate |
Type |
Supported Resolution(s) |
Frame duration |
|---|---|---|---|
|
60 Hz |
Real-time |
1920 x 1080
|
16.66 ms |
|
120 Hz |
Real-time |
1920 x 1080
|
8.33 ms |
|
180 Hz |
Real-time |
1280 x 1024 |
5.56 ms |
|
240 Hz |
Real-time |
1280 x 720
|
4.17 ms |
|
360 Hz |
Real-time |
640 x 1080 |
2.78 ms |
|
480 Hz |
Real-time |
960 x 540 |
2.08 ms |
|
480 Hz |
Sequencer - QUAD 4x |
960 x 540 |
2.08 ms |
|
720 Hz |
Sequencer - Grey720 |
1280 x 720 (greyscale) |
1.39 ms |
|
1440 Hz |
Sequencer - QUAD 12x |
960 x 540 (greyscale) |
0.69 ms |
Supported bit depths
Bit depth refers to the number of bits used per color channel per pixel. It defines the range of colors and tonal precision, with higher bit depths enabling smoother gradients and more accurate color representation. For a detailed explanation of bit depth, see Introduction to Bit Depth and Colour Lookup Tables (CLUTs).
By default, the PROPixx operates with a bit depth of 8 bits per colour. However, we offer several special video modes that support 12 bits per colour on the PROPixx. These are summarized in the table below.
|
Name |
Description |
Links |
|---|---|---|
|
L48 |
User defines a 256 x 3, 16 bits per colour* CLUT for the display |
L48: High Bit Depth Colour and Full Resolution, Limited Colour Space |
|
C48 |
Adjacent 8 bits per colour pixels are concatenated into a single 16 bits per colour* value at half the horizontal display resolution. |
|
|
M16 |
Reassigns the 8-bit red and green colour channels of a given pixel as a single 16-bit* greyscale output. The blue channel may optionally invoke a 16 bits per colour* CLUT as an overlay. |
*16 bits per colour refers to the value in software. This is reduced to 12 bits per colour output on the PROPixx
Display gamma
The gamma characterizes the relationship between the pixel values sent to the display and the output luminance, according to the function L = Vγ , where L is the output luminance, V is the input value of the pixel (typically expressed as a value from 0-1 or 0-255), and γ is the gamma exponent.
DLP projection technology produces an inherently linear gamma. That is, stepwise increases in pixel values translate to stepwise increases in luminance output. Therefore, you do not need to gamma-correct your PROPixx display to linearize it.
Some viewers may observe that brighter colours appear ‘paler’ on the PROPixx, compared to a (nonlinearized) commercial display.
White point calibration
The D65 white point is a standard illuminant defined by the International Commission on Illumination (CIE) that represents average daylight with a correlated color temperature of approximately 6500K. It is a critical reference point in vision science, ensuring consistency in color perception experiments and accurate reproduction of natural lighting conditions. It also permits conversion between different colour spaces (e.g., from CIE 1931 to L*a*b*). The PROPixx is carefully calibrated to a D65 white point across multiple brightness levels as part of factory calibration, ensuring accurate and consistent stimulus presentation.
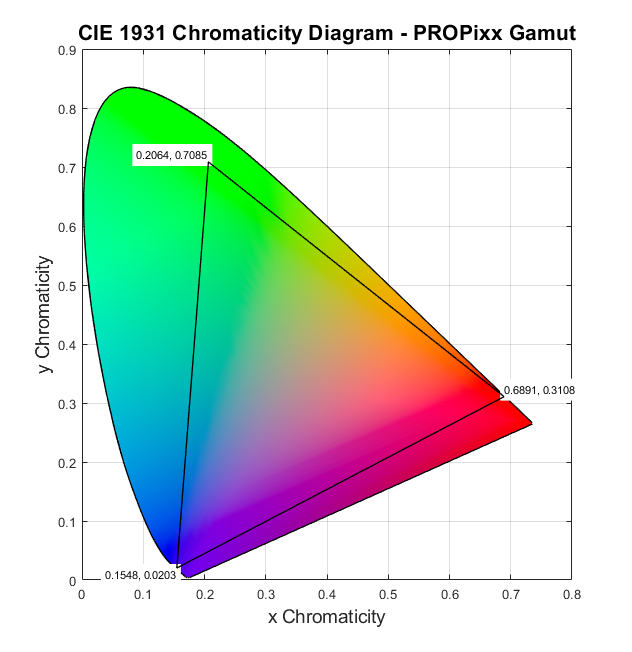
Colour gamut
The color gamut refers to the range of colors the PROPixx can reproduce. The gamut is determined by the spectral properties of the red, green, and blue LEDs, which are given below. Gamut is typically expressed in CIE colour space, which is a visual representation of the range of colours visible to the average human observer.
It is crucial to interpret colour gamut in the context of your experiment. For instance, tinted projection screens, circular polarizers, and 3D glasses can all shift a display's gamut. For colour research in particular, we recommend the use of a colorimeter or spectrophotometer to validate colour output before data collection.
Colour gamut is also dependent on operating temperature. For high-fidelity visual output, the PROPixx should be at a stable operating temperature. See Warm up time above.
Luminance
The luminance of the PROPixx output, measured at the lens, is between 400-600 lumens. In practice, final display luminance is affected by:
-
Use of 3D polarizer
-
Use of hotspot correction (see below)
-
Projection screen materials
-
Projected image size
Every installation will be slightly different. If you wish to know the exact luminance of your display, we recommend taking a direct measurement using a photometer or spectrophotometer, once your system is fully installed.
In the case of very small displays (e.g., in MRI), the default luminance may be too bright for comfort; to adjust this setting, see our guideAdjusting PROPixx Brightness.
3D applications
The PROPixx is compatible with the 3D Polarizer, which is sold separately. The 3D Polarizer is a circular polarizing filter placed in front of the lens. It is used in conjunction with 3D passive filter glasses to present frame-alternating 3D stimuli in colour or greyscale, up to 240 Hz/eye. This 3D system is fully compatible with magnetically shielded environments and eye tracking equipment. For 3D applications, we strongly recommend a 3D-optimized silver projection screen.
See 3D Projection with the PROPixx and 3D Polarizerfor more details.
The 3D polarizer positioned in front of the projector lens
Product dimensions
The PROPixx’s physical dimensions, including mounting holes on the unit's base, are given below. This example uses the VPX-ACC-6504 lens. Note that other lenses differ in diameter and length; if you have concerns regarding your lens measurements, please contact our team at scientist@vpixx.com.
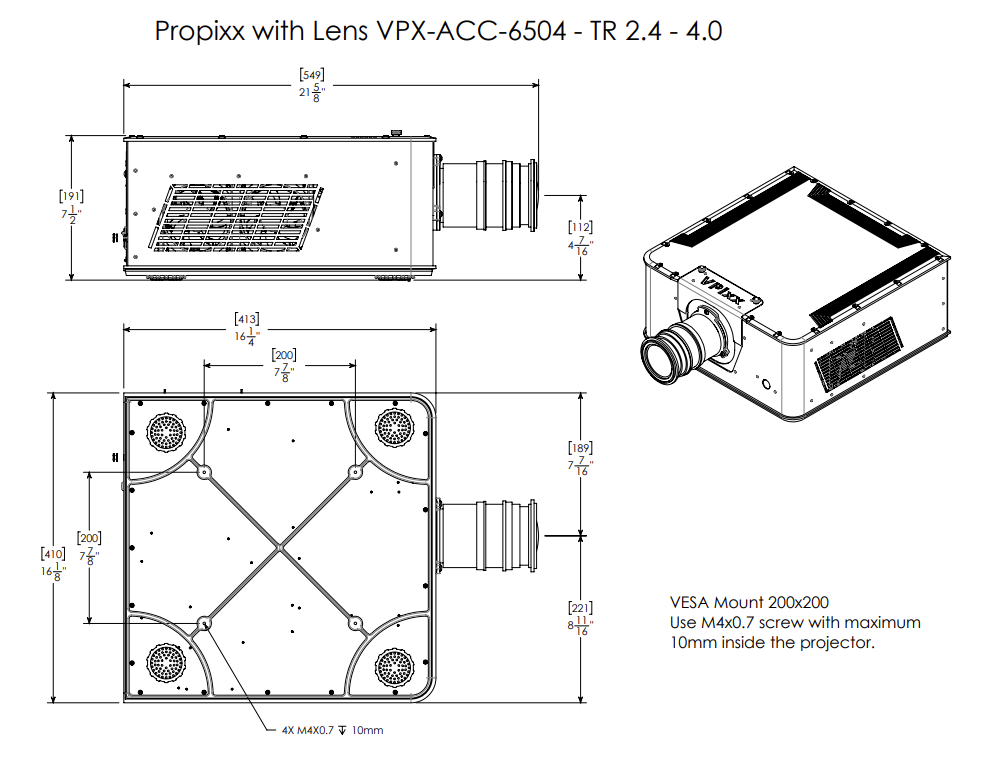
Several generations of PROPixx exist, and older units may have different dimensions. If you need assistance with mechanical drawings of older equipment, contact support@vpixx.com with your product serial number, and we will be happy to assist you.
MRI, MEG and OPM compatibility statement
Please refer to the section on MRI safety indicators below for details regarding the MRI labels on your equipment.
The standard PROPixx projector (VPX-PRO-5050) is compatible with MRI, MEG, and OPM environments when used with a waveguide. In these applications, the projector is positioned outside the magnetically shielded room (MSR), and the image is beamed through the waveguide to the display area.
A specialized version of the PROPixx, VPX-PRO-5050DM (PROPixx MRI), is designed for in-room MRI applications. This model can be safely installed within an MRI suite under the following conditions:
-
The PROPixx MRI must be used with the SHIELDPixx shielded enclosure and the associated fiber optic bridge to ensure electromagnetic isolation.
-
The projector body must remain behind the 10 mT (100 gauss) line during operation to prevent magnetic field interactions.
For additional safety guidelines and regulatory information, refer to the Warnings section.
Cleaning and Maintenance
Do not use cleaners that contain any petroleum-based materials such as benzene, thinner, or any other volatile substance to clean any part of this product.
The PROPixx's metal and plastic chassis, aluminum stand, and all cabling can be cleaned with regular cleaning or disinfecting products. Ports and plugs can be cleaned with compressed air.
To clean the PROPixx lens, gently wipe it with a damp cloth and a gentle soap, such as hand soap. Excess soap can be removed with a second, clean cloth. Alternatively, you can use a commercial LCD screen cleaner like this brand. Do not apply pressure to the lens or remove it from its housing during cleaning.
If you are using a video signal booster, we advise marking your dial setting before cleaning it in case it is accidentally adjusted.
Troubleshooting your Device
For Troubleshooting support, see Diagnosing Display Issues on the PROPixx Projector.
Related Links
-
VPixx Online Classroom and Library (VOCAL) articles:
-
Tips for Positioning your Projector and Screen -
Adjusting PROPixx Brightness -
PROPixx Projection Geometry and System Configuration -
PROPixx High Speed Projection Modes -
3D Projection with the PROPixx and 3D Polarizer -
Temporal Characteristics of the PROPixx DLP Projector -
Rapid Invisible Frequency Tagging (RIFT) using the PROPixx 1440 Hz mode
-
Compliance, Safety and Warranty Information
Click on the sections below to expand the relevant information.
Compliance Information
For the United States of America
This device complies with part 15 subpart B of FCC rules. Its operation is subject to the following two conditions: (1) this device may not cause harmful interference, and (2) this device must accept any interference received, including interference that may cause undesired operation. This equipment has been tested and found to comply with the limits for a Class A digital device, pursuant to part 15 subpart B of the FCC rules.
For Canada
This Class A digital apparatus complies with Canadian ICES-003.
CISPR warning: This is a Class A product. In domestic environments this product may cause radio interference in which case the user may be required to take adequate measures.
For European Countries
DECLARATION OF CONFORMITY
|
|
Manufacturer’s Name:
Manufacturer’s Address:
|
Product Name: PROPixx
Part Numbers: VPX-PRO-5050, VPX-PRO-5050DM
Product Options : All
Application of Council Directive:
2014/30/EEC -Electromagnetic Compatibility directive
2015/863/EU -Restriction of Hazardous Substances Directive
2012/19/EU -Waste Electrical and Electronic Equipment directive
|
|
SUPPLEMENTARY INFORMATION
To remain CE compliant, only CE compliant parts should be used with this product. Maintaining CE compliance also requires proper cable and cabling techniques. VPixx Technologies will not retest systems or components that have been modified by customers. Signature: 
|
The following information is only for EU member states:

|
The mark shown to the left is in compliance with the Waste Electrical and Electronic Equipment directive 2012/19/EU (WEEE). The mark indicates the requirement NOT to dispose of the equipment as unsorted municipal waste. For more information call VPixx Technologies Inc. or email us at support@vpixx.com |
Declaration of RoHS Compliance
|

|
This product has been designed and manufactured in compliance with Directive 2015/863/EU of the European Parliament and the Council on the restriction of the use of certain hazardous substances in electrical and electronic equipment (RoHS Directive). |
Safety and Warnings
WARNINGS
Safety precautions
This device is intended solely for research purposes and is not suitable for medical applications or diagnostic use.
FLASHING LIGHT WARNING. This device uses high-speed flashing lights that may trigger seizures, strokes, or other symptoms in some individuals.
-
Seizures: Consult a physician before use if you or your family have a history of epilepsy. Stop use immediately if you experience altered vision, dizziness, nausea, or convulsions.
-
Stroke: Consult a physician if you or your family have a history of stroke.
-
General Precautions: Do not use if you feel unwell. Take regular breaks during prolonged use. Parents are advised to closely monitor children using the device, as they may be more susceptible to the effects of flashing lights.
Risk of fire and injury
-
Never cover the lens while the projector is switched on. This could pose a fire hazard.
-
Do not cover or obstruct the ventilation outlets or inlets.
Product care
-
Use only the power cable included with the PROPixx.
-
Ensure that the power outlet includes a Ground connection, as this equipment MUST be grounded.
-
Handle the power cable carefully and avoid sharp bends. Do not use a damaged power cable.
-
Do not open the cabinet. There are no user serviceable parts inside.
-
Do not expose the projector to rain or moisture, and do not place any liquids on top of the projector.
-
Unplug before cleaning. When cleaning, use a damp (not wet) cloth.
-
Never use strong detergents or solvents such as alcohol or thinners to clean the projector and lens.
MRI safety indicators
The following table shows MR safety warning indicators and their names and meanings. Please pay special attention to the symbols on your equipment, and obey all guidelines to protect staff and equipment from injury.
|
Symbol |
Name |
Description |

|
MR safe |
Components marked with the green MR safe indicator present no danger to staff and equipment operating in the MR room. |

|
Conditionally MR safe |
The yellow Conditionally MR safe indicator denotes components that are only MR safe in a limited fashion. Product-specific safety requirements apply. For additional details, consult the product manual's safety section. |

|
MR unsafe |
The red MR unsafe indicator denotes components prohibited from entering the MR room. |