This project template demonstrates how Functions and Expressions can be used to customize the appearance and behavior of stimuli in various practical contexts.
This template project was developed for the features available in LabMaestro 1.7.1 and does not require VPixx hardware devices.
Download the template project here: MathematicalExpressionsDemo_V1.lm
Examples are implemented within a single Timelines, consecutive Epochs. They will be displayed until Wait for Inputs detects any keyboard key press.
To view the complete timeline, click the Play Timeline button located on the Timeline Window’s top-right corner.
Warning: In LabMaestro Public Beta 1 through LabMaestro 1.7, when first opening a *.lm file, the preview may not be immediately refreshed. This may occur when property fields contain Expressions, or references to custom variables defined within the property panel of Timelines. To refresh the preview, without executing the entire experiment, click on Play Timeline. Note that variables defined by Methods may have a preview option available from their own method tab.
Note that values that depend on Time, as may be used in customized time-based animations, will only reflect elapsed time when clicking Launch Experiment or Play Timeline.
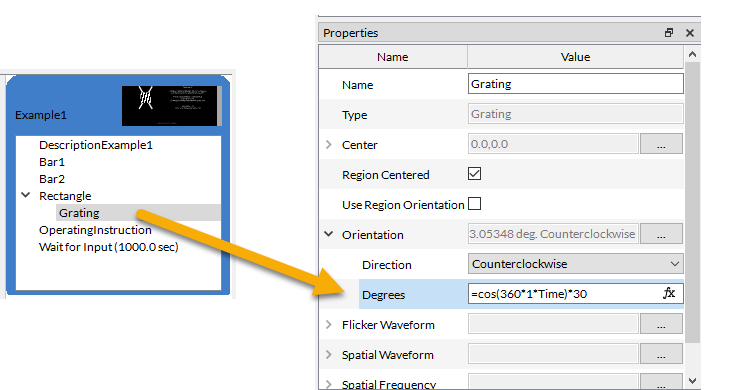
Example 1 - Using a Trigonometric Function to Animate a Stimulus
The first example presents a grating which oscillates with a motion pattern characterized by the equation cos(360fT)*theta.
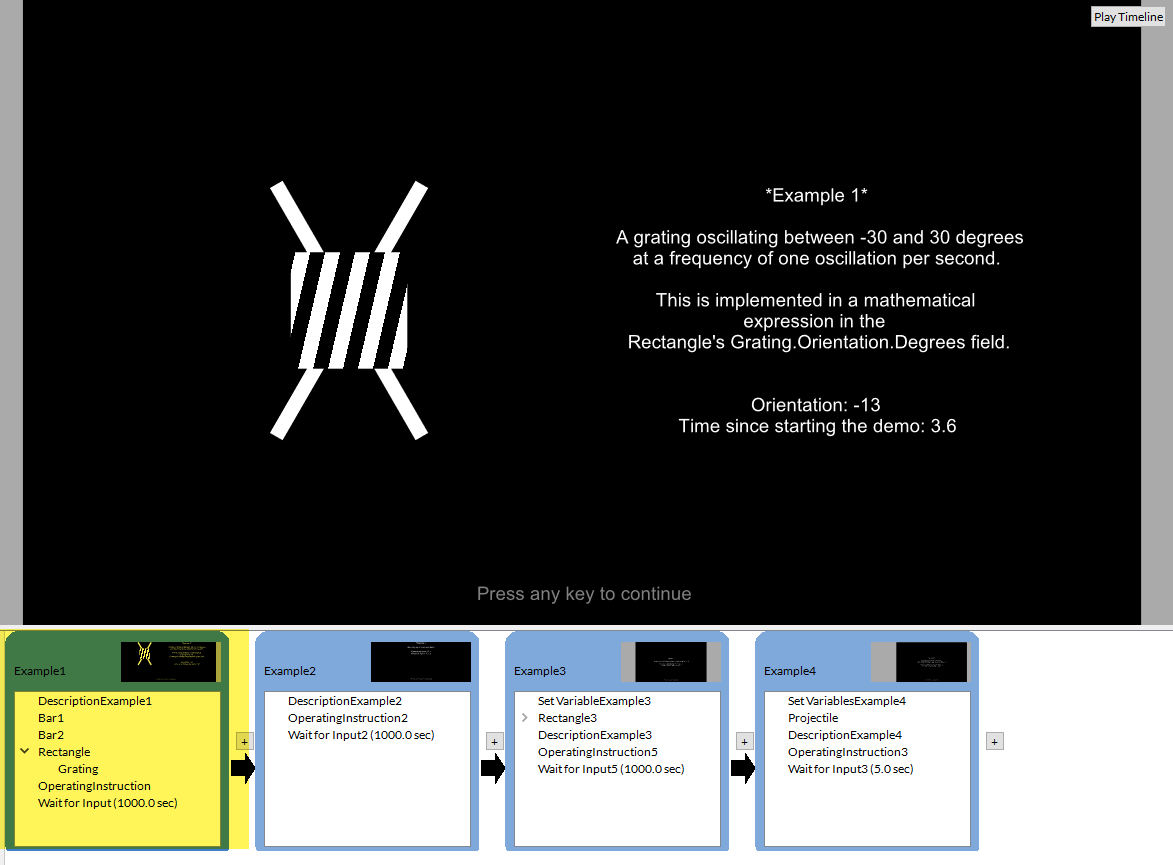
To make the Grating Pattern (but not its parent ) oscillate between -30 and + 30 degrees at a frequency of one oscillation per second, insert the following expression into the grating's Orientation. Degrees field:
=cos(360*1*Time)*30
Example 2 - Displaying Real-Time Values of Expressions on the Screen
When developing stimuli that include expressions, it is often helpful to display the result of expressions on the screen.
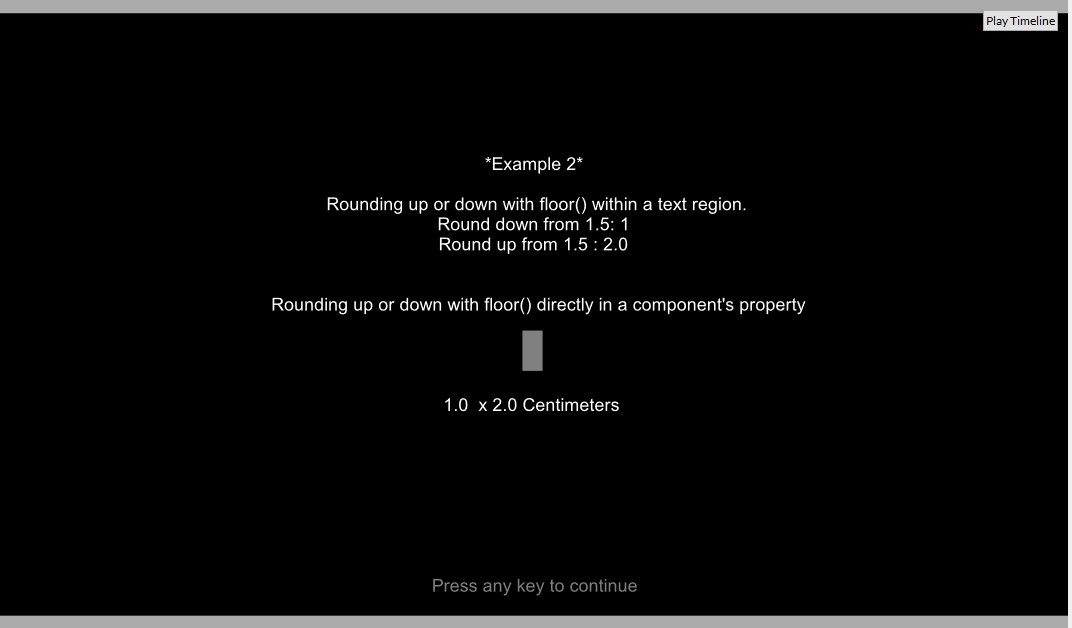
In this example, we show two different ways to display the result of the expressions. The simplest way, Method 1, involves writing the equation directly in a text region. In contrast, in Method 2, expressions are written directly in the component property where they are used, and referenced in the text region:
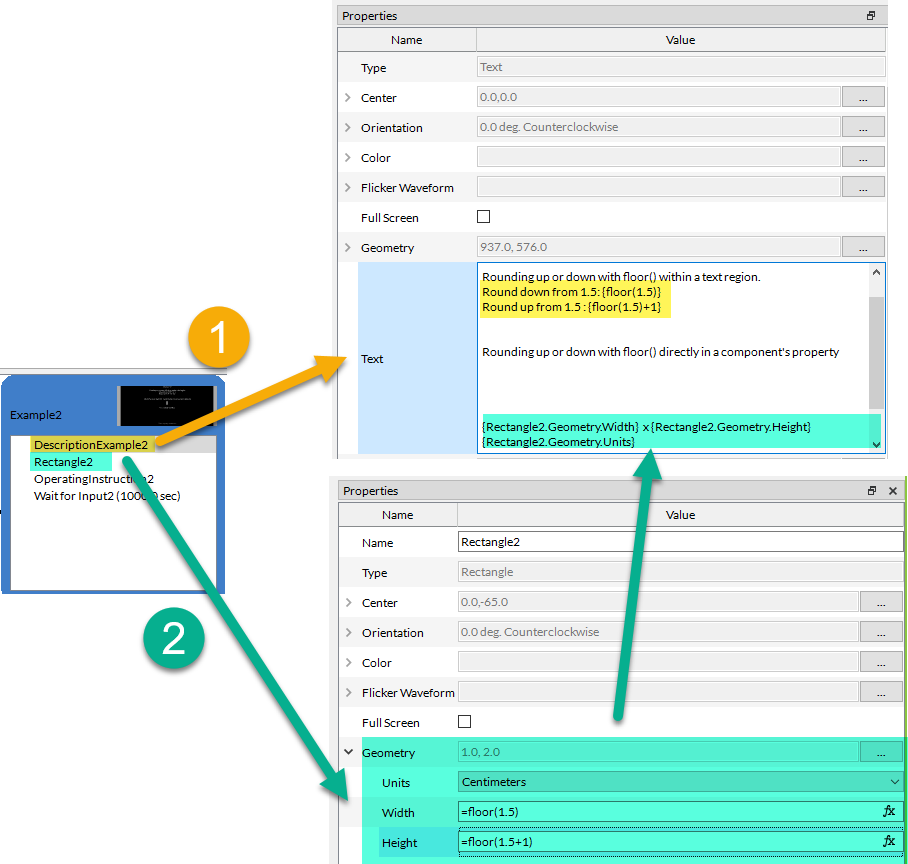
Method 1 - Writing the expression directly within a Text Region.
We use a Text Region, name DescriptionExample2, to directly show the result of an expression on the screen. Click on the text region, and enter the expression you want to evaluate between closed brackets:
{ }
Here, we use the rounding function floor() to illustrate the method, and inserted the following text in the DescriptionExample2.Text field to construct our feedback information:
Rounding up or down with floor() within a text region.
Round down from 1.5: {floor(1.5)}
Round up from 1.5 : {floor(1.5)+1}
Method 2 - Referencing a specific component property.
We first created a simple rectangular stimulus, Rectangle2, and used expressions in two fields:
Rectangle2.Geometry.Width:
=floor(1.5)
Rectangle2.Geometry.Height:
=floor(1.5+1)
We then entered the following text in the DescriptionExample2.Text field to construct our feedback screen:
Rounding up or down with floor() directly in a component's property
{Rectangle2.Geometry.Width} x {Rectangle2.Geometry.Height} {Rectangle2.Geometry.Units}
Example 3 - Creating a custom timer and limiting an expression-driven property to a maximum value
In Example 1, we showed how to use Time in expressions to create a time-based animation. Time reflects the time elapsed since the start of the Timeline. However, often, expressions should reflect the time elapsed since a more recent reference point. Here, we will demonstrate one method for creating a custom timer that reports the time elapsed since the start of a specific epoch.
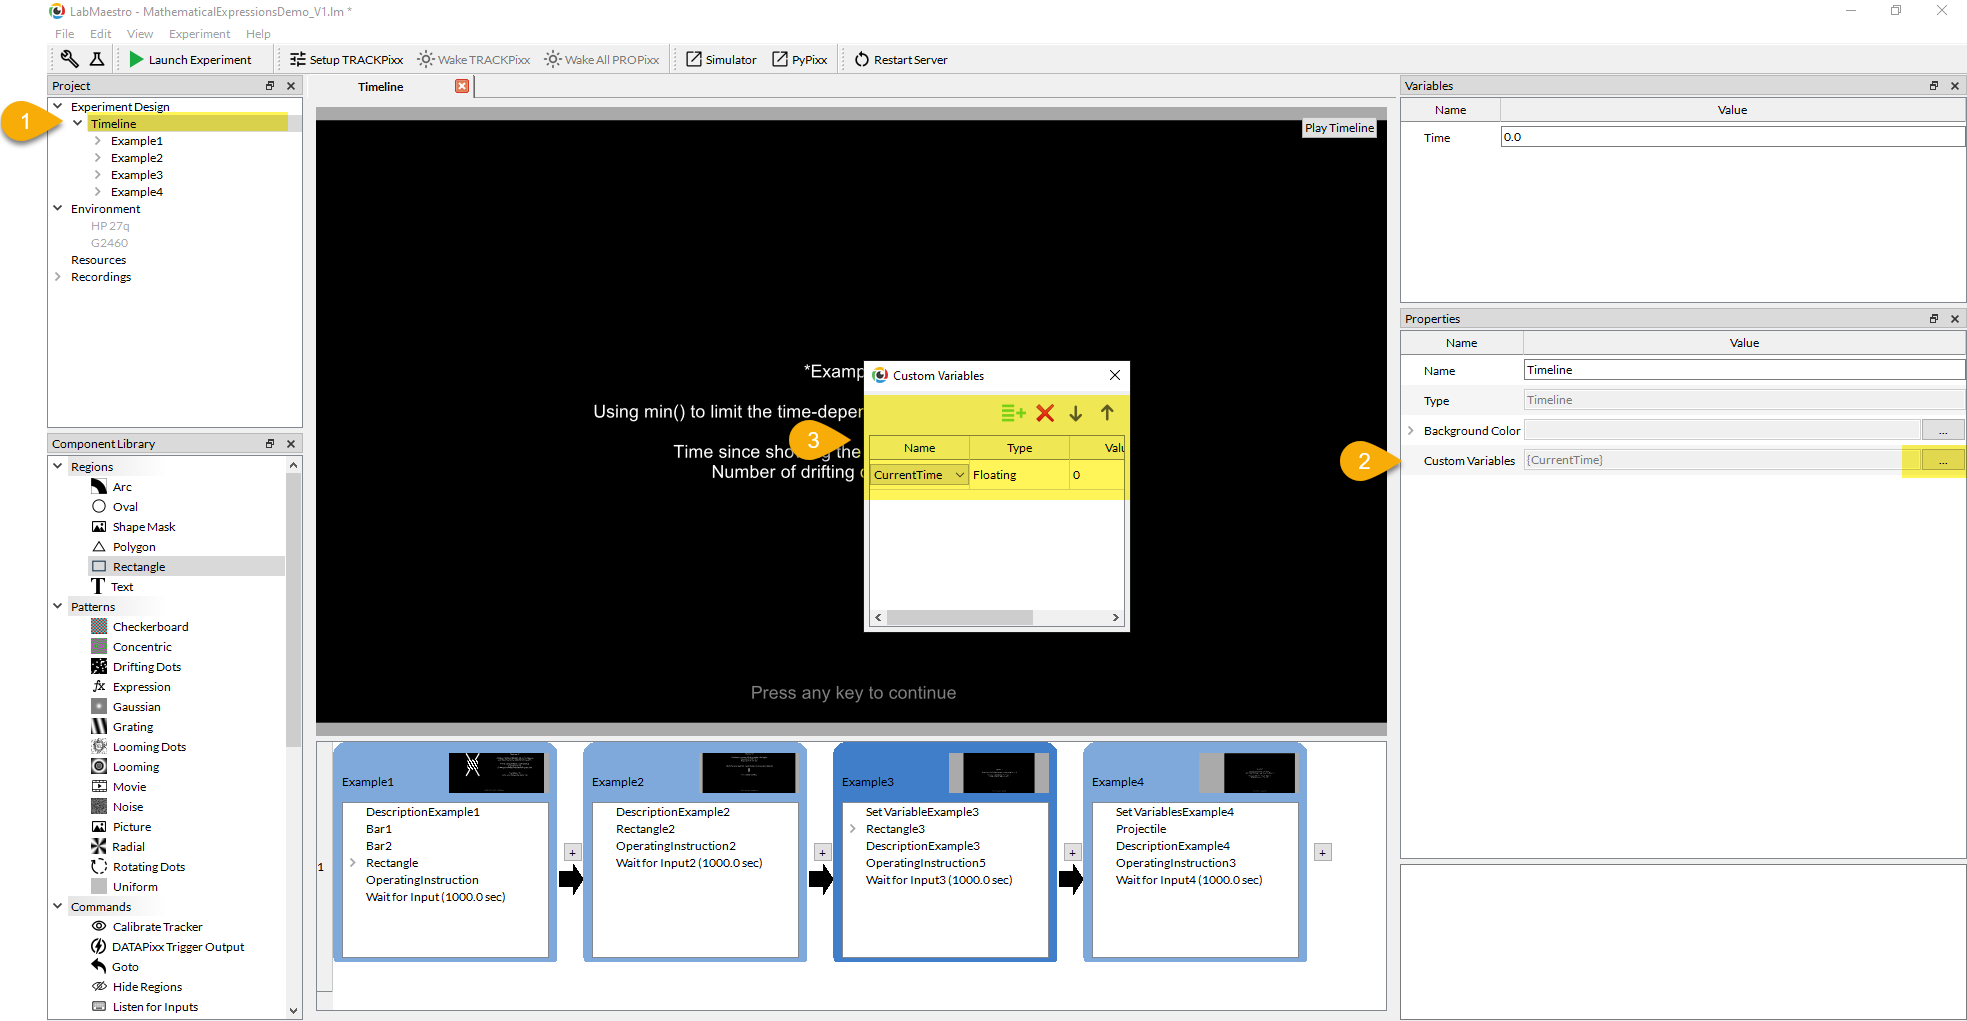
Creating a custom timer with Timeline Custom Variables
First, we need to create a custom variable to store our reference time.
Did you know? Other examples of practical applications for Timeline Custom Variables are also presented here: Controlling Experiment Flow with Enter and Exit Conditions Template Project
-
From the Project Panel, click on the Timeline to display its properties.
-
All timelines can define new custom variables, which will only be used within the local scope of their own timelines. Click on […] to open the CustomVariables dialog box.
-
We created one custom variable, CurrentTime, using the + icon, and defined it as a float. Every time the timeline is executed through the ‘PlayTimeline’ or the ‘Launch Experiment’ buttons, the CurrentTime will be reinitialized to 0.0 upon entering the timeline.
-
Since we want to use CurrentTime to store the time at which we began Example3, we inserted a Set Variables command at the beginning of the Example3 epoch, and renamed it SetVariableExample3.
-
We navigated to the list of Variables,
-
and used the + icon to select CurrentTime from the list of available variables. By using the expression:
=TimeThe SetVariable Command will replace the default CurrentTime value with the Time at which the command was executed.

Limiting an expression-driven property to a maximum value
In this example, we show a simple drifting dot stimulus, whose dot population is a function of time. We used an expression that increases the number of displayed dots at a rate of one dot per second, but never exceeding eight dots. a drifting dot pattern, if you wanted the dot population to match the time elapsed, but never exceed eight dots, you could write the following expression:
=floor(min(Time-CurrentTime,8))
By subtracting CurrentTime from Time, we ensured that the number of dots depends on the elapsed time since the beginning of this example, and not from the start of the entire timeline.

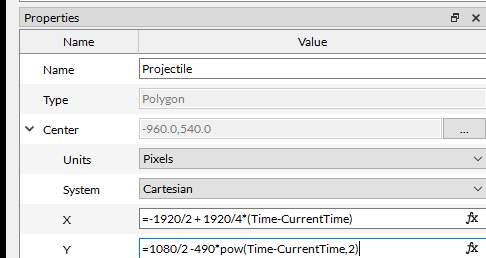
Example 4 - Animating the position of a stimulus with projectile-like motion
You can animate the position of a stimulus using mathematical functions. As a toy example, you could show projectile-like motion on a screen by implementing the following equations on a region’s center coordinates:
First, as in Example 3, we use SetVariablesExample4 to store the CurrentTime, when Example 4 began.
Using this expression in the Center.X coordinate, your projectile would originate from the left-most side of a 1920 pixel-wide screen, and cross to the right side in 4 s, i.e., at a constant speed of 480 pixels per second.
=-1920/2 + 1920/4*(Time-CurrentTime)
Whereas, this expression used in the Center.Y coordinate will make the projectile drop from the bottom of a 1080 pixel high screen, accelerating towards the bottom of the screen at a rate of 490 pixels per second :
= 1080/2 -490*pow(Time-CurrentTime,2)